

Home Assistant: Migrating to the Official Nord Pool Integration
I’ve been a happy user of the Nord Pool custom component for a long time, and it has served me well! However, with Home Assistant recently introducing its own official Nord Pool integration, and a significant market change on the horizon, it’s time to make the switch.
On October 1st, 2025, the Nord Pool market is transitioning to a 15-minute Market Time Unit (MTU). While the future of the custom component is uncertain after this change, the official Home Assistant integration has confirmed it will support the 15-minute MTU right out of the box. There might be a few hiccups during the transition, but having official support is a major advantage.
In this post, I’ll walk you through the exact steps I took to migrate my system from the custom component to the official integration, ensuring my smart home stays ahead of the curve.
Note: If you are here for the AIO Energy Management, you can still use it with Nord Pool Custom integration – you don’t have to migrate to Official Nord Pool integration unless you want to
Key Technical Differences
The biggest change between the two integrations is how they handle data. The official Nord Pool integration is built around services, while the custom component exposed everything as attributes on a sensor. This means that to get price data with the new integration, we need to actively call a service.
Another major difference is that the official integration provides only the raw price data from Nord Pool (e.g., in €/MWh for Finland) without taxes. The custom component, on the other hand, allowed you to include VAT and other additional costs directly in the sensor’s output. We’ll need to replicate this functionality using template sensors.
Step 1: Away With the Old, In With the New
Because the custom and official components share the same name (nordpool), we can’t have both installed simultaneously. This means the migration needs to be done in one go—a “big bang” approach.
Let’s get straight to it.
- Uninstall the Custom Component: Navigate to Settings > Devices & Services in Home Assistant, find your existing Nord Pool integration, and click the three dots to uninstall it.
- Remove from HACS (if applicable): If you installed the custom component via HACS, you must also uninstall it from the HACS interface. This will properly remove the files from your
custom_componentsfolder. If you installed it manually, you’ll need to delete thenordpooldirectory from yourconfig/custom_componentsfolder yourself. - Reboot Home Assistant: A full reboot is essential to ensure the old component is completely unloaded.
Once your Home Assistant has rebooted, it’s time to install the official integration.
- Install the Official Integration: Go to Settings > Devices & Services, click + Add Integration, search for “Nord Pool,” and follow the prompts to configure it with your preferred settings.
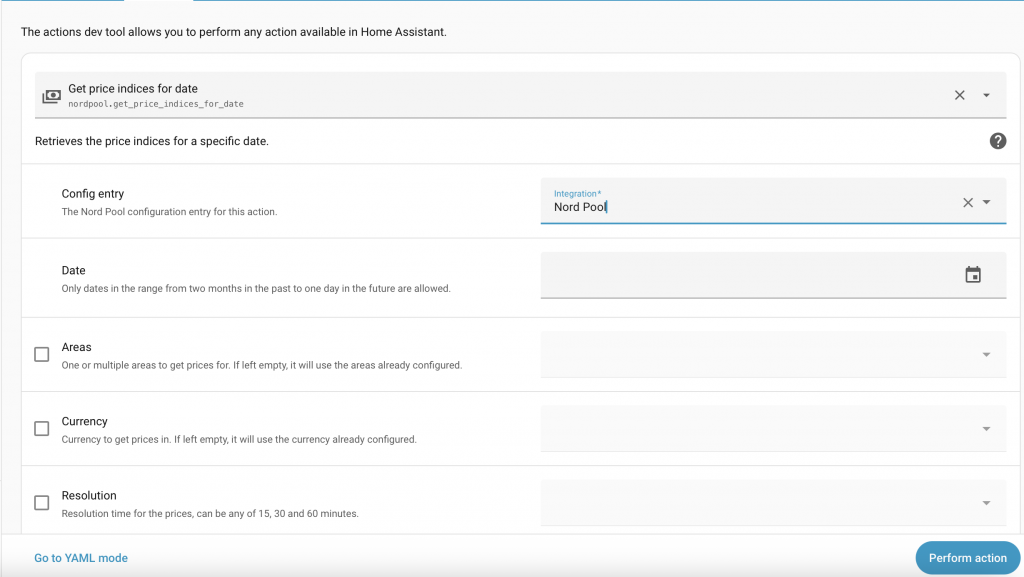
Step 2: Find Your Configuration ID
With the new service-based approach, you’ll need a config_entry ID to tell Home Assistant which Nord Pool instance you want to get data from. Think of it as a replacement for the entity_id you might have used before.
The easiest way to find this ID is:
- Go to Developer Tools > Actions.
- In the “Service” dropdown, select
Nord Pool: Get prices. - Choose your newly created config entry from the UI.
- Switch to YAML mode.
- Voila! The
config_entryID will be displayed. Copy this value for the next steps.
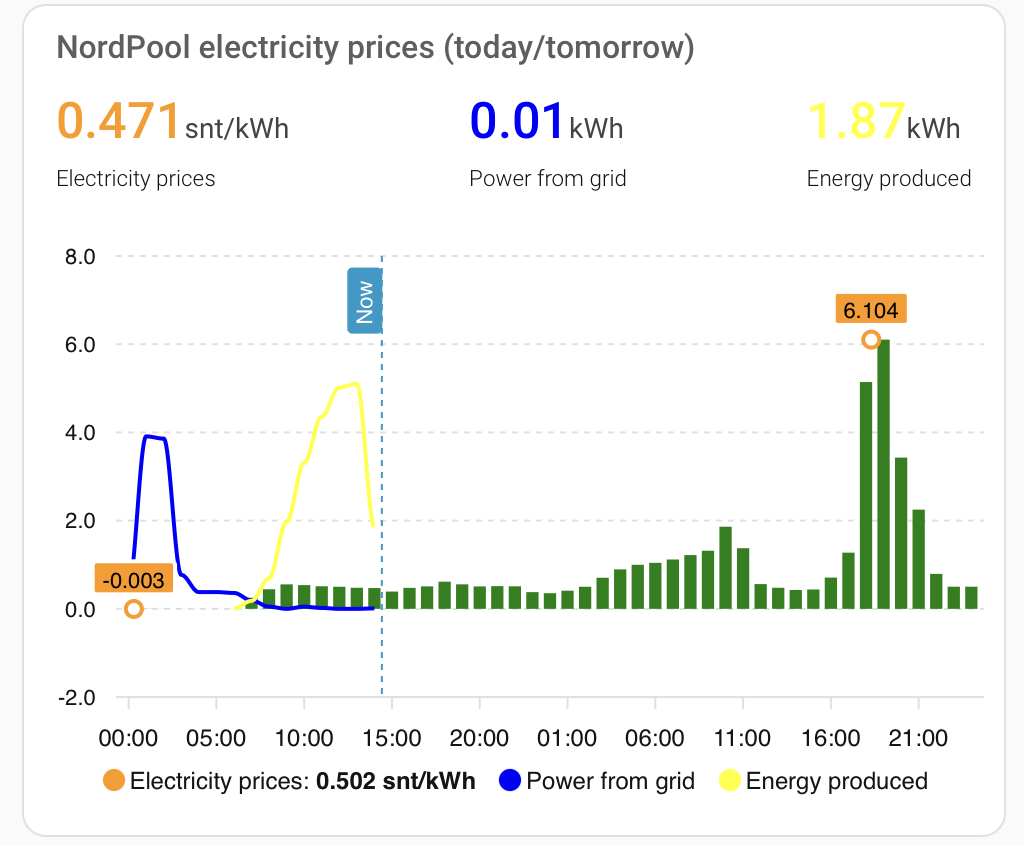
Step 3: Rebuilding the ApexCharts Price Graph
Since ApexCharts can’t call services directly to populate a graph, we need to create an intermediary: a template sensor that calls the Nord Pool service and stores the prices.
The template sensor below does exactly that. It calls the service periodically to fetch today’s and tomorrow’s prices. Don’t worry about spamming the API; the integration caches the data locally, so frequent updates won’t cause excessive network traffic.
This template also includes attributes for tax and additional_cost, making it easy to replicate the final price calculation you had with the custom component. Tax is added by multiplying original value (e.g. 25.5% = 1.255) and additional costs are added over that. So, if you your add tariffs and your tariffs needs to have VAT included remember to include as well into additional_costs.
template:
  - triggers:
      - trigger: time_pattern
        minutes: /1
      - trigger: homeassistant
        event: start
    actions:
      - action: nordpool.get_prices_for_date
        data:
          config_entry: 01K4QBH1H606SDS1V28KGR32K7
          date: "{{ now().date() }}"
          areas: FI
          currency: EUR
        response_variable: today_price
      - action: nordpool.get_prices_for_date
        data:
          config_entry: 01K4QBH1H606SDS1V28KGR32K7
          date: "{{ now().date() + timedelta(days=1) }}"
          areas: FI
          currency: EUR
        response_variable: tomorrow_price
    sensor:
      - name: Electricity prices
        unique_id: electricity_prices
        unit_of_measurement: "snt/kWh"
        icon: mdi:cash
        state: >
          {%- set region = (this.attributes.get('region', 'FI') | string) -%}
          {%- set tax = (this.attributes.get('tax', 1.0) | float) -%}
          {%- set additional_cost = (this.attributes.get('additional_cost', 0.0) | float) -%}

          {% if (today_price is mapping) and (tomorrow_price is mapping) %}
            {% set data = namespace(prices=[]) %}
            {% for state in today_price[region] %}
              {% set data.prices = data.prices + [(((state.price/10 | float)  * tax + additional_cost)) | round(3, default=0)] %}
            {% endfor %}
            {% for state in tomorrow_price[region] %}
              {% set data.prices = data.prices + [(((state.price/10 | float) * tax + additional_cost)) | round(3, default=0)] %}
            {% endfor %}
            {{min(data.prices)}}
          {% else %}
            unavailable
          {% endif %}
        attributes:
          tomorrow_valid: >
            {%- set region = (this.attributes.get('region', 'FI') | string) -%}
            {%- if (tomorrow_price is mapping) %}
              {%- if tomorrow_price[region] | list | count > 0 -%}
                {{ true | bool }}
              {%- else %}
                {{ false | bool }}
              {%- endif %}
            {%- else %}
              {{ false | bool }}
            {%- endif %}
          data: >
            {%- set region = (this.attributes.get('region', 'FI') | string) -%}
            {%- set tax = (this.attributes.get('tax', 1.0) | float) -%}
            {%- set additional_cost = (this.attributes.get('additional_cost', 0.0) | float) -%}

            {% if (today_price is mapping) and (tomorrow_price is mapping) %}
            {% set data = namespace(prices=[]) %}
              {% for state in today_price[region] %}
                {% set local_start = as_datetime(state.start).astimezone().strftime('%Y-%m-%d %H:%M:%S') %}
                {% set local_end = as_datetime(state.end).astimezone().strftime('%Y-%m-%d %H:%M:%S') %}
                {% set data.prices = data.prices + [{'start':local_start, 'end':local_end, 'price': (((state.price/10 | float) * tax + additional_cost)) | round(3, default=0)}] %}
              {% endfor %}
              {% for state in tomorrow_price[region] %}
                {% set local_start = as_datetime(state.start).astimezone().strftime('%Y-%m-%d %H:%M:%S') %}
                {% set local_end = as_datetime(state.end).astimezone().strftime('%Y-%m-%d %H:%M:%S') %}
                {% set data.prices = data.prices + [{'start':local_start, 'end':local_end, 'price': (((state.price/10 | float) * tax + additional_cost)) | round(3, default=0)}] %}
              {% endfor %}
              {{data.prices}}
            {% else %}
              []
            {% endif %}
          tax: 1.255
          additional_cost: 0
          region: FI
After creating this sensor and reloading your template entities (Developer Tools > YAML > Template Entities), you’ll have sensor.electricity_prices ready to use. Here is the ApexCharts card configuration, which is very similar to the old setup:
type: custom:apexcharts-card
experimental:
  color_threshold: true
header:
  show: true
  title: NordPool electricity prices (today/tomorrow)
  show_states: true
  colorize_states: true
graph_span: 48h
span:
  end: day
  offset: +1d
now:
  show: true
  label: Now
series:
  - entity: sensor.electricity_prices
    type: column
    show:
      extremas: true
      in_header: before_now
    float_precision: 3
    data_generator: |
      return entity.attributes.data.map((start, index) => {
        return [new Date(start["start"]).getTime(), entity.attributes.data[index]["price"]];
      });
    color_threshold:
      - value: 0
        color: green
      - value: 10
        color: orange
      - value: 30
        color: red
Step 4: Updating the Energy Dashboard
The official integration creates a sensor for the current price automatically (e.g., sensor.nord_pool_fi_current_price), which is perfect for the Energy Dashboard. However, this sensor shows the raw price. If you want your Energy Dashboard costs to reflect VAT, you’ll need another simple template sensor.
This one adds the 25.5% VAT to the raw price.
template:
  - sensor:
      name: Nord Pool current price with taxes
      unique_id: nordpool_current_price_with_taxes
      unit_of_measurement: "snt/kWh"
      state: >
        {{ (states('sensor.nord_pool_fi_current_price') | float * 100 * 1.255) | round(3) }}
You can then use this new sensor.nordpool_current_price_with_taxes in your Energy Dashboard settings for real-time costs.
Step 5: Configuring AIO Energy Management
I use the AIO Energy Management integration to calculate the cheapest hours of the day for running high-consumption devices. Version 0.5.0 introduced support for the 15-minute MTU and, crucially, price templating. This is necessary because the raw price from the Nord Pool service doesn’t include taxes or fees.
In my configuration below, I use the price_modifications template to transform the raw price from €/MWh into cents/kWh (snt/kWh) and add the 25.5% VAT.
Here is my updated configuration for AIO Energy Management for all my devices (water heater, outdoor spa and garage heating):
aio_energy_management:
    calendar:
        unique_id: energy_management_calendar
        name: Energy Management Calendar
    cheapest_hours:
      - nordpool_official_config_entry: 01K4QBH1H606SDS1V28KGR32K7
        unique_id: cheapest_hours_water_boiler
        name: Cheapest Hours Water Boiler
        first_hour: 21
        last_hour: 12
        starting_today: true
        number_of_hours: 6
        sequential: false
        failsafe_starting_hour: 1
        price_modifications: >
          {%- set as_snt = price / 10.0 %}
          {%- set with_taxes = (as_snt * 1.255) | float %}
          {{ with_taxes }}
      - nordpool_official_config_entry: 01K4QBH1H606SDS1V28KGR32K7
        unique_id: cheapest_hours_hot_tub
        name: Cheapest Hours Hot Tub
        first_hour: 0
        last_hour: 23
        starting_today: false
        number_of_hours: 5
        sequential: false
        max_price: 5.0
        price_modifications: >
          {%- set as_snt = price / 10.0 %}
          {%- set with_taxes = (as_snt * 1.255) | float %}
          {{ with_taxes }}
      - nordpool_official_config_entry: 01K4QBH1H606SDS1V28KGR32K7
        unique_id: cheapest_hours_garage_heating
        name: Cheapest Hours Garage Heating
        first_hour: 20
        last_hour: 14
        starting_today: true
        number_of_hours: sensor.garage_heating_number_of_hour
        sequential: false
        trigger_hour: 20
        failsafe_starting_hour: 1
        price_modifications: >
          {%- set as_snt = price / 10.0 %}
          {%- set with_taxes = (as_snt * 1.255) | float %}
          {{ with_taxes }}
Final Steps and Automations
I also had many automations that relied on the old custom component, and as expected, they all broke during this update. The simplest ones just needed an entity ID change, but others—like energy price push notifications or automations that change my EV charger’s color based on price—required more significant changes to work with the new service-based approach.
I won’t be diving into specific automation examples in this post, but if that’s something you’d like to see, let me know in the comments, and I might write a follow-up article!
so after i changed to official nordpool ill just need to change to
– nordpool_official_config_entry: XXXXXXXXXXXXXXXXXXXXX
in AIO to get the prices?
and if i want to use apex i need to make the template?
Yes, except uninstalling custom component version and installing + configuring Home Assistant core version obviously.
Aio works just by changing the config entry, no other changes necessary unless you want to include tariffs or similar for calculations.
Apex graph currently needs a bit more as there’s no way to get the data from service directly.
im using tibber to get prices so im cool, just need to get the AIO hours 😉
Just one question, how will it calculate for example 8 cheapest hours when 15min hits?
number_of_hours is number of hours, no changes in there.
Example:
You want to get eight hours out so you set number_of_hours = 8
When using mtu 15, you get 8*15 slots so total 8 hours 🙂
I’m planning to implement number_of_slots at some point that follows selected mtu allowing user to select e.g. 1.5hours, but that’s not in progress yes.
And one more point, by default, the implementation uses 60min mtu. So even if data comes with 15min mtu and no mtu value is set or set to 60, it will combine the full hours by mean value.
Changing mtu to 15 will use 15min slot sizes, only available after 1st October of course.
You state “Go to Developer Tools > Services.” > in my config i need to go to “Go to Developer Tools > Actions.”?
You’re absolutely correct, a mistake in my part.
Thanks for noticing, it’s corrected on the post now as well 🙂
Great work! I have some questions regarding the Apex-template which I don’t get to create the sensor.
I have pasted it into the configuration.yaml, switched to my own config_entry, switched to SEK and tried both SE & SE3 as region (you have FI). I have the Nordpool setup to SE3 and SEK if that matters.
Under Developer Tools > YAML > I don’t have the “Template Entities” selection (instead I just refreshed all YAML configs), running latest 2025.9.3.
Am I doing it right or should I create the template as a helper or similar? The AOI seems to work as I see entries in the calendar.
Regards Mikael
I’m using packages so the template code is on a separate file totally in my env.
(https://www.home-assistant.io/docs/configuration/packages/)
When you set it up on your configuration.yaml, first ensure you only have one ‘template:’ section in the whole file. If you have many, it won’t work. If you already had the ‘template:’ in there, just add the sensors inside that block.
Also check your home-assistant.log to see if there are any errors regarding it.
Edit: And if you copy-pasted the code, ensure that ” -marks are as they should. Sometimes copying from a blog post changes the format to near the correct, but not the proper mark.
I only had that template in the yaml so OK there. I noticed it is working with FI+EUR setup (with my config_entry). When I put SE3 and SEK there are 2 errors in the Log after reboot, This is the shorter one suggesting it has something to do with region, hmm:
Template variable warning: ‘dict object’ has no attribute ‘FI’ when rendering ‘{%- set region = (this.attributes.get(‘region’, ‘SE3’) | string) -%} {%- set tax = (this.attributes.get(‘tax’, 1.0) | float) -%} {%- set additional_cost = (this.attributes.get(‘additional_cost’, 0.0) | float) -%} {% if (today_price is mapping) and (tomorrow_price is mapping) %} {% set data = namespace(prices=[]) %} {% for state in today_price[region] %} {% set data.prices = data.prices + [(((state.price/10 | float) * tax + additional_cost)) | round(3, default=0)] %} {% endfor %} {% for state in tomorrow_price[region] %} {% set data.prices = data.prices + [(((state.price/10 | float) * tax + additional_cost)) | round(3, default=0)] %} {% endfor %} {{min(data.prices)}} {% else %} unavailable {% endif %}’
Template variable warning: No aggregated item, sequence was empty. when rendering ‘{%- set region = (this.attributes.get(‘region’, ‘SE3’) | string) -%} {%- set tax = (this.attributes.get(‘tax’, 1.0) | float) -%} {%- set additional_cost = (this.attributes.get(‘additional_cost’, 0.0) | float) -%} {% if (today_price is mapping) and (tomorrow_price is mapping) %} {% set data = namespace(prices=[]) %} {% for state in today_price[region] %} {% set data.prices = data.prices + [(((state.price/10 | float) * tax + additional_cost)) | round(3, default=0)] %} {% endfor %} {% for state in tomorrow_price[region] %} {% set data.prices = data.prices + [(((state.price/10 | float) * tax + additional_cost)) | round(3, default=0)] %} {% endfor %} {{min(data.prices)}} {% else %} unavailable {% endif %}’
Template variable warning: ‘dict object’ has no attribute ‘FI’ when rendering ‘{%- set region = (this.attributes.get(‘region’, ‘SE3′) | string) -%} {%- if (tomorrow_price is mapping) %} {%- if tomorrow_price[region] | list | count > 0 -%} {{ true | bool }} {%- else %} {{ false | bool }} {%- endif %} {%- else %} {{ false | bool }} {%- endif %}’
Template variable warning: ‘dict object’ has no attribute ‘FI’ when rendering ‘{%- set region = (this.attributes.get(‘region’, ‘SE3’) | string) -%} {%- set tax = (this.attributes.get(‘tax’, 1.0) | float) -%} {%- set additional_cost = (this.attributes.get(‘additional_cost’, 0.0) | float) -%} {% if (today_price is mapping) and (tomorrow_price is mapping) %} {% set data = namespace(prices=[]) %} {% for state in today_price[region] %} {% set local_start = as_datetime(state.start).astimezone().strftime(‘%Y-%m-%d %H:%M:%S’) %} {% set local_end = as_datetime(state.end).astimezone().strftime(‘%Y-%m-%d %H:%M:%S’) %} {% set data.prices = data.prices + [{‘start’:local_start, ‘end’:local_end, ‘price’: (((state.price/10 | float) * tax + additional_cost)) | round(3, default=0)}] %} {% endfor %} {% for state in tomorrow_price[region] %} {% set local_start = as_datetime(state.start).astimezone().strftime(‘%Y-%m-%d %H:%M:%S’) %} {% set local_end = as_datetime(state.end).astimezone().strftime(‘%Y-%m-%d %H:%M:%S’) %} {% set data.prices = data.prices + [{‘start’:local_start, ‘end’:local_end, ‘price’: (((state.price/10 | float) * tax + additional_cost)) | round(3, default=0)}] %} {% endfor %} {{data.prices}} {% else %} [] {% endif %}’
Did you change the attribute ‘region: FI’ in the attributes section of the template to ‘SE3’? That’s the only place you need to make changes. Others are just default values, if attribute can’t be read.
Hi again, I noticed VAT was 1.255, I changed it to 1.25 and then I saw that it expects 3 digits so added it back and now all works! It was not the region problem, no errors after reboot! Thanks again!
Good to hear you got it working. The digit amount should not matter as longs as the value is a floating number. I might need to test 1.25 VAT as well to see how it goes 🙂
It works with 1.25, just tried it now. Must have been something else I did wrong earlier. Now the button “Template entities” have appeared as well, guess this was my first template that enabled that button under “yaml reloading”..
Might be best to delete some comments so I don’t fool anyone else about the VAT..
is it only me that cheapest hours dont work anymore after switching norpool? My Expensive hours works.
aio_energy_management:
calendar:
name: Energi Hanterings Kalender
unique_id: energi_hanterings_kalender
cheapest_hours:
– nordpool_official_config_entry: 01K4ZNZSX4W8TAABP2PVXKGXSU
unique_id: billigaste_timmarna_sensor
name: Billigaste Timmarna
first_hour: 0
last_hour: 23
starting_today: false
number_of_hours: 8
sequential: false
inversed: false
price_limit: 0.45
failsafe_starting_hour: 1
– nordpool_official_config_entry: 01K4ZNZSX4W8TAABP2PVXKGXSU
unique_id: dyraste_timmarna
name: Dyraste Timmarna
first_hour: 0
last_hour: 23
starting_today: false
number_of_hours: 8
sequential: false
inversed: true
price_limit: 0.55
failsafe_starting_hour: 1
nevermind, got it to work now i think.
I switched to the official nord pool.
I also made some modifications to the Nord pool sensor (sensor.electricity_prices) to based on the time (night/day tariffs) as well as transfer price like this:
sensor:
– name: Electricity prices
unique_id: electricity_prices
unit_of_measurement: “snt/kWh”
icon: mdi:cash
state: >
{%- set region = (this.attributes.get(‘region’, ‘FI’) | string) -%}
{%- set tax = (this.attributes.get(‘tax’, 1.0) | float) -%}
{%- set hourly_fixed_cost = (this.attributes.get(‘hourly_fixed_cost’, 0.0) | float) -%}
{%- set night_rate = (this.attributes.get(‘night_rate’, 0.0) | float) -%}
{%- set day_rate = (this.attributes.get(‘day_rate’, 0.0) | float) -%}
{% macro cost_for_hour(price, starttime) %}
{%- set h = as_datetime(starttime).hour -%}
{%- set time_rate = night_rate if (h >= 22 or h
{%- set region = (this.attributes.get(‘region’, ‘FI’) | string) -%}
{%- if (tomorrow_price is mapping) %}
{%- if tomorrow_price[region] | list | count > 0 -%}
{{ true | bool }}
{%- else %}
{{ false | bool }}
{%- endif %}
{%- else %}
{{ false | bool }}
{%- endif %}
data: >
{%- set region = (this.attributes.get(‘region’, ‘FI’) | string) -%}
{%- set tax = (this.attributes.get(‘tax’, 1.0) | float) -%}
{%- set hourly_fixed_cost = (this.attributes.get(‘hourly_fixed_cost’, 0.0) | float) -%}
{%- set night_rate = (this.attributes.get(‘night_rate’, 0.0) | float) -%}
{%- set day_rate = (this.attributes.get(‘day_rate’, 0.0) | float) -%}
{% macro cost_for_hour(price, starttime) %}
{%- set h = as_datetime(starttime).hour -%}
{%- set time_rate = night_rate if (h >= 22 or h 24 hours window when the new prices come in to update the already scheduled cheapest hours.
Anyway, this is awesome.
Kudos to you guys!
After i changed to official noordpool, Price_limit don’t give me cheapest hours anymore for some reason, even if the price is below like before. price_limit seems to work for expensive hours tho (inversed: true)
Are you using price modifications? Official Nord Pool provides raw values that are eur/mWh. So those values are most probably more than 100. Make a price modification that converts your price to snt/kwh and you should be fine.
Of course if you are in Sweden etc, the price is most like kr/mWh.
The hacs versionnhave a fork https://github.com/ssmipp/nordpool that have quarter prices. Is it possible to add support for that One until its merged to main? 😉
Hi Jimmy!
I assume you are talking about AIO Energy Management support..
I would need dig a bit deeper into that specific integration changes. In theory, that should already work if data is reported with date time and price value in the today_raw and tomorrow_raw values.
If not, most probably I don’t have enough time to implement that one before 1st October, but maybe during the next weekend..
It works with hacs Nordpool fork. Just me that forgot to add mtu: 15 🙂
Your template trigger introducés errors in the logfile when switching to a 15 minute interval. Returned reply value exceeds 16K. Seems to work fine however but don’t know what the impact is on HA restarts. Also every minute a log file entry is written.
You’re right, changing the code to 15min interval quadruples the data and it exceeds the allowed attribute limit.
The template sensor used with Apex charts will need some changes when 15min is taken into use.
Will get back to this, thanks for reporting!
I resolved the size issue by building my own version of the template sensor where I only store Epoch seconds for the start time for each 15-minute price slot. No end time is needed.
It requires changes in automations, Apexcharts etc. utilising the sensor attributes, but is fairly easy to implement. The only downside is that the attribute values are no longer human readable.
Hi, Changed to official nordpool, and everything works fine, just that the integration entities become unavailable randomly. Integration reload fixes the problem. Does anyone else have this?
Made a template which has same name as old HACS integration and all works straight away.
I haven’t had any issues at all, but I’ve heard that at least one person has had the same symptoms.
Is it the template that goes unavailable or the Nord Pool integration (e.g. entity of integration ‘sensor.nord_pool_fi_current_price’ ?
All integration entities go unknown. chat gtp found some discussions where suhgested that giving nordpool entities friendly names causes this. Deleted all and will see if it works.
Other thing I noticed today is Current price entity only updates hourly, not 15min.
Apwx chart shows correctly 15min prices.
I have similar issue too. Today at 1AM Nordpool integration’s “Currency” and “Last updated” became unavailable. “Currency” changed to “EUR” at 2AM. This causes a gap in Nordpool price data. ApexCharts graph shows prices also during this period, but the template sensor showing price with tax is having a gap between 1AM and 2AM.
From Home Assistant system log I can see that there was an error 1AM in Nordpool integration “Error requesting nordpool data”.
How do I create the template sensor? Via the helper section? If not, how to do it?
I made it on a package (https://www.home-assistant.io/docs/configuration/packages/), but can be also created directly into configuration.yaml
Unfortunately I didn’t find a way to create it using UI.
When I past the code into the configuration I get this error “Property triggers is not allowed.” and “Property actions is not allowed.”
I have exactly the same problem
I did the package way, so I started by go into Studio Code Server, then in the configuration.yaml I added the following code packages: !include_dir_named packages then I created a new folder called packages. After that I created a file called nordpool.yaml. Then I used ChatGPT and pasted the code from this website as well as my error code and went onwards. And at last I got this code that worked for me, I’m in Sweden
template:
– trigger:
– platform: time_pattern
minutes: “/1”
– platform: homeassistant
event: start
action:
– service: nordpool.get_prices_for_date
data:
config_entry: 01K6HQES8XEYWZ79NKMPR7ZKFT
date: “{{ now().date() }}”
areas: SE3
currency: SEK
response_variable: today_price
– service: nordpool.get_prices_for_date
data:
config_entry: 01K6HQES8XEYWZ79NKMPR7ZKFT
date: “{{ (now().date() + timedelta(days=1)) }}”
areas: SE3
currency: SEK
response_variable: tomorrow_price
sensor:
– name: Dagens elpriser
unique_id: electricity_prices
unit_of_measurement: “öre/kWh”
icon: mdi:cash
state: >
{% set region = this.attributes.get(‘region’, ‘SE3’) %}
{% set tax = this.attributes.get(‘tax’, 1.25) | float %}
{% set additional_cost = this.attributes.get(‘additional_cost’, 0.0) | float %}
{% set now_dt = now().astimezone() %}
{% if today_price is mapping and tomorrow_price is mapping %}
{% set prices = today_price[region] + tomorrow_price[region] %}
{% set current_price = namespace(value=None) %}
{% for p in prices %}
{% set start = as_datetime(p.start).astimezone() %}
{% set end = as_datetime(p.end).astimezone() %}
{% if now_dt >= start and now_dt
{% set region = this.attributes.get(‘region’, ‘SE3’) %}
{% if tomorrow_price is mapping %}
{{ tomorrow_price[region] | list | count > 0 }}
{% else %}
false
{% endif %}
data: >
{% set region = this.attributes.get(‘region’, ‘SE3’) %}
{% set tax = this.attributes.get(‘tax’, 1.25) | float %}
{% set additional_cost = this.attributes.get(‘additional_cost’, 0.0) | float %}
{% if today_price is mapping and tomorrow_price is mapping %}
{% set all_prices = today_price[region] + tomorrow_price[region] %}
{% set result = namespace(prices=[]) %}
{% for p in all_prices %}
{% set local_start = as_datetime(p.start).astimezone().strftime(‘%Y-%m-%d %H:%M:%S’) %}
{% set local_end = as_datetime(p.end).astimezone().strftime(‘%Y-%m-%d %H:%M:%S’) %}
{% set price = ((p.price / 10) * tax + additional_cost) | round(2) %}
{% set result.prices = result.prices + [ {‘start’: local_start, ‘end’: local_end, ‘price’: price} ] %}
{% endfor %}
{{ result.prices }}
{% else %}
[]
{% endif %}
tax: 1.25
additional_cost: 0
region: SE3
Thank you Teodor, I could not copy your code because the layout fell apart, I did however have something to compare now and when I changed triggers to trigger and actions to action to problem was gone.
Also the last 3 lines with:
tax: 1.25
additional_cost: 0
region: SE4
needed 2 more spaces in front of them.
Thanks for your help, I have a working sensor now!
Thank you very much for this helpful tutorial. I have one problem, though. The ApexChart price graph correctly displays the price in 15-minute intervals. However, sensor.nord_pool_fi_current_price updates only once per hour, and it does not show the average of the four quarter-hour prices, but rather the price of the first quarter. This is important for me, since I won’t get a new 15-minute MTU-capable electricity meter until next fall. Until then, my electricity company will charge me based on the hourly average price.
It’s a known issue in the Home Assistant Nord Pool integration. More info in here: https://github.com/home-assistant/core/issues/153298
Hopefully it will be resolved soon by Home Assistant core team.
Thank you, it seems to be corrected in 2025.10.1 and works now as expected. However, I still need a sensor that gives me the hourly average price. I modified your sensor.electricity_prices (to be honest, by using ChatGPT) and added it to your trigger based template after the definition of electricity_prices. I now have a sensor electricity_hourly_average that gives me the average price of the ongoing hour:
– name: Electricity hourly average
unique_id: electricity_hourly_avg
unit_of_measurement: “snt/kWh”
icon: mdi:chart-line
state: >
{% set region = ‘FI’ %}
{% set tax = 1.255 %}
{% set additional_cost = 0.0 %}
{% set now_time = now() %}
{% set prices = namespace(values=[]) %}
{% for state in today_price[region] %}
{% set start = as_datetime(state.start).astimezone() %}
{% if start.hour == now_time.hour and start.date() == now_time.date() %}
{% set p = ((state.price/10 | float) * tax + additional_cost) %}
{% set prices.values = prices.values + [p] %}
{% endif %}
{% endfor %}
{% if prices.values | count == 0 %}
{% for state in tomorrow_price[region] %}
{% set start = as_datetime(state.start).astimezone() %}
{% if start.hour == now_time.hour and start.date() == now_time.date() %}
{% set p = ((state.price/10 | float) * tax + additional_cost) %}
{% set prices.values = prices.values + [p] %}
{% endif %}
{% endfor %}
{% endif %}
{% if prices.values | count > 0 %}
{{ (prices.values | sum / (prices.values | count)) | round(3) }}
{% else %}
unavailable
{% endif %}
It seems to work even if I do not fully understand it. Are you able to spot problems in it? Or do you have a more straightforward solution?
Hi Toni
Thank you for amazing work. Ive been using the older version of cheap and expensive packages for managing my heatpump, EV charging and even the fridge 🙂
Now since the change to 15 minute pricing option will be upgrading to this new one.
But i am a bit confused about the first_hour, last_hour and starting_today setting and usecases.
starging_today – false then it will only generate the timeslots for next day? What is the usecase for True?
With the first and last hour, what are those supposed to be set when i want to find most expensive and cheapest slots during the 24h so my heat pump is turned off when its most expensive and EV charging when its cheapest.
Hi!
Yes, if starting_today is false, all the possible time slots will be set for tomorrow.
example use case of starting_today = true:
You might want to schedule your water heater between 22-07. So the code needs to know if to schedule combined hours for today and tomorrow. E.g between two days.
…well okay to be honest, this could be handled inside the code as well, if starting is greater than ending. This might be in changed upcoming releases later.. kind of legacy code 🙂
If you want the full day to be used as schedule, use starting_today: false, first_hour: 0, last_hour: 23.
And if you want the most expensive hours to be found, set ‘inversed: true’. That way the most expensive hours will be found.
And by default this implementation uses 60min mtu. If you want to use 15min slots, set ‘mtu: 15’ and you will get 15min slots. But keep in mind that the ‘number_of_hours’ configuration is still hours. So ‘number_of_hours: 1’ will find you FOUR 15min slots.
And if you want find the most expensive and cheapest hours, make two configurations – one for each.
First of all thanks Toni for these great posts.
One thing left me wondering if I did everything right.
It seems I’m getting the next day prices / prices 0100-0100
All the prices are correct and matches when I compare them from current prices from e.g. my Helen Energy App.
For example my apex chart now looks a bit funky since the first hour of the day is blank.
With previous implementation with custom nordpool integration apex chart looked ok starting from 0000 ->
So did norpool actually change the reporting timeframe to obey CET or what happened?
Thanks for you kind feedback Rami!
Nord Pool has always provided data in CET. Integrations might or might not cache previous data, so depending of the used integration, you might get the data from ‘previous’ day as well.
Official Nord Pool integration only return the data per day (CET).
To get first hour of day visible you need to get the previous day data in the automation template as well and combine that with next day.
As you are not the only one asking about this, I will make an example this week that shows the functionality on this post to get the first hour visible as well. 🙂
Hi Rami and sorry for the delay to provide what I promised (been quite busy lately).
Here’s the CET+1 corrected version. Basically we just query for yesterday prices as well and grab the latest four 15min slots and combine it with the data 🙂
Here’s pastebin for it: https://pastebin.com/FbUCL6kK
I will add a link to the blog post itself later too.
This blog is very much appreciated. Many thanks, things work so seamless following your guides!
I haven’t had time to dig much deeper but according to the Nordpool integration documentation all timestamps are in UTC. Wouldn’t it then mean that this “first hour missing”- issue only happens during summertime (and I suppose just for FI)?
I keep my additional costs in helpers and my overall solution is a bit messy since I’m quite the novice but I approached this by adding a check if we are in daylight savings time and in that case pick last hours from “previous day”. But my friday brain is perhaps not fully operating anymore so might have wrong assumptions. https://pastebin.com/PbN6h2AV
Hello Toni, would it make sense to also remove extra 4 x 15min from the end of tomorrow prices, same way than you take only 4 units from yesterday, take all but 4 [-4:] units from tomorrow? This was my idea when reading through the the pastebin code.
Yes if you don’t want to see the first hour of the day after 🙂
I like to see it as it can ‘predict’ the day after day quite well sometimes.
Is there anyone else having problems with the official Nord Pool integration? It is 19:13 now and the last update was 9:21, meaning I still don’t have tomorrows prices.
All good here (Finland), at least for me.
Have you tried to reload Nord Pool integration?
SE4 here. Yes i did, I even reinstalled the integration and rebooted the whole system. Also my internet connection is fine. I’m a bit lost because there doesn’t seem anything to tinker with in this integration, it should just work right?
Yes, it should ‘just work’.
You might want to check the logs from home-assistant.log.
..And if you can’t find an error there, enable debug logging from Nord Pool integration for more detailed logs.
I had no bugs at all, I reinstalled the integration again and now it just works, I’m really puzzled by this but thanks for the help, I really appreciate it.
Hi,
I had a thought to move over to the official integration, and this article has been linked everywhere.
Well, i got stuck before i even started.
My template sensor is stuck at 9,284snt/kwh and has been since created 2 hours ago. Any ideas? What am i missing?
All i’ve done is changed EUR to SEK and FI to SE3.
https://pastebin.com/rqJr4kgJ
added to template.yaml – included to configuration.yaml
Are you running latest Home Assistant 2025.10.1 ?
In the core integration there was an update bug on 2025.10.0 that caused similar behaviour to yours.
I was moving over to the official integration and got stuck on a few things and this article has been very helpful! Thank you very much!
I’m sorry, but I lost the track on Step 3: Rebuilding the ApexCharts Price Graph
Can you explain step-by-step what is needed to be done here? A template sensor? Where do I do that?
Excellent question, I might need to rephrase beginning of the step 3 to make it more clear!
Anyhow, until I have made the change, you add the template sensor to configuration.yaml (or in a package).
When using the nordpool official config entry, will AIO then be using the sensor electricity_prices or the raw value from config_entry/nordpool?
Since I have variable prices for distribution I would want to have that been taken into consideration.
Thanks. Also, it would be nice to be able to get AIO at some point on 15min granularity, so I can turn on and off batteries during the most expensive 15min block during a 1 hour block. It has been varying quite much within the hour now.
Hi!
AIO uses the Nord Pool integration directly, template sensor represented in here is only for Apex Charts to use (and maybe some others..).
Also AIO Energy Managgement already supports 15min mtu from v0.5.0 forward – just add configuration: ‘mtu: 15’ for selected AIO entry 🙂
I tried to use helper entity in price_limit, but it didn’t work (no errors, active value shows the previous price_limit value and price_limit shows entity name).
Should it work?
Like price_limit: input_number.xyz
price_limit is locked in when data is received or trigger time is reached.
active_price_limit is the locked in value.
So it won’t change until expiration of the data. You can of course clear the data using clear_data and new data will be fetched with new price_limit.
Hi!
For some reason I have 6 of 24 sensors disabled by default, one of them is the “Current price”, with the message “Cannot change status. Disabled by Device” and there is no way to enable it. Feels like I tried everything. Any ideas?
Didn’t quite understand your issue.
That’s normal to have 6 of 24 enabled only.
You should be able to enable disabled entities by going to the entity -> settings -> click ‘enable’ switch.
Sorry for not discribing the issue more in detail. Anyways, the problem was solved by disable and re-enable integration. Uninstall and re-install did not solve the issue.
It seems I can’t get any data into the AIO integration.
In the debug logs i can find this:
2025-10-12 23:56:32.581 DEBUG (MainThread) [custom_components.aio_energy_management.cheapest_hours_binary_sensor] No valid data found. Check failsafe
my config.yaml:
######aio#####
aio_energy_management:
calendar:
unique_id: energy_management_calendar
name: NordPoolCalendar
cheapest_hours:
– nordpool_official_config_entry: 01K6Y1R2252N739BKE8E9AMJEV
unique_id: cheapest_hours
name: Cheapest Hours
first_hour: 21
last_hour: 12
starting_today: true
number_of_hours: 4
sequential: false
– nordpool_official_config_entry: 01K6Y1R2252N739BKE8E9AMJEV
unique_id: expensive_hours
name: Expensive Hours
first_hour: 21
last_hour: 12
inversed: true
starting_today: true
number_of_hours: 4
sequential: false
Any idea’s ?
tnx!
Sorry I missed your comment earlier few days ago!
Did this get resolved? Most probably data was not coming through from Nord Pool service. Maybe you tried it before the prices were actually published out?
Hi, Got it working. It’s working amazing! Thanks for the effort you have put in!
Great guide! Love what you are doing here!
Have got that colorized_states: true working correctly? Now it just turns the price orange. I would like if it would change colors according to the electricity price as the colums do.
First of all thanks for the feedback!
colorized_states do not correlate with series threshold. Don’t know if and how such behaviour would be implemented.
You can try to find more info from Apex Charts integration page: https://github.com/RomRider/apexcharts-card
Hi Tony,
Your previous cheapest hours automation worked great but now as a still newbie moving over, i get stuck with these instructions:
“Since ApexCharts can’t call services directly to populate a graph, we need to create an intermediary: a template sensor that calls the Nord Pool service and stores the prices.
The template sensor below does exactly that. It calls the service periodically to fetch today’s and tomorrow’s prices. Don’t worry about spamming the API; the integration caches the data locally, so frequent updates won’t cause excessive network traffic.”
Could you please go in more detail how this should be done? I googled and tried ChatGTP but am afraid I messed it up even more. 🙁
About Nord Pool service calls:
As far as I know the data is cached inside the service, so no REST API calls to Nord Pool should be done every time.
Anyhow, you could still use the Nord Pool custom component and just use AIO Energy Management for cheapest hours. But if you want to move to use the Nord Pool official integration and Apex Charts, this is how you need to do it currently.
Template sensor should be created inside the configuration.yaml or its own package. It kind of makes similar Nord Pool sensor like in the custom nord pool integration.
In which part you got stuck?
Yes, sorry for a vague description. So this is how i understood Step 3 together with Google and ChatGTP:
1. In the file configuration.yaml, i added a row:
template: !include templates.yaml
2. Added a file:
/homeassistant/templates.yaml
3. Added there the content, which is modified to get the price for Estonia:
# Template sensor for electricity prices.
# Step3: https://www.creatingsmarthome.com/index.php/2025/09/12/home-assistant-migrating-to-the-official-nord-pool-integration/
# template:
– triggers:
– trigger: time_pattern
minutes: /1
– trigger: homeassistant
event: start
actions:
– action: nordpool.get_prices_for_date
data:
config_entry: 01K7PQ8CQVHYM2C36SSZ05ZC0X
date: “{{ now().date() }}”
areas: EE
currency: EUR
response_variable: today_price
– action: nordpool.get_prices_for_date
data:
config_entry: 01K4QBH1H606SDS1V28KGR32K7
date: “{{ now().date() + timedelta(days=1) }}”
areas: EE
currency: EUR
response_variable: tomorrow_price
sensor:
– name: Electricity prices
unique_id: electricity_prices
unit_of_measurement: “€/kWh”
icon: mdi:cash
state: >
{%- set region = (this.attributes.get(‘region’, ‘EE’) | string) -%}
{%- set tax = (this.attributes.get(‘tax’, 1.0) | float) -%}
{%- set additional_cost = (this.attributes.get(‘additional_cost’, 0.0) | float) -%}
{% if (today_price is mapping) and (tomorrow_price is mapping) %}
{% set data = namespace(prices=[]) %}
{% for state in today_price[region] %}
{% set data.prices = data.prices + [(((state.price/10 | float) * tax + additional_cost)) | round(3, default=0)] %}
{% endfor %}
{% for state in tomorrow_price[region] %}
{% set data.prices = data.prices + [(((state.price/10 | float) * tax + additional_cost)) | round(3, default=0)] %}
{% endfor %}
{{min(data.prices)}}
{% else %}
unavailable
{% endif %}
attributes:
tomorrow_valid: >
{%- set region = (this.attributes.get(‘region’, ‘EE’) | string) -%}
{%- if (tomorrow_price is mapping) %}
{%- if tomorrow_price[region] | list | count > 0 -%}
{{ true | bool }}
{%- else %}
{{ false | bool }}
{%- endif %}
{%- else %}
{{ false | bool }}
{%- endif %}
data: >
{%- set region = (this.attributes.get(‘region’, ‘EE’) | string) -%}
{%- set tax = (this.attributes.get(‘tax’, 1.0) | float) -%}
{%- set additional_cost = (this.attributes.get(‘additional_cost’, 0.0) | float) -%}
{% if (today_price is mapping) and (tomorrow_price is mapping) %}
{% set data = namespace(prices=[]) %}
{% for state in today_price[region] %}
{% set local_start = as_datetime(state.start).astimezone().strftime(‘%Y-%m-%d %H:%M:%S’) %}
{% set local_end = as_datetime(state.end).astimezone().strftime(‘%Y-%m-%d %H:%M:%S’) %}
{% set data.prices = data.prices + [{‘start’:local_start, ‘end’:local_end, ‘price’: (((state.price/10 | float) * tax + additional_cost)) | round(3, default=0)}] %}
{% endfor %}
{% for state in tomorrow_price[region] %}
{% set local_start = as_datetime(state.start).astimezone().strftime(‘%Y-%m-%d %H:%M:%S’) %}
{% set local_end = as_datetime(state.end).astimezone().strftime(‘%Y-%m-%d %H:%M:%S’) %}
{% set data.prices = data.prices + [{‘start’:local_start, ‘end’:local_end, ‘price’: (((state.price/10 | float) * tax + additional_cost)) | round(3, default=0)}] %}
{% endfor %}
{{data.prices}}
{% else %}
[]
{% endif %}
tax: 1.24
additional_cost: 0
region: EE
4. My sensor sensor.electricity_prices has no data stored. Therefore charts do not work.
Do you see somewhere a newbie mistake which would fix this? Thanks.
I just happened to scroll the comments but noticed that probably at least one of the config entries for nordpool.get_prices_for_date is wrong. They both should have the same value for get_prices_for_date. Now they are different which would mean one of them is not correct.
Not sure if that will solve it but probably makes sense to doublecheck
0zz1e, thanks, this fixed it!
Hi!
Is there any way to manually update the my_cheapest_hours and my_expensive_hours data for already fetched data after you change values in the AIO Energy Management yaml configuration? It´s seems, at least in my case, that the info updates only at the next time when prices for tomorrow are fetched by the Nordpool integration. Br Marcus
Reloading and restarting doesn´t seem to help.
Hi again, sorry for spamming your blog with questions to which answers are very well documented. Found the action: Clear cached data (aio_energy_management.clear_data) and action: Reload integration (aio_energy_management.reload_data) on your Github. Feel free o delete my posts.
Hi!
I am so grateful for this guide!
I have two different HA-setups, one in Sweden and one in Denmark, and I have used this guide for energy management in both of them in the process of swapping out the former HACS based Nord pool custom integraton.
The one i Sweden went quite easy. But in the Danish Ha-setup I ran into some problems finding the Nord Pool config_entry ID. When doing as suggested in the guide, by using: Developer Tools > Actions and then in the “Service” dropdown, select Nord Pool: Get prices and switch to YAML, the configuration entry ID was not shown. The output was only:
action: nordpool.get_prices_for_date
data: {}
But I managed to find the ID in a quite different way, and I thought I just might explain it here if anyone else runs into the same problem:
Go to “Settings” > “Devises and Services” and then click on the Nord Pool integration.
Then click on the Nord Pool hub you’ve previously created. In my case it’s called “Nord Pool DK2”. Now under “Service info” (I believe this is the English title?) You can “Download diagnostics”. This creates a JSON-file and even though i couldn’t find the configuration ID inside the JSON file, is is actually a part of the filename itself. Just rip out the “config_entry-nordpool-” and “.json” and there You go!
Hej Toni, thank you so much for your wonderful work. I use your cheapest hours integration for several years now and now I installed the update. After a few tweaks it actually shows the correct energy prices from nordpool incl. VAT. Even the calendar has been built. BUT no entries so far (installed everything yesterday evening).
I get an error in my logs which maybe addresses this:
This error originated from a custom integration.
Logger: custom_components.aio_energy_management.binary_sensor
Source: custom_components/aio_energy_management/binary_sensor.py:98
integration: AIO Energy Management (documentation)
First occurred: 5:42:43 PM (1 occurrence)
Last logged: 5:42:43 PM
Configuration validation error for nord pool cheapest hours sensor: expected int for dictionary value @ data[‘last_hour’]
If this is not the source of the missing cheapest hours entries in my calendar, what else can I try?
Thanks again!
Michael
Hi Michael!
Most probably you have first_hour including leading zero (like ’01’). Remove the zero and it should work.
This config issue will be fixed at some point to allow leading zeros as well 🙂
Yes, that was the problem: I had “09” as my last hour. Now I changed it to “9” and have my first calendar entries for tomorrow 🙂
Appreciate your help, thank you!
Mikael
Hello Toni,
Thanks for your great work.
I have migrated to the new nordpool.
The old ones were working very well, but decided to migrate.
But afther that the problems begins. Not your fault, but mine becaue i have probebly do something wrong.
It is not clear to me where to put the code?
Does it have to be in de configuration.yaml, or templates.yaml or automations.yaml.?
All “FI” i have changed to “NL”
but the electricity_prices stays on “0”
the graph is empty and continious “loading”
and are the old files in the packages still used? or can i delete them.
I use packages (https://www.home-assistant.io/docs/configuration/packages/).
So, I have placed the template sensor in one (I named it nordpool.yaml).
It should work in templates.yaml if you put it in there.
Also configuration.yaml should work as long as you don’t have duplicate ‘template:’ blocks in there.
Thanks for your answer, I think the code is working for a part.
The first part (- trigger) is not working
When i put this in developer, actions:
action: nordpool.get_prices_for_date
data:
config_entry: 01K7YPRY09JQAMGVNQX60DMTGR
areas: NL
currency: EUR
date: “2025-10-21”
I get a list with values
but the “sensor.nordpool_energy_prices” is unavailable.
does this has something to do with the prices are now for 15 minutes?
This is the code, i have put in the templates.yaml.
– trigger:
– trigger: time_pattern
minutes: /1
– trigger: homeassistant
event: start
action:
– action: nordpool.get_prices_for_date
data:
config_entry: 01K7YPRY09JQAMGVNQX60DMTGR
areas: NL
currency: EUR
date: “{{ now().date() }}”
response_variable: today_price
– action: nordpool.get_prices_for_date
data:
config_entry: 01K7YPRY09JQAMGVNQX60DMTGR
areas: NL
currency: EUR
date: “{{ now().date() + timedelta(days=1) }}”
response_variable: tomorrow_price
Hi Toni,
Please help me with price_modifications part of the script. How would you configure season electricity transfer (kausisähkö) fees where winter day fee is applicable from Monday to Saturday 1.11.-31.3.2025 from 7 am to 10 pm, and other time fee on all other hours? I am quite a newbie with Home Assistant but managed to configure these fees in earlier advanced_cheapest_hours automation. After I migrated to official NordPool Integration and AIO_energy_management, however, all my attempts to create similar configuration have been unsuccessful.
Hi!
The ‘time’ variable is type of datetime (https://www.home-assistant.io/blog/2017/10/15/templating-date-time/) in the price_modifications template.
You can use methods like time.month to check winter fees and time.weekday() to check if it’s Sunday or something else.
Hopefully you can get started with these details. I can provide you more detailed example next week once I get back home and to my computer.
Hi Toni,
and thanks instructions and explanations.
I have been fighting for a while with electricity pricing starting and ending times.
I have configured Electricity Prices Template sensor according your example and everything is working except, my electricity prices are starting from 1:00 a’clock and ending next day 1:00 a’clock.
My timezone in HA is (GMT+02:00) Helsinki.
Any ideas how to fix this.
Thanks in advance!
As Nord Pool is providing prices on CET only, in Finland we need to get the prev. day as well to get it start 00:00.
Here’s an example: https://pastebin.com/FbUCL6kK
I will update the blog post with note to this once I get back hone next week 🙂
Now it works!
Thanks for the quick reply.
Dear Toni,
I have one more issue. Yesterday the cheapest hours where scheduled in the energy management calender from 11 PM to 3 PM in my case (4 hours).
One of my automations (boiler) startet as scheduled. But it didn’t end. I examined the automation traces and found that the calendar event was obviously deleted before the ending time occured. All “old” events seem to be deleted in the calendar,
I tried to reload YAML (Developer Tools -> AIO Energy Management) and yesterday’s event was visible again for about 2 minutes before it disappeared again.
Never had this issue with the previous version of cheapest hours, so I was wondering if this could be an issue in my setup?
Here’s my /configs/aio_cheapest_hours.yaml in case you find some time to check. THANKS!
aio_energy_management:
calendar:
unique_id: energy_management_calendar
name: Energy Management Calendar
cheapest_hours:
– nordpool_official_config_entry: 01K***************************D5
unique_id: my_cheapest_hours
name: Cheapest Hours
first_hour: 20
last_hour: 9
starting_today: true
number_of_hours: 4
sequential: false
failsafe_starting_hour: 1
price_modifications: >
{%- set as_snt = price / 10.0 %}
{%- set with_taxes = (as_snt * 1.250) | float %}
{{ with_taxes }}
EDIT: Calendar Energy Management turned off occurs in my Activities shortly after I reloaded the YAML (where the calendar turnes on)
There’s an issue with either HA core or in AIO that end events are not called for at least this calendar.
I’m in a middle of finding the root cause and will continue once I get back home next week.
Also old calendar events are deleted automatically before end is called (in case the event is last hour of the calendar) – fix incoming for that as well.
Until then, please use binary_sensor state (on/off) to trigger automations. This was the original plan also and using calendar events kind of came as a surprise for me 🙂
Ps. Failsafe is only called on binary sensor as well
OK, changed automation to something like
“If cheapest hours changes to on” (off respectively) .
Thanks for this!
Michael
Works!
I tried this migration during this weekend and after some tinkering got the apex-charts working well. My approach was to have two attributes, similar to unofficial Nordpool integration provides to keep the tomorrow chart displaying only 24h.
But I ran into issue:
So, this is from home_assistant.log and it seems it’s not happy with tomorrows prices? Or did I screw up something really well or is it just that today is not the good day to start with this? 😀
2025-10-26 15:15:15.384 ERROR (MainThread) [custom_components.aio_energy_management.math] Data provided for calculation has invalid amount of values. This is most probably erro
r in data provider
2025-10-26 15:15:15.385 ERROR (MainThread) [homeassistant.helpers.entity] Update for binary_sensor.nelja_kalleinta_tuntia fails
Traceback (most recent call last):
This is a DST (daylight saving) problem.
I’ve just investigated this some time and seems like the issue lies in the Home Assistant core Nord Pool integration that handles one extra hour wrongly.
More information can be found from here: https://github.com/kotope/aio_energy_management/issues/122
Yeah I suspected something like that after the log entry and also when looking today prices with apex charts, maybe tomorrow is better day to start this migration again.
Thanks for the info, I’ll follow the github discussions from now on!
I’ve had my AIO package, updated with official NordPool, working well for a couple of weeks. But now there are no more calendar entries and my sensors are not updated since Oct 25 just after midnight.
Is there a problem? DST?
Yes, DST issue in the code when using Core HA Nord Pool integration. More info here: https://github.com/kotope/aio_energy_management/issues/122
This will be fixed on AIO side soon and should not affect next update cycle anymore as DST change has fully been passed now.
Now, Oct 27 afternoon, the sensors are again updated and calendar entries are as expected.
I guess there was a DST problem.
Is it really necessary to trigger this every minute?
template:
– triggers:
– trigger: time_pattern
minutes: /1
– trigger: homeassistant
event: start
actions:
– action: nordpool.get_prices_for_date
…
I think it is good enough if we trigger it every 15 minutes because the price will not change during the quarter anyway.
Of course not necessary to trigger each minute, feel free to tune it down 🙂
Can you share the code of the Nordpool prices apex chart in this page? The one on the right, with combined power from grid and energy produced. Love it!
Thanks.
Here’s the apex chart code I’m using:
https://pastebin.com/0uS8xz8e
And for the energy balance current hour, used in my apex chart, you can check this article:
https://www.creatingsmarthome.com/index.php/2023/08/30/home-assistant-hourly-imported-exported-energy-balance-in-solar-automations/
The code here: https://pastebin.com/0uS8xz8e seems to be incomplete because yaxis definitions doesn’t exist.
Weird, that’s the full code that I’m using right now and it’s working perfect.
Y-axis will be automatically determined I guess..
Hello, can you help me with cheapest hours.
Everything seem work, Apex chart and other.
Problem only with Cheapest hours.
Here is a code:
aio_energy_management:
calendar:
unique_id: energy_management_calendar
name: Energy Management Calendar
cheapest_hours:
– nordpool_official_config_entry: 0XXXXXXXXXXXXXXXXXXXX
unique_id: my_cheapest_hours_evcs
name: My Cheapest Hours for EVCS
first_hour: 0
last_hour: 23
starting_today: true
number_of_hours: 4
sequential: true
failsafe_starting_hour: 1
price_limit: 10.0
price_modifications: >
{%- set as_snt = price / 10.0 %}
{%- set with_taxes = (as_snt * 1.210 + 5.244) | float %}
{{ with_taxes }}
Last time it’s triggered to ‘On’ today – from 1:00 to 5:00
But if I see Nordpool Prices in this hours kw costs approx 15 cents….
From 4:15 to 4:45 was 8 cents…
My goal to find cheapest hours by 24h with high price limit to 10 cents and trigger to launch EМ сharger…
Thanks!
Looks like running on failsafe.
There’s a problem in your config. As you are requesting hours from 00 – 24, you need to set
starting_today: falseIt needs to be true only when setting starting time on today’s side.
There should be an error in your logs about invalid config 🙂
Much of the installation and configuration is unnecessarily complicated, as reading all the comments points out. Perhaps a GUI way to install and configure would be in place?
I agree, GUI would be much better .. but that would need time and effort to implement 🙂
But maybe some rainy day. 🙂
Help!
I tried (I think) everything.
the text below I put in the templates.yaml (included by configuration.yaml)
when I test “get prices for date” in Developor tools, Action. I get a list of output, but my chart stays empty
no error messages, just no data
– trigger:
– trigger: time_pattern
minutes: /1
– trigger: homeassistant
event: start
action:
– action: nordpool.get_prices_for_date
data:
config_entry: ——————
date: “{{ now().date() }}”
areas: nl
currency: EUR
response_variable: today_price
– action: nordpool.get_prices_for_date
data:
config_entry: ——————
date: “{{ now().date() + timedelta(days=1) }}”
areas: nl
currency: EUR
response_variable: tomorrow_price
sensor:
– name: Electricity prices
unique_id: electricity_prices
unit_of_measurement: “EUR/kWh”
icon: mdi:cash
state: >
{%- set region = (this.attributes.get(‘region’, ‘nl’) | string) -%}
{%- set tax = (this.attributes.get(‘tax’, 1.0) | float) -%}
{%- set additional_cost = (this.attributes.get(‘additional_cost’, 0.0) | float) -%}
{% if (today_price is mapping) and (tomorrow_price is mapping) %}
{% set data = namespace(prices=[]) %}
{% for state in today_price[region] %}
{% set data.prices = data.prices + [(((state.price/10 | float) * tax + additional_cost)) | round(3, default=0)] %}
{% endfor %}
{% for state in tomorrow_price[region] %}
{% set data.prices = data.prices + [(((state.price/10 | float) * tax + additional_cost)) | round(3, default=0)] %}
{% endfor %}
{{ min(data.prices) }}
{% else %}
unavailable
{% endif %}
attributes:
tomorrow_valid: >
{%- set region = (this.attributes.get(‘region’, ‘nl’) | string) -%}
{%- if tomorrow_price is mapping %}
{%- if tomorrow_price[region] | list | count > 0 -%}
{{ true | bool }}
{%- else %}
{{ false | bool }}
{%- endif %}
{%- else %}
{{ false | bool }}
{%- endif %}
data: >
{%- set region = (this.attributes.get(‘region’, ‘nl’) | string) -%}
{%- set tax = (this.attributes.get(‘tax’, 1.0) | float) -%}
{%- set additional_cost = (this.attributes.get(‘additional_cost’, 0.0) | float) -%}
{% if (today_price is mapping) and (tomorrow_price is mapping) %}
{% set data = namespace(prices=[]) %}
{% for state in today_price[region] %}
{% set local_start = as_datetime(state.start).astimezone().strftime(‘%Y-%m-%d %H:%M:%S’) %}
{% set local_end = as_datetime(state.end).astimezone().strftime(‘%Y-%m-%d %H:%M:%S’) %}
{% set data.prices = data.prices + [{
‘start’: local_start,
‘end’: local_end,
‘price’: (((state.price/10 | float) * tax + additional_cost)) | round(3, default=0)
}] %}
{% endfor %}
{% for state in tomorrow_price[region] %}
{% set local_start = as_datetime(state.start).astimezone().strftime(‘%Y-%m-%d %H:%M:%S’) %}
{% set local_end = as_datetime(state.end).astimezone().strftime(‘%Y-%m-%d %H:%M:%S’) %}
{% set data.prices = data.prices + [{
‘start’: local_start,
‘end’: local_end,
‘price’: (((state.price/10 | float) * tax + additional_cost)) | round(3, default=0)
}] %}
{% endfor %}
{{ data.prices }}
{% else %}
[]
{% endif %}
tax: 0,000
additional_cost: 0,000
region: nl
Hello, do you find a solution? I think i have the same issue. But I have the error below:
“`
AttributeError: ‘NoneType’ object has no attribute ‘lower’
“`
at the end of my template.
Thank you
Hi Toni,
I’m wondering how should I configure AIO Energy Management in configuration.yaml in order to achieve a low price limit in addition to the required hours, which I already got working.
I’ll elaborate. Now I have input_number.required_hours setting up the number_of_hours variable for the AIO. I would like to set a limit of price to achieve that the amount of selected hours could be higher than number_of_hours, if the price is lower than the limit. And the minimum amount of hours set by number_of_hours would still always be chosen, even if the prices are higher than the limit the whole day.
Hi!
Currently it’s not possible to have more hours than number_of_hours.
However, don’t throw all your hope out yet as it’s in my TODO list to add such a support 🙂
More info on the GitHub project page: https://github.com/kotope/aio_energy_management/issues/105
I’ll try to implement this feature during December.
Hi. I’m a newbee regarding both HA and AIO. I get the sensor to work, but I’m confused about two things (and ChatGTP have not been able to solve it for me 😉 )
* Hours seems to need to be int? Does quarter of hours not work?
* How do I change first / last hour dynamically, i.e. my thougt was that as I plug in the car in the charger I wanted to reload the AIO optimization and that it then should relate to when I want to unplug the car again.
Hi!
We’ve all been newbies once 🙂
Only full hours supported at the moment. Quarter hours (15min) maximum amount will be implemented once I find some spare time to do so.
And unfortunately first_hour and last_hour can’t be dynamic, haven’t actually thought that those could bebe dynamic as well.
On your use case of the car charging it could be difficult to get the behaviour you are looking for. AIO is designed to calculate cheapest hours for the next day. Even if there were dynamic support for first and last hours, connecting the charger after 00:00 would calculate hours for the next day, and obviously prices are not available yet for that.
The functionality you are looking for is interesting though. I need to think about if I could add another feature to suit this need.
Thanks! I guess (?) I could configure a number of different sensors, and then pick and choose from them. But would probably quite complicated…
I have the below code:
cheapest_hours:
– nordpool_official_config_entry: 01KB036ZYHRGB7QXV3NR1M0J64
unique_id: cheapest_hours_car
name: Cheapest Hours Car
first_hour: 14
last_hour: 8
starting_today: true
number_of_hours: 3
sequential: false
failsafe_starting_hour: 1
mtu: 15
price_modifications: >
{# Spotpris i SEK/kWh (om integration rapporterar öre/kWh, justera om behövs) #}
{%- set spot = price | float / 100.0 %}
{# Energi‑ och effektavgifter enligt Nord Pool eller ditt elavtal #}
{%- set energy_price = spot %}
{# Vattenfall Eldistribution elnätsavgift – default #}
{%- set network_fee = 0.268 %}
{# Identifiera höglastid (vardag 06–22 under kallperiod) #}
{%- set month = time.month %}
{%- set hour = time.hour %}
{%- set weekday = time.isoweekday() %}
{%- if (weekday = 6) and (hour
{# Spotpris i SEK/kWh (om integration rapporterar öre/kWh, justera om behövs) #}
{%- set spot = price | float / 100.0 %}
{# Energi‑ och effektavgifter enligt Nord Pool eller ditt elavtal #}
{%- set energy_price = spot %}
{# Vattenfall Eldistribution elnätsavgift – default #}
{%- set network_fee = 0.268 %}
{# Identifiera höglastid (vardag 06–22 under kallperiod) #}
{%- set month = time.month %}
{%- set hour = time.hour %}
{%- set weekday = time.isoweekday() %}
{%- if (weekday = 6) and (hour < 22) %}
{%- set network_fee = 0.670 %}
{%- endif %}
{# Energiskatt (SE): exempel ca 36,96 öre/kWh = 0.3696 SEK/kWh #}
{%- set energy_tax = 0.3696 %}
{# Moms 25% på energi och nätavgifter #}
{%- set pre_vat = energy_price + network_fee + energy_tax %}
{%- set with_vat = pre_vat * 1.25 %}
{{ with_vat | round(4) }}
It results in:
List
– start: '2025-12-16T23:15:00+01:00'
end: '2025-12-17T00:00:00+01:00'
– start: '2025-12-17T02:00:00+01:00'
end: '2025-12-17T04:15:00+01:00'
Active number of hours
3
Failsafe
start: '01:00:00'
end: '04:00:00'
Expiration
17 December 2025 at 16:00:00
Updated at
16 December 2025 at 16:00:03
Fetch date
16 December 2025
Name
Cheapest Hours Water
Type
CheapestHoursBinarySensor
Calendar
true
Archived
– start: '2025-12-16T01:00:00+01:00'
end: '2025-12-16T04:00:00+01:00'
Max price
7.06
Min price
6.83
Mean price
7.01
First hour
20
Last hour
15
Starting today
true
Number of hours
2
Failsafe starting hour
2
Is sequential
true
Failsafe active
false
Inversed
false
And
List
– start: '2025-12-16T23:15:00+01:00'
end: '2025-12-17T00:00:00+01:00'
– start: '2025-12-17T02:00:00+01:00'
end: '2025-12-17T04:15:00+01:00'
Active number of hours
3
Failsafe
start: '01:00:00'
end: '04:00:00'
Expiration
17 December 2025 at 09:00:00
Updated at
16 December 2025 at 21:51:41
Fetch date
16 December 2025
Name
Cheapest Hours Car
Type
CheapestHoursBinarySensor
Calendar
true
Archived
Max price
7.06
Min price
6.83
Mean price
7.01
First hour
14
Last hour
8
Starting today
true
Number of hours
3
Failsafe starting hour
1
Is sequential
false
Failsafe active
false
Inversed
false
The are both 3 hour long, and have on and off. It seems both will be on for three hours in total, and that they both have split on-periods. I thougt one of them should have a solid block of hours scheduled?
Looks like you’ve hit a bug with the sequential hours (https://github.com/kotope/aio_energy_management/issues/134).
I’ve tried to reproduce this multiple time, but haven’t been successful of repeating this one.
I got a few questions for you, that could help me solve this bug:
– Have you had non-sequential configuration in use earlier with the same sensor?
– Which timezone are you in?
Hi Toni,
Thanks you for your great work. I’ve been using your previous version of cheapest hours for a while and now your new AIO. Everything works great! But I have a question, if the cheapest hours go past midnight, then two entries are created in the calendar. The automation I created for battery charging starts in the first hour e.g. from 23:00 and stops at 00:00, but it does not start in the next hour e.g. from 00:00 to 02:00. It turns out that the binary sensor simultaneously changes state from on to off and vice versa?
Hi and thanks for the nice feedback Aivars!
binary_sensor should not reset off/on even when going past midnight. If it’s happening for you, there’s probably a bug somewhere hidden. Could you provide me a screenshot of your binary_sensor event log so I can check it out? If yes, please send it to me to creatingsmarthome (at) gmail.com 🙂
Hi Toni, thanks for quick replay. This only happened once, if it happens again I will send you a log.
Hi all,
I’m sorry if this is a total newbie question.
I currently have the following code in my configuration.yaml. When I try to add a calendar card to a dashboard it says no calendar entities are found. I also have no clue how I can retrieve the list with cheapest three hours. When I go to view all entities the AIO Energy Management integration only has an ‘update’ entity nor can I seem to find a ‘cheapest_hours_battery_charging’ sensor.
aio_energy_management:
calendar:
unique_id: energy_management_calendar
name: Energy Management Calendar
cheapest_hours:
– nordpool_official_config_entry: 01K1VE0W479MEEH1N2WXBFVQT5
unique_id: cheapest_hours_battery_charging
name: Cheapest Hours Battery Charging
first_hour: 0
last_hour: 23
starting_today: false
number_of_hours: 3
sequential: true
failsafe_starting_hour: 1
price_modifications: >
{%- set as_cent = price / 10.0 %}
{{ as_cent }}
I might be missing something simple. I also am not sure how I can see or test if the integration is installed correctly in the first place?
First check the home assistant logs. If there’s a configuration error, you should see it in the logs.
As you see the integration your installation should be ok. Either configuration issue or error with Nord pool most likely.
But once you check the logs, we know more 🙂
Hi
This is the only somewhat related error. But it only happens once a day when new prices are fetched and just works after a retry I think.
Logger: homeassistant
Source: components/nordpool/services.py:161
First occurred: January 2, 2026 at 12:00:09 PM (39 occurrences)
Last logged: 2:00:12 AM
Error doing job: Task exception was never retrieved (None)
Traceback (most recent call last):
File “/usr/local/lib/python3.13/site-packages/aiohttp/client_reqrep.py”, line 539, in start
message, payload = await protocol.read() # type: ignore[union-attr]
^^^^^^^^^^^^^^^^^^^^^
File “/usr/local/lib/python3.13/site-packages/aiohttp/streams.py”, line 680, in read
await self._waiter
asyncio.exceptions.CancelledError
The above exception was the direct cause of the following exception:
Traceback (most recent call last):
File “/usr/src/homeassistant/homeassistant/components/nordpool/services.py”, line 146, in get_prices
price_data = await func(
^^^^^^^^^^^
……
)
^
File “/usr/src/homeassistant/homeassistant/components/nordpool/services.py”, line 120, in get_prices_for_date
return await client.async_get_delivery_period(
^^^^^^^^^^^^^^^^^^^^^^^^^^^^^^^^^^^^^^^
……
)
^
File “/usr/local/lib/python3.13/site-packages/pynordpool/__init__.py”, line 127, in async_get_delivery_period
data = await self._get(API + “/DayAheadPrices”, params)
^^^^^^^^^^^^^^^^^^^^^^^^^^^^^^^^^^^^^^^^^^^^^^^^
File “/usr/local/lib/python3.13/site-packages/pynordpool/__init__.py”, line 231, in _get
async with self._session.get(
~~~~~~~~~~~~~~~~~^
path, params=params, timeout=self._timeout
^^^^^^^^^^^^^^^^^^^^^^^^^^^^^^^^^^^^^^^^^^
) as resp:
^
File “/usr/local/lib/python3.13/site-packages/aiohttp/client.py”, line 1510, in __aenter__
self._resp: _RetType = await self._coro
^^^^^^^^^^^^^^^^
File “/usr/local/lib/python3.13/site-packages/aiohttp/client.py”, line 779, in _request
resp = await handler(req)
^^^^^^^^^^^^^^^^^^
File “/usr/local/lib/python3.13/site-packages/aiohttp/client.py”, line 757, in _connect_and_send_request
await resp.start(conn)
File “/usr/local/lib/python3.13/site-packages/aiohttp/client_reqrep.py”, line 534, in start
with self._timer:
^^^^^^^^^^^
File “/usr/local/lib/python3.13/site-packages/aiohttp/helpers.py”, line 713, in __exit__
raise asyncio.TimeoutError from exc_val
TimeoutError
The above exception was the direct cause of the following exception:
Traceback (most recent call last):
File “/usr/src/homeassistant/homeassistant/components/template/coordinator.py”, line 140, in _handle_triggered_with_script
if script_result := await self._script.async_run(run_variables, script_context):
^^^^^^^^^^^^^^^^^^^^^^^^^^^^^^^^^^^^^^^^^^^^^^^^^^^^^^^^^^^
File “/usr/src/homeassistant/homeassistant/helpers/script.py”, line 1833, in async_run
return await asyncio.shield(create_eager_task(run.async_run()))
^^^^^^^^^^^^^^^^^^^^^^^^^^^^^^^^^^^^^^^^^^^^^^^^^^^^^^^^
File “/usr/src/homeassistant/homeassistant/helpers/script.py”, line 460, in async_run
await self._async_step(log_exceptions=False)
File “/usr/src/homeassistant/homeassistant/helpers/script.py”, line 526, in _async_step
self._handle_exception(
~~~~~~~~~~~~~~~~~~~~~~^
ex, continue_on_error, self._log_exceptions or log_exceptions
^^^^^^^^^^^^^^^^^^^^^^^^^^^^^^^^^^^^^^^^^^^^^^^^^^^^^^^^^^^^^
)
^
File “/usr/src/homeassistant/homeassistant/helpers/script.py”, line 556, in _handle_exception
raise exception
File “/usr/src/homeassistant/homeassistant/helpers/script.py”, line 524, in _async_step
await getattr(self, handler)()
File “/usr/src/homeassistant/homeassistant/helpers/script.py”, line 1009, in _async_step_call_service
response_data = await self._async_run_long_action(
^^^^^^^^^^^^^^^^^^^^^^^^^^^^^^^^^^
……
)
^
File “/usr/src/homeassistant/homeassistant/helpers/script.py”, line 624, in _async_run_long_action
return await long_task
^^^^^^^^^^^^^^^
File “/usr/src/homeassistant/homeassistant/core.py”, line 2835, in async_call
response_data = await coro
^^^^^^^^^^
File “/usr/src/homeassistant/homeassistant/core.py”, line 2878, in _execute_service
return await target(service_call)
^^^^^^^^^^^^^^^^^^^^^^^^^^
File “/usr/src/homeassistant/homeassistant/components/nordpool/services.py”, line 161, in get_prices
raise ServiceValidationError(
……
) from error
homeassistant.exceptions.ServiceValidationError: There was a connection error connecting to the API. Try again later
This is a timeout error from nord pool service to nord pool API.
Not directly related to AIO, but ultimately triggered by AIO Energy Management.
Nothing to worry about and something that “can’t” be fixed on AIO side.
Yes, I figured as much indeed.
So what else could be the reason it’s not working?
Is there anything else I need to do besides installing through HACS and adding the config above to configuration.yaml?
Could you send your full AIO configuration to me on creatingsmarthome (at) gmail.com?
I could test your configuration on my dev env to see if it works for me. I could also take it out of the comment, but the indentations and quotes could get wrong and be the issue on that case.
The instructios are very vague. It does not say where each code should go. Also the examples on the github page do not work even if the ID is changed. And why not an example how to include most expensive hours to use residential batteries?
Excellent comment. The problem of defining the specific place of the code is that all the systems are not same. This article assumes you have the basic knowledge of Home Assistant and know where to put the data.
As I’m using Home Assistant packages, all my examples goes to packages unless stated otherwise (maybe this should be stated in the article though..)
What comes to the most expensive hours, this guide is more of moving from Nord Pool custom component to Home Assistant core integration. If you wish to see more AIO Energy Management examples, check the previous AIO Energy Management articles. From there you should find the examples needed 🙂
The GitHub example id change issue you need to explain more as I didn’t quite understand it from this comment.
Template stopped working after core update 2026.2.1
Odd, I’m also on 2026.2.1 and everything is working well.
Have you checked home-assistant logs to see if there are more details about this?
I had to change this part a bit:
– triggers:
– trigger: time_pattern
minutes: /1
– trigger: homeassistant
event: start
action:
– service: nordpool.get_prices_for_date
data:
config_entry: 01XXXXXXXXXXXXXXXXXXXXXXXX
date: “{{ now().date().isoformat() }}”
areas: “FI”
currency: EUR
response_variable: today_price
– service: nordpool.get_prices_for_date
data:
config_entry: 01XXXXXXXXXXXXXXXXXXXXXXXX
date: “{{ (now() + timedelta(days=1)).date().isoformat() }}”
areas: “FI”
currency: EUR
response_variable: tomorrow_price
This is the error I get in Home Assistant log:
Logger: homeassistant.components.sensor
Source: helpers/entity_platform.py:680
integration: Sensor (documentation, issues)
First occurred: 13:30:06 (1 occurrence)
Last logged: 13:30:06
Error adding entity sensor.electricity_prices for domain sensor with platform template
Traceback (most recent call last):
File “/usr/src/homeassistant/homeassistant/components/sensor/__init__.py”, line 689, in state
numerical_value = float(value) # type:ignore[arg-type]
ValueError: could not convert string to float: ‘unavailable’
The above exception was the direct cause of the following exception:
Traceback (most recent call last):
File “/usr/src/homeassistant/homeassistant/helpers/entity_platform.py”, line 680, in _async_add_entities
await self._async_add_entity(
entity, False, entity_registry, config_subentry_id
)
File “/usr/src/homeassistant/homeassistant/helpers/entity_platform.py”, line 998, in _async_add_entity
await entity.add_to_platform_finish()
File “/usr/src/homeassistant/homeassistant/helpers/entity.py”, line 1395, in add_to_platform_finish
self.async_write_ha_state()
~~~~~~~~~~~~~~~~~~~~~~~~~^^
File “/usr/src/homeassistant/homeassistant/helpers/entity.py”, line 1018, in async_write_ha_state
self._async_write_ha_state()
~~~~~~~~~~~~~~~~~~~~~~~~~~^^
File “/usr/src/homeassistant/homeassistant/helpers/entity.py”, line 1163, in _async_write_ha_state
) = self.__async_calculate_state()
~~~~~~~~~~~~~~~~~~~~~~~~~~~~^^
File “/usr/src/homeassistant/homeassistant/helpers/entity.py”, line 1070, in __async_calculate_state
state = self._stringify_state(available)
File “/usr/src/homeassistant/homeassistant/helpers/entity.py”, line 1024, in _stringify_state
if (state := self.state) is None:
^^^^^^^^^^
File “/usr/src/homeassistant/homeassistant/components/sensor/__init__.py”, line 691, in state
raise ValueError(
……
) from err
ValueError: Sensor sensor.electricity_prices has device class ‘None’, state class ‘None’ unit ‘Euro/kWh’ and suggested precision ‘None’ thus indicating it has a numeric value; however, it has the non-numeric value: ‘unavailable’ ()
I’ve changed the template as follows, now it’s functioning again.
– triggers:
– trigger: time_pattern
minutes: /5
– trigger: homeassistant
event: start
actions:
– action: nordpool.get_prices_for_date
data:
config_entry: 01xxxxxxxxxxxxxxxxxxxxxxxx
date: “{{ now().date() }}”
areas: “{{ this.attributes.get(‘region’, ‘NL’) }}”
currency: EUR
response_variable: today_price
– action: nordpool.get_prices_for_date
data:
config_entry: 01xxxxxxxxxxxxxxxxxxxxxxxx
date: “{{ now().date() + timedelta(days=1) }}”
areas: “{{ this.attributes.get(‘region’, ‘NL’) }}”
currency: EUR
response_variable: tomorrow_price
sensor:
– name: Electricity prices
unique_id: electricity_prices
unit_of_measurement: “EUR/kWh”
icon: mdi:cash
state: >
{% set region = this.attributes.get(‘region’, ‘NL’) %}
{% if today_price is mapping and tomorrow_price is mapping %}
{% set data = namespace(prices=[]) %}
{# Convert EUR/MWh → EUR/kWh by dividing by 1000 #}
{% for state in today_price[region] %}
{% set data.prices = data.prices + [(state.price / 1000) | float] %}
{% endfor %}
{% for state in tomorrow_price[region] %}
{% set data.prices = data.prices + [(state.price / 1000) | float] %}
{% endfor %}
{{ min(data.prices) | round(6) }}
{% else %}
0
{% endif %}
attributes:
region: NL
tomorrow_valid: >
{% set region = this.attributes.get(‘region’, ‘NL’) %}
{{ tomorrow_price is mapping and tomorrow_price[region] | list | count > 0 }}
data: >
{% set region = this.attributes.get(‘region’, ‘NL’) %}
{% if today_price is mapping and tomorrow_price is mapping %}
{% set data = namespace(prices=[]) %}
{% for state in today_price[region] %}
{% set local_start = as_datetime(state.start).astimezone().strftime(‘%Y-%m-%d %H:%M:%S’) %}
{% set local_end = as_datetime(state.end).astimezone().strftime(‘%Y-%m-%d %H:%M:%S’) %}
{% set data.prices = data.prices + [{
‘start’: local_start,
‘end’: local_end,
‘price’: (state.price / 1000) | round(6)
}] %}
{% endfor %}
{% for state in tomorrow_price[region] %}
{% set local_start = as_datetime(state.start).astimezone().strftime(‘%Y-%m-%d %H:%M:%S’) %}
{% set local_end = as_datetime(state.end).astimezone().strftime(‘%Y-%m-%d %H:%M:%S’) %}
{% set data.prices = data.prices + [{
‘start’: local_start,
‘end’: local_end,
‘price’: (state.price / 1000) | round(6)
}] %}
{% endfor %}
{{ data.prices }}
{% else %}
[]
{% endif %}
Mine stopped working too, I will try your edited version.
Unfortunately your edited version didn’t help me.