

Home Assistant: Scheduling the car heater
Winter is coming once again and pre-heating car is needed when the temperature drops below five degrees. This automation is something that I wrote to a friend of mine and he has been using it for a year now for two cars, so I’d say it’s usable since I’ve had no complaints about it 🙂
Full package can be downloaded from my GitHub repository at https://github.com/kotope/ha_car_heater
This is automation is based on existing automation, but this has quite many tweaks compared to the original. Original can be found from here (thanks to the original author as well).
What does it do?
The grand idea is to make pre-heating car as simple as possible. You set departure time from Home Assistant UI and the automation handles the rest.
Of course below the hood there’s more logic:
- User sets the departure time from UI
- Automation calculates how long should the heating be on using current temperature
- Will run only if temperature drops < 10
- Formula: temperature * -0.05 + 1
- Summary: -30c = 2.5h; -20c = 2h; -10c = 1.5h; 0c=1h; +5c=0.8h
- 3 hours before departure automation re-checks the temperature and does adjustments to heating time
- At calculated heater start time checks the power comsumption of the plug
- If power consumption stays at zero, send push notification to user to check if power cable is connected
- Stop heating at departure time
Also there’s also a text included that shows the current status of the automation.
Requirements
Required and optional hardware for this to work:
- Home Assistant supported outdoor plug with power consumption support (e.g. Nedis Outdoor plug flashed with Tasmota. Note: latest Nedis plugs might contain other than ESP8266 and cannot be flashed to use Tasmota)
- Home Assistant supported Outdoor temperature sensor (OPTIONAL)
Installation
Automation is created as a package, because it includes input components, helpers and automations. Download the car_heater.yaml package from https://github.com/kotope/ha_car_heater/blob/main/car_heater.yaml and copy to Home Assistant configuration directory. The package can be set up by adding it to configuration.yaml like this:
homeassistant:
  packages:
    car_heater: !include car_heater.yaml
After including the package in the configuration file, we should setup proper entities in the package file. Entities that needs to be added are: (All changed entities are marked as #CHANGE-ME in the car_heater.yaml file).
Car heater power switch
entity_id: switch.car_heater
This switch is the main switch entity that connects the car heater to the power socket.
Car heater power consumption
entity_id: sensor.car_heater_power
This is the power consumption sensor used to verify, that the power cable is physically connected.
Temperature sensor
entity_id: weather.home.attributes.temperature
Outside temperature sensor that is used to calculate proper heating times. This can be used from local weather service integration or some separate temperature sensor.
Notification entity
service: notify.mobile_app_samsung_s10
Service id to send notification, if the power cable is unplugged.
…and restarting
Finally after changing entities and devices it’s time to verify the config and restart the Home Assistant configuration interface.
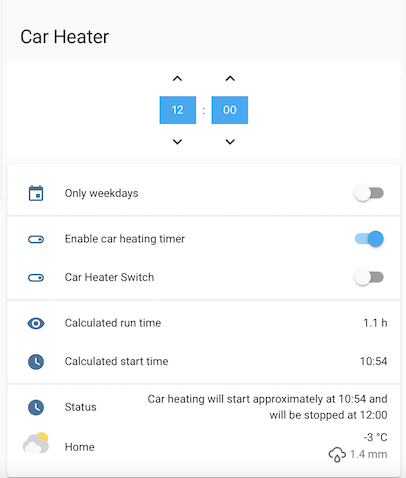
Example UI
For the UI, I’m trying make it as simple as possible. In stock Home Assistant there’s not a very usable time picker car so with this UI I’m using a custom card called time-picker-card (also installable using HACS).
Example UI has time picker for scheduled departure, enable only weekdays switch, enabling/disabling the scheduler, manually controllable car heating plug, run time length and start time. Also some status information along with current outside temperature.
Example UI can be also downloaded directly from GitHub: https://github.com/kotope/ha_car_heater/blob/main/sample_lovelace_ui.yaml.
Awesome!
I was googling this today on the 25th so the timing could not have been better!
Hi,
I have 6 of those Nedis plugs with flashed Tasmota’s from Puuilo and Motonet and now one for the Car heater just got this automation! Thanks.
Too sad that new ones has that Beken chip.
The old patch of the Nedis WIFIPO120FWT devices are still in sale. Working ones has that “works with Amazon Alexa and Google Assistant” in the Circle.
Non working devices has fancy Alexa and Google logos at the right bottom corner of the package.
Great automation, Toni! A couple of questions from a Home Assistant newbie:
-Where do I find the Device ID to use for receiving notifications?
-The calculated run time is always 2.5h regardless of the outside temperature, some examples of what I’ve tried so far:
value: ‘{{ states.sensor.temperatur_ute }}’
value: ‘{{ sensor.temperatur_ute }}’
value: ‘{{ states.weather.********.attributes.temperature }}’
https://imgur.com/a/IhDuN2w
BR
Jesper from Sweden
Hi!
An excellent first question! I snooped around, but could not actually find the device_id anywhere anymore.. a long time ago it was visible in Home Assistant Companion app, but could not find it anymore. (I’ve been just copy pasting the device_id from another automations so far).
You can replace the notification sending by changing it to call entity instead like this:
– service: notify.mobile_app_samsung_s10
message: Car heater
title: Car heating power cable is not connected!
For the second question I’d suggest to use the developer tools template editor to find the proper outside temperature sensor and it’s value. (You can also use developer tools ‘states’ view to find the proper entity first).
e.g.
My outside temperature works with value:
{{ states(‘sensor.temperature_outdoor’) }}
..and through the weather integration:
{{ states.weather.home.attributes.temperature }}
However, that is totally dependant of your entity or weather integration you are using.
Point is to get numeric decimal value out of outside temperature value.
Ps. I will update the automation template from GitHub to support this new style notification sending in few days. Thanks for mentioning this issue 🙂
Thanks a lot for the reply! I managed to fix error no 2, but the notification problem is still there, so I’ll wait until you update it on GitHub!
Hi,
Finally had time to make the changes.
So the notification service is now changed on the GitHub code and also fixed one small issue in the same automation block (had extra ‘ slipped in accidentally).
Feel free to try it out now and please send me some feedback if it works properly now 🙂
Thank you so much!
Works perfectly fine with notifications and all. I would just want to modify one thing and that is to make the run time a little bit longer. What should i change and to what to extend every activation with say 30 minutes or so?
Hi and thanks for the feedback!
Runtime calculation can be found from car_heater.yaml line 194:
{{(states(‘input_number.car_heater_3h_before_temp’)|float * (-0.05) + 1)|round(1)}}
As mentioned in this article the formula is: (temperature * -0.05 ) + 1
So if you like to add static 30min (1/2 hours) to all calculated values you could modify the formula like: (temperature * -0.05 ) + 1 + 0.5
Changing the line 194 as below should do the trick:
{{(states(‘input_number.car_heater_3h_before_temp’)|float * (-0.05) + 1 + 0.5)|round(1)}}
Thank you for a quick reply. Works great! 🙂
I have to correct myself. It doesn’t work as I thought. I seem to have the same issue as Jesper above, but for me the calculated run time is fixed at 1.8 hours (without the addition of the 30 minutes from the previous question). I have tried all variants with both weather- and sensor attributes and if I use the developer template the correct value is displayed. I just can’t get that part to work.
Can you send me your car heater package (with your entities in place) and I’ll check the validity of it and try to reproduce the issue on my own environment?
If yes, please send it to creatingsmarthome (at) gmail.com and I’ll have a look on it.
Thanks for the automation, just what i was looking for! There will be cold in Finland soon!
Hey.
I don’t understand how the outdoor temperature sensor should increase. The calculated run time is always 2.5h regardless of the outside temperature. I have tried many different options to replace this.
value: ‘{{states.weather.home.attributes.temperature}}’
For example, this
value: “{{states.sensor.ulkolampotila}}” This does not work.
Hi!
Please try to add that “{{states.sensor.ulkolampotila}}” in ‘developer tools->template editor’ section of your Home Assistant to verify that you get the value properly from that device.
And just to clarify that the runtime is only updated in two states of the automation: when enabling the timer and second time three hours before departure time.
Please post the results of your template editor and lets continue troubleshooting 🙂
“<template TemplateState()>”
but still not working. did i need to add my own outdoor temperature sensor to just one line?
“<template TemplateState()>”
Hi,
That response from developer tools/template editor is wrong. You should get proper temperature value out of it, like ‘-10.0’. That means that your entity is wrong in the automation as well.
Temperature entity is in two places of the package (marked as CHANGE-ME comment in the yaml file).
So, try to find the proper entity for your temperature or weather sensor (which ever you want to use).
{{ states(‘sensor.ulkolampotila’) }}
Result type: string
-7.8
This template listens for the following state changed events:
Entity: sensor.ulkolampotila
Configuration invalid
if i put this on it still won’t work.
Error loading /config/configuration.yaml: invalid key: “OrderedDict([(“states(‘sensor.ulkolampotila’)”, None)])”
in “/config/packages/car_heater.yaml”, line 14, column 0
now it works! 😀
‘{{states.sensor.ulkolampotila.state}}’
Great
Had the same issue. Your code solved it!
I use the outdoor sensor of my Nibe heat pump.
Thanks! I had the very same error.
I have a Nedis outdoor plug of the latest model. As I understand it, that contact is not able to control the car heater. To make it work which outdoor plug should I buy?
Hi!
I’ve been only using the older Nedis outdoor plugs myself so I really can’t guarantee any other models to work. However the automation should work with any other outdoor plug as well that has a power consumption measurement and HA support.
Few key points I’d suggest:
– Search for an outdoor plug with local connectivity rather than a cloud
– Enough amperages to handle car heater loads (16A)
– Power consumption measurements
– HA support (obviously)
I can recommend Shelly 1pm, but it needs to be installed inside an electrical socket.
However, you should be able to make the latest Nedis model to work as well. Just install it on HA with Tuya integration.
One thing about automation you might have to chgange is the interval when checking if the car heater cable is connected. Few key steps:
– Turn on the plug through home assistant
– Measure the time it takes to actually update consumption value on Home Assistnt end after turning on the plug
– Change the measured value into automation line 48 (timeout: 00:00:35)
Hi
I don´t know i you solved your issue with a new Nedis smart plug. I use one myself and I´ve managed to get it to work without flashing the device. Added the plug via Tuya intergration. In entities the sensors were deactivated by default. Activated the three sensors. My enitites are called:
switch.outdoor_smart_plug_socket_1
sensor.outdoor_smart_plug_power
sensor.outdoor_smart_plug_current
sensor.outdoor_smart_plug_voltage
Since the original code was sensor.car_heater_power i used the first sensor in my solution.
Is it absolutely necessary to have Tasmota? Could you not just use any smartplug? For example a Shellyplug with original firmware?
Hi,
Yes of course you can use any smart-plug.
However, you might want to tweak notification time at line 48 (timeout: 00:00:35) depending on how fast does your smart-plug notify about changed power consumption
I have 2 cars with car heaters. How do i solve that with this?
Hi!
1. Copy car_heater.yaml to car_heater_2.yaml
2. Change all ids of automations, input values and sensors to something unique (e.g.car_heater_status_2, car_heater_3h_before_start_time_2, car_heater_on_timer_2, etc…) for the newly copied yaml
* Remember to also change references inside the automations
3. Change the correct entities for the second car
4. Add also the second yaml file to packages in configuration.yaml
packages:
car_heater: !include car_heater.yaml
car_heater2: !include car_heater_2.yaml
Sweet, thank you so much for this automation.
Is it possible to change the calculations? Lets say its -1 here, now it starts an hour before departure, i would like to up the time a little bit. Maybe 1.5 hours before departure.
I figured out the start time, i changed the calculated value like this: float * (-0.05) + 1.5)
But about adding the second car. Could you make a list where the entries needs to be changed? I started, but unsure on quite a few if they need to changed or not 🙂
Hi,
Please send me an email to creatingsmarthome (at) gmail.com and I’ll send you car_heater_2.yaml file that you can use (of course remember to change your own entities in it) 🙂
I have the same problem with adding a second car. I’m not sure what to change. Can you send me car _heater_2.yaml
Sure thing! Check your mail in a moment 🙂
Hello, is it possible to have a version of “car 2” aswell?
Absolutely, check your email shortly!
Hi,
Can’t get this heater 2 working for another car. In how many places should i put the _2 change?
Quite many places in fact 🙂
I will send you a full package with the ready made conversations to your email.
Is it possible to make this car_heater_2.yaml public? I too would like to add an extra heater.
Really useful automation! Just what I have been searching for.
I was a bit worried when the times stopped working after HA update but the solution was waiting for me at your site. Thanks for that!
Hi,
Thanks for the great automation!
If i want to manually set run time, how can i do that ?
Easiest way would be to set ‘car_heater_run_time’ to something static (or maybe change it to input_datetime to be able to set it manually every time you want).
However, that would leave quite much of the automation void and there would be some non-required stuff in automation as well.
I would most probably start from the scratch and just take bits and pieces from the current automation.
Thanks! This was easy enough to implement =)
Works like a charm…
Now if only there was like a Calendar to this 😀
Calendar where you could input multiple departure times per day… I work mostly from home these days. Still every morning I gotta drive the kid to kindergarten and then in the late afternoon I fetch her home. Now I got two separate cards and automations running to achieve this
Nice automation and I am very happy that you have shared the setup. What do I need to adjust if I want to delay the stop of the car heater with say 1 hour? Sometimes the departure time can be delayed and I dont want the car to become cold again…When I leave a simply unplug the cord so no worries if the timer is delayed for me. Thanks
Hi,
I might have not undestood your question properly, but maybe you could just simply increase the departure time when you want to delay the start?
That could be one way of course and maybe the simplest but I can try to explain a little bit more. If I schedule to depart at 08:00 but I am late for some reason and leave first at 09:00 I dont want the automation to stop at 08:00. The automation could continue for another hour or two to avoid a cold car. Then if I leave 08:00 (or 08:30 if I am late) I unplug the cable from the car which results in zero energy consumption so it dosent matter if the automation is still running. With this little tweak I dont have to adjust the departure time (I bet I am in hurry if I am late 🙂 ). And the status information in Home assistant will also be correct which is nice
Thanks for clarifying it, now I understand your needs 🙂
in car_heater.yaml at line 105 there’s a following condition that turns off the plug at departure time:
value_template: ‘{{ now().time().strftime(“%H:%M:%S”) == states.input_datetime.car_heater_departure_time.state }}’
If you add a static value in that same condition in that automatio (turning off the switch) you should get what you are looking for.. like this:
value_template: ‘{{ (now().strftime(“%s”) | int + (60*60)) | timestamp_custom(“%H:%M:%S”, false) == states.input_datetime.car_heater_departure_time.state }}’
60*60 is offset in seconds (60 seconds * 60 minutes = 1h).
So by replacing the line 105 with code abofe, the plug turn off should be delayed by one hour from departure time.
Ps. I did not test that, so please try it out before actually using it so you won’t get a cold car in the morning 🙂
So now I have had time to test the code but it gives me the following error:
Logger: homeassistant.config
Source: config.py:464
First occurred: 12:30:06 PM (1 occurrences)
Last logged: 12:30:06 PM
Invalid config for [automation]: invalid template (TemplateSyntaxError: unexpected char ‘“’ at 19) for dictionary value @ data[‘condition’][0][‘conditions’][0][‘value_template’]. Got None. (See ?, line ?).
I have tried to find the error but no luck so far…do you see something that needs to be changed?
Hi,
If you copy-pasted my suggestion in previous reply, ensure that ‘ and ” marks are correct. It seems that WordPress seems to format those a bit wrong and are not actually proper quotes.
If you still are having issues, could you send your car_heatear.yaml to creatingsmarthome (at) gmail.com and I’ll have a look 🙂
I’ve tried to add this 1 hour delay in case I’m late. but now it doesn’t turn off at all.
Hi!
Thanks for the comment! This has been solved previously on a email with another commenter, but seems like I’ve forgot to post it as a comment in here.
There’s a but in the 1h delay functionality in above comment.. proper delay should work like this:
{{ now().time().strftime(“%H:%M:%S”) == (states.input_datetime.car_heater_departure_time.attributes.timestamp | int + (60*60)) | timestamp_custom(“%H:%M:%S”, false) }}
Hi,
Thanks for the great automation!
I tried to add this to my HA. But I keep gettings this error in my configuration:
Error loading /config/configuration.yaml: while parsing a block mapping
in “/config/packages/car_heater.yaml”, line 34, column 5
expected , but found ‘-‘
in “/config/packages/car_heater.yaml”, line 46, column 5
What am I doing wrong? I can mail you my car_heater.yaml with my entites if tou want to take a look?
Hi,
Please send the configuration to me on creatingsmarthome (at) gmail.com and I’ll have a look 🙂
Thank you!!! Bumped in this exactly when looking to build a scheduler for car heating, in Finland as well 🙂
Good to hear it’s helpful! Thanks for the coffee!
What I do wrong? When I change this line
# CHANGE-ME: car heater power switch (note: two entrys in this block)
to
entity: switch.lohkis_10a_128
I get this error:
Invalid config for [sensor.template]: [entity] is an invalid option for [sensor.template]. Check: sensor.template->sensors->car_heater_status->entity. (See ?, line ?).
You should not change that exact line but the two ones in the block below:
{% if is_state('switch.car_heater', 'on') %}->
{% if is_state('switch.lohkis_10a_128', 'on') %}
..and same goes all the # CHANGE-MEs.. they usually point to the row below or to the full block (like one above that mentions ‘two entries’.
Maybe not the most clear way to indicate needed changes, but I didn’t figure out any better when writing that automation guide 🙂
Ok, THANKS!! Got it working now 🙂
value: ‘{{ states.weather.home.attributes.temperature }}’ seems to be not working, don’t know what to put there.
Do you have weather integration installed on your Home Assistant instance?
I’m using met.no integration and have configured it named ‘home’.
So you most probably need to a) install weather integration and/or b) configure it as ‘home’ or change the entity name.
This you can easily check from your devices&services page from Home Assistant.
..or another option is to use external outside temperature sensor if you have one installed and integrated into Home Assistant.
value: ‘{{ states.weather.koti.attributes.temperature }}’ is working for me (accuweather).
I also have outside temperature sensor, entity: sensor.lampotila_ulkona_147, but what to put there? value: ‘{{ ?? }}’
You can use your sensor like this:
value: ‘{{ states.sensor.lampotila_ulkona_147.state }}’
…most probably. Details are depending of your temperature sensor, but 95% of cases works like that.
Hi,
I’m using plejd and having CTR-01 Relays on both engine heater sockets. Problem is theese don’t measure power. Is it still possible using this?
Absolutely, you just don’t get push notifications if the car heater fails to start, e.g. no cord plugged.
Just remove ‘car_heater_push’ automation from the package (delete lines from 34 to 61)
Wounderfull automation if I can manage to get it to work.
The good thing is that it turns off the outlet after departure-time, so some parts are working even for me 🙂 Also the thee automations “Turn on car heating immediately if needed” “Start engine heater at calculated start time” and “Stop engine heater at departure time” seems to work fine!
But I get 3 errors in the systemlog after setting a time and press/enable.. and the timer never starts..
Error1: Template variable error: ‘sensor’ is undefined when rendering ‘{{ sensor.inside_inside_inside_outside_temperature }}’ (Source: helpers/template.py:135)
Error2: Turn on car heating timer: Error executing script. Error for call_service at pos 1: Error rendering data template: UndefinedError: ‘sensor’ is undefined
Error3: Error while executing automation automation.turn_on_car_heating_timer: Error rendering data template: UndefinedError: ‘sensor’ is undefined
The sensor a netatmo “sensor.inside_inside_inside_outside_temperature” seems to work fine by it self, as far as I can tell, it register the temp outside in Celsius continiously.
But I still guess the problem is here..
Did try to change it to annother sensor “weather.forecast_myhome” delivered from “Meteorologisk institutt (Met.no): Home” but that one shows both temp/barometics/windspeed ect. But no go..
Any suggestions?
Hi!
Could you send your full modified package to creatingsmarthome (at) gmail.com and I’ll try to have a look if I can spot something odd from there? 🙂
I must be stupid but I cannot make it work. The outside temperatur will not get updated but are stuck on the initial -30 deg, hence a 2.5 hour duration for the heater.
I am using an external sensor to get the temperature and that sensor work and get good reading. However, the temperature will not get transferred to the entity “input_number.car_heater_3h_before_temp”.
In row 14 (and 159) in the script I have used several different versions:
value: ‘{{ sensor.z_wave_sensor_2_air_temperature }}’
value: ‘{{ states.sensor.z_wave_sensor_2_air_temperature }}’
I guess I have made some beginners mistake.
It’s difficult to say for sure, since I don’t know about your entities, but try to add .state at the end of the second item.
Like this:
value: ‘{{ states.sensor.z_wave_sensor_2_air_temperature.state }}’
Thank you for your quick reply!
No luck however when I added .state
If I check the value by using the template editor in the Developer Tools I get the expected value, in this case -1.86.
For some reason this value will not get correctly transferred.
After a restart it seems to work.
Excellent! Well done!
This is a great automation! A further optimization suggestion would be for the case when the departure time is reached in the script but the actual departure is delayed for some reason. Turning the heater off means the car could be cold when you go, leaving it on consumes unnecessary energy. Maybe the optimal would be to have it alternating between on and off in a cycle to keep it luke warm. Adjusting the duty cycle to the outside temperature would be an extra icing on the cake.
Hi, i get some strange behaviour that i cant figure out, wonder if you have some advice. It seems that i get the correct temperature and the calculation of the run time seems reasonable and follows the temperature. But the calculation of the start time is off, the estimated start time is after the departure time and the value “3h before departure time” is only 1h before the depparture time. So i get for example “car heating will start approximately at 11.12 and will be stoped at 10.00. Also the “time until set departure” is a negative number e.g. -787.0
Any hints what could be wrong? I first thought the clock in my installation could be off but it seems ok.
Hi!
Seems a bit odd. Could you send me the car_heatear.yaml to creatingsmarthome (at) gmail.com and I’ll see if I spot anything? Only from that information I’m not thinking of any possible reason, haven’t seen that kind of behaviour before.
Hi Toni,
Thanks, I sent you the file but meanwhile i was able to make a fix that works for now…
It seems that the comparison of time variables in the yaml file creates unexpected results for me. The start time is always 2h off and I think its related to convertion between unix time and local time but have not been able to figure out how to solve it properly.
For now I added a constant 7200s in this row
{{ strptime(((as_timestamp(‘1970-01-01 ‘ ~ states(‘input_datetime.car_heater_departure_time’)) – (7200 + states(‘sensor.car_heater_run_time’)|float *3600))|timestamp_custom), ‘%Y-%m-%d %H:%M:%S’).strftime(“%H:%M”)}}
And then I get correct start time.
Based on another thread I understand that this- sequence
{{ utcnow().tzinfo }}
{{ now().tzinfo }}
{{ now().astimezone().tzinfo }}
should give as result UTC, local time zone, local time zone
But in my case the last row gives UTC. My theory is that this is the cause for my issue
Excellent that you solved the problem!
However, I’m a bit curious what happened since I never got your .yaml file 🙂
Hi,
No matter what I do, I can’t make the time to change based on temperature and I am not sure even how to troubleshoot it. Any suggestions are welcome.
Thanks!
Hi!
Sorry for the late reply.
Could you send your modified car heater yaml package to me at creatingsmarthome (at) gmail.com and I’ll try to see if I can spot something odd in there?
Hi Toni,
is it possible for you or maybe someone else, im not confirm with that 🙁 ,to change the yaml code, so i can use a turn on & turn off script?
My car heater power switch will be a Luminea WiFi flush-mounted switch which is running on Google Assistant.
So i added the Google SDK to my Home Assistant and created 2 scripts.
These are both working well to switch the module on & off.
Also i´m running in at some set time issues.
I just can set the “Calculated start time” ones. After this the “Calculated start time” will first change after a reboot again.
Best
Tim
Hi, I have problem with adding the package to the end of HA 2023.1.3 configuration.yaml . The error I get is: “Unable to read car_heater.yaml” How I can fix this?
Hi!
Working fine with 2023.1.3 for me at least.
Maybe there’s some kind of configuration issue in your configuration.yaml?
Can you send me by email (creatingsmarthome (at) gmail.com) the lines from your configuration.yaml where you are including car_heater.yaml package? (or the full configuration.yaml file if in doubt)
moi.
yritän tässä itsekkin tuota värkkäillä käyttöön ja saan tuota samaa unable to read erroria. mistähän voisi johtua?
Hi!
If you can, please send your configuration.yaml to creatingsmarthome (at) gmail.com as well and I’ll have a look of your configuration too 🙂
(and lets try to keep the comment section in English, you can use Finnish on the email of course).
Hi Toni,
Thanks for the great automation!
I can´t test it in action since it’s warm in Stockholm now, but it looks fine so far and I got everything to work in the UI by reading the comments.
I think I have a little different question/use for it:
At 08:00 we use the car.
At 13:30 we use the same car again.
I guess it’s difficult to set two times in the UI and the way is to treat this as two cars like someone asked you about.
That is to copy ‘car_heater.yaml’ to ‘car_heater_2.yaml’ and add _2 to everything except ‘entity_id: switch.car_heater_switch’ and create two UI’s – “Car heater morning” and “Car heater afternoon”?
Best regards,
John
Hi!
First time I’ve hear of this kind of usage 🙂
I think the easiest way would indeed to make two separate automations (like if there were two cars).
If you need a pre-made car_heater_2.yaml, send me a mail to creatingsmarthome (at) gmail.com and I’ll send you a copy.
There’s quite much of id/entity changes to be made when making a copy.
Thank you! An e-mail is on its way! 🙂
Hi,
Can you tell which strings I’ll have to find/replace (add the “_2”) in the duplicated file in order to make such a copy?
I too need a second timer for the afternoon. In fact, I’d need 14 timers a week, but this will have to do for now.
Hello Toni,
Thanks for the great automation. This was exactly what I needed. It took some time to get it up and running. I had a little problem with the temperature sensor reading, but it is solved now.
Is it possible that you can send a copy of car_heater_2.yaml code for me?
Of course, send me an email to creatingsmarthome (at) gmail.com and I’ll send you the file 🙂
-Toni
I had problems with timezone or dst, resulting in Start Time was +1 hour. So when Departure Time was 22:00, Start Time was 22:30 (instead of 21:30) when Run Time was 30minutes.
I changed timestamp_custom() to timestamp_custom(local=False) and it fixed the problem.
Hope it help someone else.
Hey, Where in the code did you change that, because in the car_heater.yaml I could not find ‘timestamp_custom()’?
I am experiencing the problem of static start time of 2,5 hours before departure, no matter the temperature. As far as I know, there are two lines on car_heater.yaml where outdoor temperature sensor should be placed, and I have now on both lines this:
value: ‘{{states.sensor.outdoor_temperature.state}}’
That seem to output this on developer tools:
value: ‘-1.61’
I have restarted HA and everything, but calculated run time shows 2,5h anyway. Not sure if it’s expected but the card shows -1,6C instead of -1,61C, maybe that’s just rounding the number?
Rounding the value should not affect.
One thing that you should check through developer tools is if you’re sensor is returning ‘string’ or ‘number’.
You can check it when typing {{ states.sensor.outdoor_temperature.state }} at the developer tools template and see above the right view for result type like: ‘Result type: string’
If the value is a number, could you send your car_heater.yaml to creatingsmarthome (at) gmail.com and I’ll have a quick check if I can spot anything wrong?
It seems to be number. I will send you my yaml, thanks!
An update: Just a moment ago I decided to disable the car timer and enable it again. And now that static 2,5 hours changed to 0,7 hours! It’s 5C or so, so maybe that’s correct. Anyway, seems like restarting Home Assistant wasn’t enough, I needed to turn off switch “Enable car heating timer” from UI and then turn it back on!
I experience a similar issue and was able to “reset” the start time with disabling/enabling the timer.
By default, the calculated run time is only updated when enabling the schedule and before 3 hour mark of the scheduled heating.
So, it doesn’t update in real time, only when needed 🙂
Of course you could make an automation that updates the runtime every minute or so.
Therefore most probably everything is working as intended for you.
I still think there is an issue with the 3h mark update. I feel that the time can only update up, not down. I will follow the behaviour and report back.
Update: My fault. I found out that my outside temperature sensors lowest value is -9,9 °C, it doesn’t go lower than that. Your code works.
Great to hear you figured it out (and a bit relieved that there was no issue in the code itself) ! 🙂
Is it possible to change the code so that the car heater starts when it is below 5 degrees celcius rather than 10 degrees?
Hi Daniel!
Sure it’s possible to change.
Find this line and change ’10’ to something more suitable for you:
{% if ((states('input_number.car_heater_3h_before_temp')|float) < 10) %}Hi,
Thanks for a great add-on.!
I’m just starting out with HA and I’ve only got half a week’s experience so far. But I’ve managed to get this Car Heater to work, even though it took some trial and error.
I removed the functionality for power measurements, since my smart plug (Airam) doesn’t support that.
I even changed the row so that there’s 15 minutes of extra time after departure time. But the app doesn’t indicate on the card that there is any extra time, so I changed the text for the Car heater status. It now says “Heater will start at 06:06 and will stop at 07:00 plus 15 minutes”.
One thing that I’m missing though, is a week timer. I depart at different hours every day of the week, but these are repeated every week. (So, for instance 8:00 on all Mondays, 7:00 on all Tuesdays, and so on.
On top of that, I also need another car heating time in the afternoon every weekday.
I’ve managed these in another automaton app called OpenNetHome, but I am phasing that out in the near future. It does have a very flexible week timer, but that is nearly impossible to manage on a mobile phone.
So if someone could point me in the right direction for a timer like that, then I’d be very grateful.
Is it possible to add notification “car plug not connected” at evening before bedtime. Now the calculaited start time is 04:05 and it sends me notification when I´m still sleeping. It would be nice to have notification at evening, before I go to bed.
And can you send me car_heater_2.yaml, I need to add another automation.
Car plugged status can be verified only when the heating starts and power consumption begins.
So, in theory, you could be able to enable the heating for something like 30s at the evening and see if power is consumed and notify if not.
That would need an extra step to be implemented to the automation of course.
and for the car_heater_2.yaml. Please send me email to creatingsmarthome (at) gmail.com and I’ll reply you with the second package.
Thank you, a great tool for us people of ice and snow!
For my own purposes, I modified your code a bit. I removed the weekdays stuff and made it a one off. As in when the heater finishes, it also disables the heater, and I have to enable it manually again. I only go to the office now and then, but I always want to connect the cable when I arrive home. I don’t want the heater to run every morning.
When using the heater like this, I also made a cable test. When enabling the heater, it runs for 5 seconds and checks for power usage. If power is less than 100 W, it notifies the user.
Well, a long backstory. When debugging this, I had some odd behavior. Took some time for a beginner, but I finally found out, that the last line of the code does not evaluate the car_time_until_departure correctly over the midnight. So if now() and departure time are on different days, car_time_until_departure evaluates to negative numbers. Just for your information, should you wish to address this.
Vesa, you are correct! But this overnight bug appeared not long time ago, probably after HA update. Unfortunately now I have to set morning timer after midnight(( Tony, can you please help with this?
Hi Vesa and Igor!
I’ve made a fix for this and it can be found from a new branch: https://github.com/kotope/ha_car_heater/tree/issue/fix_negative_departure
I will merge it to the master branch once I’ve tested it fully with a real life scenario (now I’ve only mocked it during development).
Hopefully it works properly now 🙂
Oh and I’ve only changed ‘car_time_until_departure’ sensor on the bottom of the package, so it’s enough that you copy only that part.
If you can, please send feedback if it works properly with you now 🙂
Hi Vesa!
Thanks for pointing this out. I’ll have a look on it as soon as I can!
Hi, thanks for a great package, i have used it 2 winters now. But now i’m running to some problems, calculated run time wont change form 1,0 h. I have try different sensors between 20*C to -19*C and I updated to the newest version from github without change. Is any others having the same problem.
Hi!
Just tested it out as I haven’t used it either since last winter. Everything seemed to work ok.
I’ve figured out what doesn’t work. My thermometer does not update input_number.car_heater_3h_before_temp but if I change it manually the rest works as it should. I have replaced the sensor in two places, now can’t figure out what I need to change to get it working again.
Sorry, i messed up
Hi, I have this same problem, but I’m using the weather forecast temperature for this. When I set timer on, it reads current temp, but over night, if forecast temperature is changing, it does not update the timer. If I understand right, it should check every minute if temp is changed, but on my HA it doesn’t do it.
It only had one random 0,1h jump on calculated run time, but it’s not related to temperature changes.
Am I missing something or is this just not working with the weather forecast system?
It sets the run time 3h before the set departure time, based on the temperature at that time.
Hello
Is it possible to make it so that you can have two cars on different plugs in the same automation with different departure times?
You can use two packages, one for each car. Just need to change the automation and ids to unique so that they don’t mix up.
If you wish to have pre-made example of the second automation, send me mail to creatingsmarthome (at) gmail.com and I’ll send you the second example 🙂
https://github.com/kotope/ha_car_heater/blob/main/car_heater.yaml
if the file starts with automation: , it will create incorrect nesting, because Home Assistant already expects !include to point directly to a list.
Hi!
This implementation is a package, not only an automation.
When using packages you need to define type of functionality in the file as well (e.g. automation, input_number, sensor) etc..
If it would be just an automation and would be included in the automation block of Home Assistant, then nesting would be the end result and would not work. 🙂
More information about packages and how to include can be found from here:
https://www.home-assistant.io/docs/configuration/packages/
Tack!
It works very well. But now I’m thinking about switching off the engine heater. When I get home and plug in the engine heater wire, it’s still on. Is it the case that power on works but no logic to then turn it off?
The switch should turn off itself at departure time.
The functionality to turn off starts at line 95 and turn_off action is made at line 124.
So ensure your entity id is correct at line 126 🙂
Thank you for a great automation!
It’s already that time of year and I got this running easily enough (except for the notification part).
I cant get this to work. I have change everyting that i need to change in the file but still it says it dont find the entity 🙁
Stupid me 🙂 Ididen change it in the dashboard. Now it can find the entity but it always start 2,5 hours before. It dosent matter what temperature it is
Sounds issue where the temperature can’t be read.
Have you changed it like this if using external temperature sensor:
value: '{{ states.sensor.temperature_outdoor.state }}'And please note that it’s in two spots in the automation.
Yes i have change both of them. I got 3 errors in the log
Template variable error: ‘sensor’ is undefined when rendering ‘{{ sensor.vader_outdoor_temperature }}’
Sample temperature 3h before departure time: Error executing script. Error for call_service at pos 1: Error rendering data template: UndefinedError: ‘sensor’ is undefined
Error while executing automation automation.sample_temperature_3h_before_departure_time: Error rendering data template: UndefinedError: ‘sensor’ is undefined
Looks like the Sensor is undefined?
Now i got this errors instead
Sample temperature 3h before departure time: Error executing script. Invalid data for call_service at pos 1: expected float for dictionary value @ data[‘value’]
and
Error while executing automation automation.sample_temperature_3h_before_departure_time: expected float for dictionary value @ data[‘value’]
You need to use the state of the sensor. Like this:
{{ states.sensor.vader_outdoor_temperature.state }}Hopefully this will solve your issue 🙂
For me it started working after changing temp sensor to
states(”sensor.koket_ute_temperatur”)
I tried all other suggestions first written above in the comments but I saw in the code that “# CHANGE-ME: power consumption sensor” was written different and tried… ta da works 🙂
Thanks for your work Toni!
The latest Home Assistant update (2025.12.0) gave me a warning about “Legacy sensor template deprecations”.
This Car Heater addon was included in those warnings.
I have now made corrections to the YAML that you can use:
# NEW SENSOR TEMPLATES:
template:
– sensor:
unit_of_measurement: h
default_entity_id: sensor.car_heater_run_time
name: Calculated run time
state: “{% if ((states(‘input_number.car_heater_3h_before_temp’)|float) 0) %}\n {{ strptime(((as_timestamp(‘1970-01-01
‘ ~ states(‘input_datetime.car_heater_departure_time’)) – (states(‘sensor.car_heater_run_time’)|float
*3600))|timestamp_custom), ‘%Y-%m-%d %H:%M:%S’).strftime(\”%H:%M\”) }}\n {%else%}\n
\ Never\n {%endif%}\n{% else %}\n waiting for sensors\n{% endif%}”
– sensor:
default_entity_id: sensor.car_heater_3h_before_start_time
icon: mdi:clock
name: 3h before start time
state: “{% if states.input_datetime.car_heater_departure_time.state is defined
%}\n {{ strptime(((as_timestamp(‘1970-01-01 ‘ ~ states(‘input_datetime.car_heater_departure_time’))
– (10800))|timestamp_custom), ‘%Y-%m-%d %H:%M:%S’).strftime(\”%H:%M\”) }}\n{%
else %}\n waiting for sensors\n{% endif%}”
– sensor:
default_entity_id: sensor.car_heater_status
icon: mdi:clock
name: Car heater status
state: “{% if is_state(‘input_boolean.car_heater_enable’, ‘on’) %}\n {% if is_state(‘switch.airam_smart_plug_ip44_9620100’,
‘on’) %}\n Car heating is currently active and will stop at {{ states.input_datetime.car_heater_departure_time.attributes.timestamp
\ | timestamp_custom(\”%H:%M\”, false) }} plus 15 minutes\n {% else %}\n Heater
will start at {{ states.sensor.car_heater_start_time.state }} and will stop
at {{ states.input_datetime.car_heater_departure_time.attributes.timestamp |
timestamp_custom(\”%H:%M\”, false) }} plus 15 minutes\n {% endif%}\n{% else
%}\n {% if is_state(‘switch.airam_smart_plug_ip44_9620100’, ‘on’) %}\n Car
heating is active and controlled manually!\n {% else %}\n No car heating
scheduled\n {%endif %}\n\n{% endif%}”
– sensor:
default_entity_id: sensor.car_time_until_departure
icon: mdi:clock
name: time until set departure
state: “{%- if as_timestamp(now().strftime(\”%Y-%m-%d \”) + states.input_datetime.car_heater_departure_time.state)
# {% if ((states(‘input_number.car_heater_3h_before_temp’)|float)
# {% if states.input_datetime.car_heater_departure_time.state is defined %}
# {% if ((states(‘sensor.car_heater_run_time’)|float) > 0) %}
# {{ strptime(((as_timestamp(‘1970-01-01 ‘ ~ states(‘input_datetime.car_heater_departure_time’)) – (states(‘sensor.car_heater_run_time’)|float *3600))|timestamp_custom), ‘%Y-%m-%d %H:%M:%S’).strftime(“%H:%M”) }}
# {%else%}
# Never
# {%endif%}
# {% else %}
# waiting for sensors
# {% endif%}
# – platform: template
# sensors:
# car_heater_3h_before_start_time:
# friendly_name: ‘3h before start time’
# icon_template: mdi:clock
# value_template: >
# {% if states.input_datetime.car_heater_departure_time.state is defined %}
# {{ strptime(((as_timestamp(‘1970-01-01 ‘ ~ states(‘input_datetime.car_heater_departure_time’)) – (10800))|timestamp_custom), ‘%Y-%m-%d %H:%M:%S’).strftime(“%H:%M”) }}
# {% else %}
# waiting for sensors
# {% endif%}
# – platform: template
# sensors:
# car_heater_status:
# friendly_name: ‘Car heater status’
# icon_template: mdi:clock
# value_template: >
# {% if is_state(‘input_boolean.car_heater_enable’, ‘on’) %}
# {% if is_state(‘switch.airam_smart_plug_ip44_9620100’, ‘on’) %}
# Car heating is currently active and will stop at {{ states.input_datetime.car_heater_departure_time.attributes.timestamp | timestamp_custom(“%H:%M”, false) }} plus 15 minutes
# {% else %}
# Heater will start at {{ states.sensor.car_heater_start_time.state }} and will stop at {{ states.input_datetime.car_heater_departure_time.attributes.timestamp | timestamp_custom(“%H:%M”, false) }} plus 15 minutes
# {% endif%}
# {% else %}
# {% if is_state(‘switch.airam_smart_plug_ip44_9620100’, ‘on’) %}
# Car heating is active and controlled manually!
# {% else %}
# No car heating scheduled
# {%endif %}
#
# {% endif%}
# – platform: template
# sensors:
# car_time_until_departure:
# friendly_name: ‘time until set departure’
# icon_template: mdi:clock
# value_template: >-
# {%- if as_timestamp(now().strftime(“%Y-%m-%d “) + states.input_datetime.car_heater_departure_time.state) < as_timestamp(now()) -%}
# {{ ((as_timestamp(now().strftime("%Y-%m-%d ") +
# states.input_datetime.car_heater_departure_time.state) + (3600*24)) –
# as_timestamp(now().strftime("%Y-%m-%d %H:%M"))) / 60 }}
# {%- else -%}
# {{ (as_timestamp(now().strftime("%Y-%m-%d ") +
# states.input_datetime.car_heater_departure_time.state) –
# as_timestamp(now().strftime("%Y-%m-%d %H:%M"))) / 60 }}
# {%- endif -%}
Hi!
do you add these lines to heater config yaml or where? or is this alternative config to previous config?
hello.
After updating home assistant i now get repairs notifications saying “Legacy sensor template deprecation” and those are the sensors in this heating automation. How to fix this? Thank’s
Template syntax has been changed on Home Assistant core, but I have had no time to make the changes on the GitHub page.
If you wish to make the changes already you can check out Miccis comments 04/12/2025 at 15:03 below how to do it.
The codes in this page will be updated eventually as well. There’s about 6 months time frame until the old syntax stops working 🙂
Hi,
From Home Assistant version 2026.6 onward, this integration will no longer work because Template sensors are no longer supported in this form.
Has anyone already figured out how to update this Car_heater.yaml file so that the integration continues to work once that Home Assistant version goes into effect?
The Template changes themselves are easy to make so that Home Assistant understands them, but after that the Car_heater no longer works.
Thank you.
Hi and sorry for a late approval, the message was mistakenly marked as a spam.
Anyhow, the GitHub repository now contains updated version of the car heater that has no deprecated templates in use anymore 🙂
Updated version still has:
# CHANGE-ME: outside temperature sensor
value: ‘{{ states.weather.home.attributes.temperature }}’
in stead of:
# CHANGE-ME: outside temperature sensor
value: ‘{{ states.weather.home.attributes.temperature.states }}’
Hi,
Thanks for this great addon. Been using it for a while now. And even adapted it a little.
But would it be possible to have individual weekdays on/off instead of the “Only weekdays” option?
Like, one could tick just the individual days one would like. For instance just Tuesdays and Thursdays, instead of Mon-Fri or Mon-Sun.
Is there a smart way of doing this so that it doesn’t increase the height of the lovelace card too much? Like, with the days side by side.
Like in this image:
https://freeimage.host/i/fOgw0an
Can you paste your adaptation?