
E-ink dashboard for Home Assistant
One day I accidentally stumbled upon a devkit that is using ESP32 as a base with integrated 4.7″ e-ink display. What’s good in e-ink is that the display is only drawing power when the data is fetched and screen is refreshed, so it can easily be battery powered! And when doing battery powered, the placement of it is much much easier.
This time I didn’t think of writing a full guide since the same code would fit in no ones Home Assistant directly, but this is rather just an inspirational work report to get things on going.
Hardware
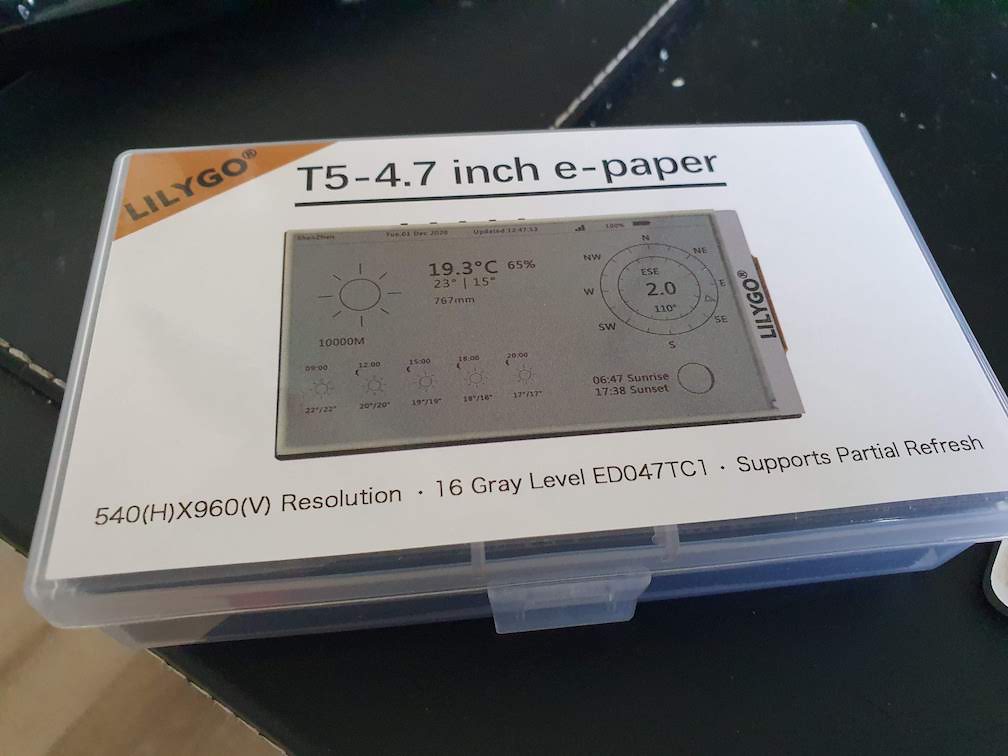
In this project I’m using LILYGO TTGO T5-4.7 Inch E-paper ESP32 devkit with 18650 Battery holder. It’s a ready made devkit with ESP32 running 4.7″ e-ink display and a 18650 battery holder. What’s good in this devkit is that it’s already 100% supported by ESPHome third party library, so the integration to home assistant is much simpler without the need to implement the core display functionality.
This devkit includes the battery protection and charger circuits, so when choosing the proper 18650 battery it needs to be unprotected in order to fit it in the slot. That’s 65mm total length when the protected batteries are 70mm.
4.7″ e-ink display has a resolution of 960×540 pixels. It’s quite much for a display of this size so no single pixels can be seen easily and everything looks very sharp.
3D Printed case
This hardware seems to be quite popular among the hobbyists so there’s tons of different 3D prints available at the thingiverse! Eventually I ended printing up this because it’s on landscape and has a built-in support for table stands.
Software
And now the most interesting and most time consuming part: the software!
Since the devkit is already supported by ESPHome, I decided to go with that. Another way would have been to actually implement a native application using e.g. Arduino, but then accessing Home Assistant devices would have been quite much of work. With ESPHome we have direct communication channel with the HA instance. Just remember to actually adopt the device in the Home Assistant ESPHome integrations for the communication to work. The device will be auto discover through ESPHome as soon as first version of ESPHome library is flashed into the device and started up.
Choosing the entities displayed
Because the devkit in my use is going to be battery powered, the ESP should be put to deep sleep as long as possible (20min in my case). It leads to a ‘problem’ that there should not be any entities in the display that requires constant updates (e.g. clock).
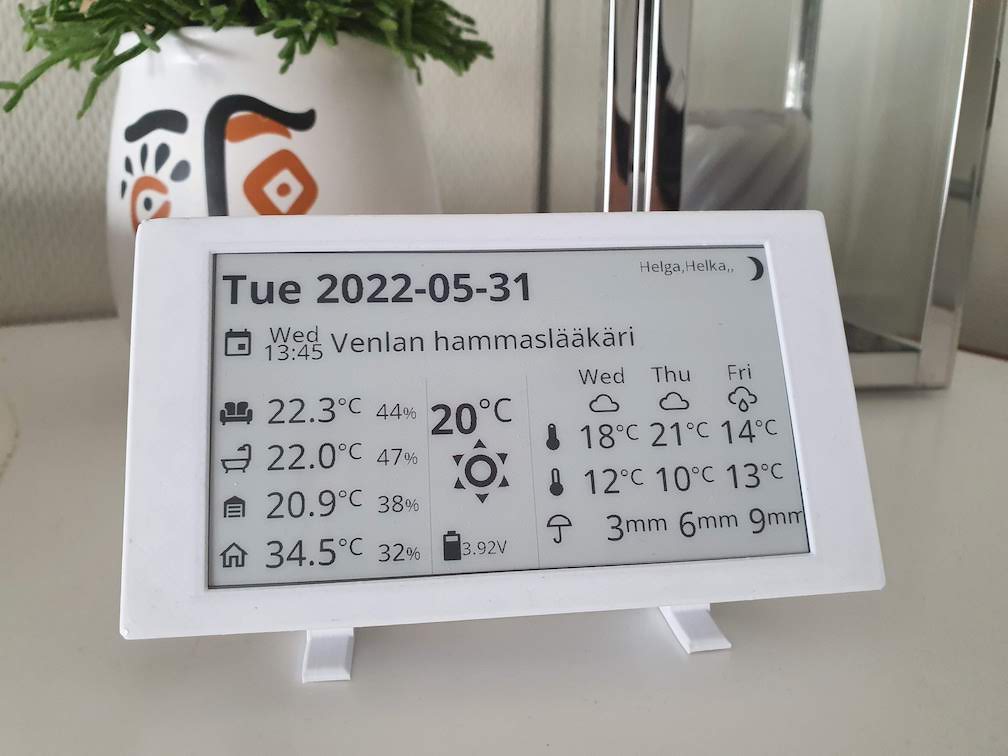
There’s a few items that I would like to see while going past the display: next calendar even, current weather and weather prediction for the next three days.
After the key items selected I decided to add some fillers for the rest of the space: temperature + humidity items, name days, moon phase and a current date.
Oh, and of course I need to see the battery status in order to check when recharge is needed!
The code
Without going through the whole code step by step, the current implementation is pretty much standard ESPHome stuff and drawing is done by just X and Y coordinates along with baseline and font.
The layout of my dashboard is heavily inspired by this similar project. So big thanks to GitHub user tolnai.
All of the code can be found from my GitHub page.
Conclusion
I’ve been using the display in a desk stand on an entrance for few weeks now and I’m very happy about it! Now I can easily check the next family calendar event and weather forecast every time I pass by. I’m even thinking of ordering another of the hardware and use it for something else as well!
The battery has drained about 10% in the last few weeks so I’m predicting that the battery will actually last many months without needing to recharge. There’s also some optimisation that can be done with my code to decrease the battery usage as well.
Can you please link to a compatible battery for this?
Hi!
I’m using Samsung 18650-26F: https://uk.rs-online.com/web/p/speciality-size-rechargeable-batteries/7887261
These can be found from many online stores (including aliexpress).
Do you have an updated link to the dev board? The linked board is no longer available 🙁
Hi!
This seems to be the same: https://www.aliexpress.com/item/1005002921144852.html
Hello,
Thanks a lot for the code.
I made the installation, integration with HA works, but the e-ink display remains blank. Any idea, what is wrong?
Tomas
Does it flicker (black / white) when powered up or do you get any errors at the ESPHome logs?
I don’t have a clear answer for the problem, but I would try just to draw a simple line (or similar) to see if the problem is in the code or in the display itself.
Hello,
It is white, but it flickers during start, refreshing and after press of the button.
I tried to draw a line with script below, but nothing happened.
display:
– platform: t547
id: t5_display
update_interval: never
lambda: |-
it.line(0, 0, 50, 50);
Ok, that’s a bit odd if nothing ish shown .. (the screen should flicker during start as your does).
I’d guess the screen is broken or LilyGo has changed something on the chip.
Can you provide the link where you bought the display?
Unfortunately, I have exactly the same problem. The display is updating, but I only see a white screen. Do you need to install the drivers separately?
The display is okay; I have installed Lillygo’s test programs. Then everything runs as it should.
Did you find any working drivers? My board don’t want to show data from ESP, only if I upload some program via Arduino. Screen version is “screen-4.7-S3” V2.3
Did anyone of you guys find a solution for the blank screen?
Unfortunately I never received the newer version of the display I ordered some months ago, so haven’t been able to test the latest eink display.
Thanks for reminding me though, I will order a new one from some other vendor to see if I can find a solution. Will take from weeks to months until the item arrives probably.
I ordered this (today) for similar project. Let’s see when/if it arrives. https://www.aliexpress.com/item/1005006381315736.html
I got mine working. The ESP32-S3 display version requires certain changes compared to Toni’s excellent work:
esphome:
platformio_options:
build_flags: “-DBOARD_HAS_PSRAM”
board_build.arduino.memory_type: qio_opi
board_build.flash_size: 16MB
esp32:
board: esp32-s3-devkitc-1
framework:
type: arduino
external_components:
– source: github://Fabian-Schmidt/esphome-lilygo_t5_47_display
components: [“lilygo_t5_47_s3_display”]
and I had to put ‘setup_priority: -100’ to ‘display:’ otherwise the wifi choked off
Also changed battery calculation
– platform: adc
pin: GPIO09
name: “${esp_name} Battery Voltage”
id: batt_volt2
attenuation: 12db
update_interval: never
– platform: template
name: “${esp_name} Battery”
id: batt2
unit_of_measurement: “%”
accuracy_decimals: 0
device_class: battery
lambda: |-
int y = ((id(batt_volt2).state – 2.3)/(4.1 – 2.3))*100;
if (y < 100) {return y;} else {return 100;};
update_interval: never
Thank you very much for this! This is most probably very much appreciated by others as there seems to be no-older version available anymore on the market 🙂
Petri,
I am new to this stuff . How would the new eink-dashboard.yaml look with your changes?
And thank you for the update.