
Home Assistant: Nord Pool cheapest hours package
In previous post Home Assistant: Nord Pool Spot prices and how to automate devices for cheapest hours I created an automation that uses Nord Pool Spot prices for automations, but the examples were not complete and I got lots of questions how to finalise and/or improve the code to do specific things like setting the end time.
In this post I’m going to tackle the installation issue and give a a full example (using packages) that can be easily copy-pasted to your own environment.
Using the cheapest hours package
Before continuing, please read the original post and setup the Nord Pool integration (and Apex charts if you wish) if you already haven’t!
I’m using packages throughout my whole Home Assistant instance. It groups each functionality to its own files instead of mixed amount with configuration.yaml, automation.yaml, etc.. So, just copy paste the nordpool_cheapest_hours.yaml from my GitHub repository to the Home Assistant config folder and set the following lines in the configuration.yaml:
homeassistant:
  packages:
    nordpool_cheapest_hours: !include nordpool_cheapest_hours.yaml
Of course you should also change the entities and modify the automation for your own purposes. That I cannot ready for you, look out the #CHANGE-ME tags from inside the nordpool_cheapest_hours.yaml
After that just restart your Home Assistant and everything should be ready and cheapest hours automation be running properly!
If in doubt or having issues, feel free to leave a comment!
Tip: you can also move your Nord Pool integration configurations to the package file to keep the configuration.yaml more clear.
Perfekt….thanks !
A question is it possible to connect for an example numberOfSequentialHours to a input_number on a card?
Thanks again
Yep, easily. Like this:
# Just a dummy input_number for the testing...

input_number:

  test_number:

    name: Number of cheapest sequential hours

    initial: 3

    min: 1

    max: 24

    step: 1
Then just add the value from the number to the template sensor:
{%- set numberOfSequentialHours = states('input_number.test_number') | int -%}Hi
Thanks !
It also works with helpers.
Helpers is better because they retain the value, as you mentioned i earlier post
Thanks
Hi Toni,
thanks for this great code, it works quite good for charging my car.
I have 1 question though that might be related to this question from Jonas. I would like to have a “helper” where I can change the “set last hour”
For tomorrow for instance the cheapest hour is at 20:00pm but I need my car to be charged 07:00am latest.
I guess the solution might be similar to the one you gave to Jonas? I am only not sure how to make a helper etc.
Thanks a lot!
Hi!
Should work somehow like this:
1. Go to Home Assistant settings -> Devices & Services -> Helpers -tab -> Create helper: ‘Number’
2. Add a name, minimum value: 0, maximum value: 23
3. Check the entity id given to the input_number (open the item you just created)
4. Change the cheapest hours template lastHour like this (of course change your entity name): {%- set lastHour = states.input_number.name_of_your_input_number_entity.state | int -%}
Now you should be able to configure the lastHour value by the input_number helper 🙂
Thanks a lot Toni for the support and good explanation! works like a charm!
Hi,
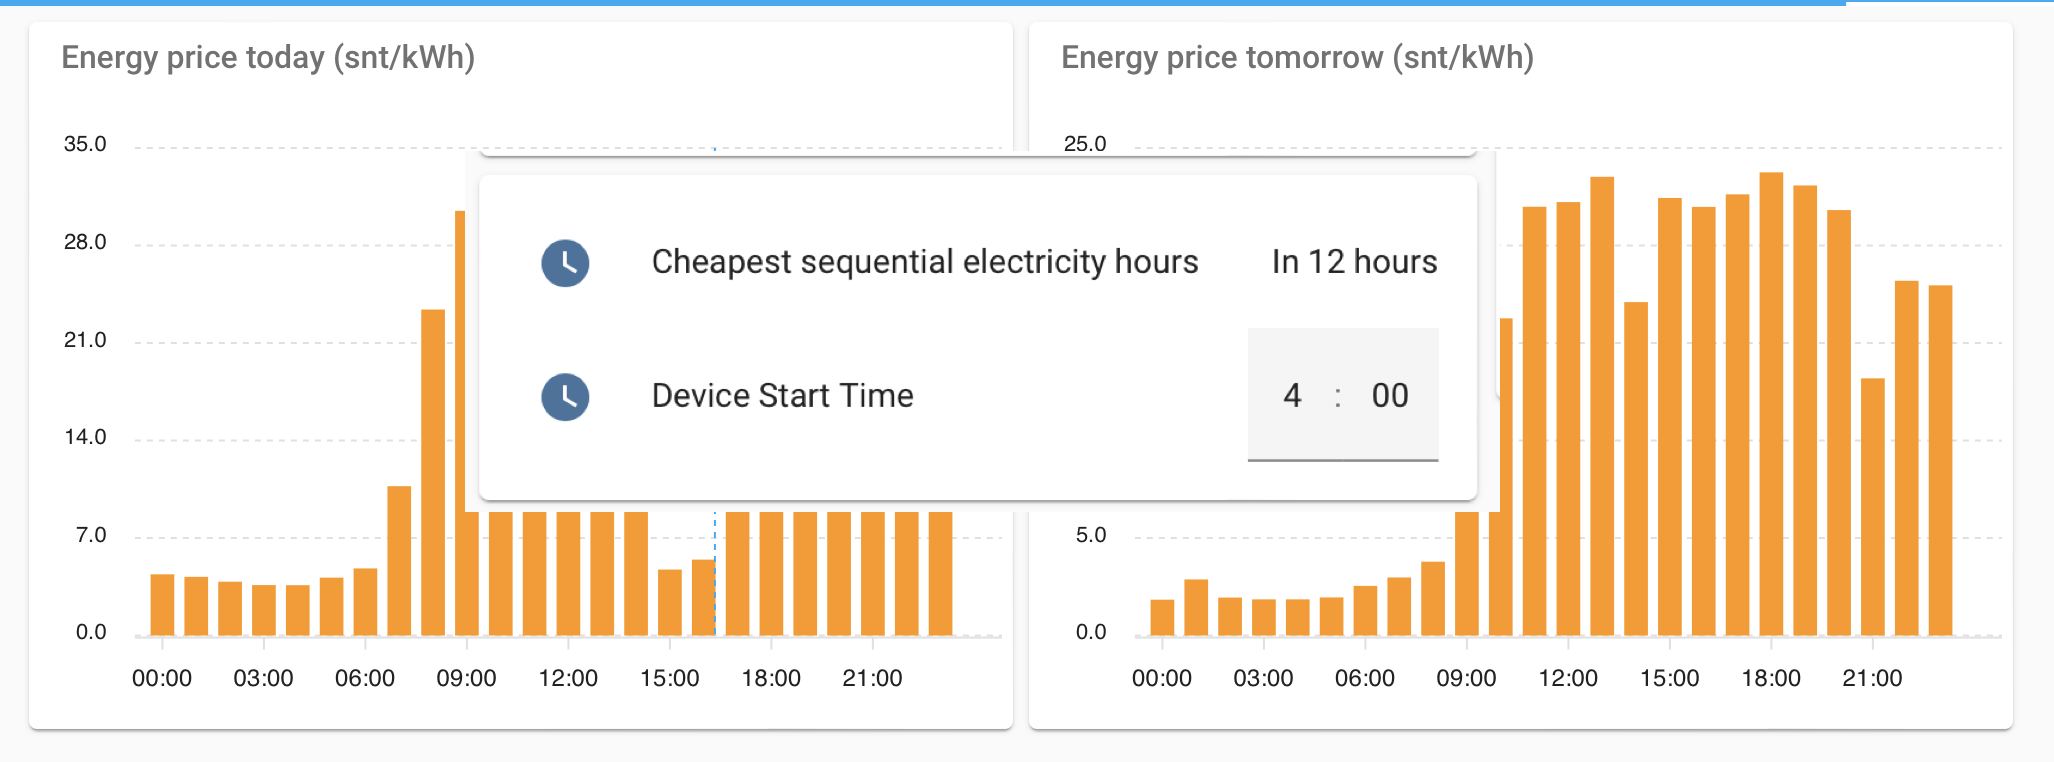
Thaks for the great code. What I have used to start and stop automations, like water boiler, is a template sensor that compares the time to the times that your code have set. With that extra sensor it is easy to start and stop automation by the sensor state.
template:
– sensor:
– name: cheapest sequential 5 hours
state: >-
{%set start = state_attr(‘input_datetime.device_start_time’,’hour’) %}
{% set end = state_attr(‘input_datetime.device_end_time’,’hour’) %}
{% if now().hour >= start and now().hour < end %}
True
{% else %}
False
{% endif %}
That’s a very good approach! Thanks for sharing 🙂
Hi!
I am having a problem with this code. But I’m pretty sure i’ve done something wrong, because the device it is currently controlling is neither turning off nor on. Have i done something wrong, and if so then what?
The code in question:
# CHANGE-ME: Do anything you like when the start / Stop triggers hit..
# Start the device for cheapest hours
– id: ‘1663399614858’
alias: Turn on device for cheapest hours
description: ”
trigger:
– platform: time
at: input_datetime.device_start_time
condition: []
action:
– service: input_boolean.turn_on
entity_id: switch.shelly_shplg_s_4022d882e9b0
mode: single
# Stop the device after cheapest hours
– id: ‘1663399614818’
alias: Turn off device after cheapest hours
description: ”
trigger:
– platform: time
at: input_datetime.device_end_time
condition: []
action:
– service: input_boolean.turn_off
entity_id: switch.shelly_shplg_s_4022d882e9b0
mode: single
Hi!
input_boolean.turn_on -> switch.turn_oninput_boolean.turn_off -> switch.turn_off
Change those since you are using a switch 🙂
Thank you very much! This did indeed solve the problem! 🙂
Can someone help me change this package to where it calculates the X most expensive hours instead? I need it to turn off my heat pump during price peaks…
Thanks alot!
change this line (and rename the variables):
if ns.counter < ns.cheapestPrice
Hi,
When I load your packages HomeAssistant goes into safe mode.
This is what I did.
Added these lines at the end of configuration.yaml
homeassistant:
packages:
nordpool_cheapest_hours: !include nordpool_cheapest_hours.yaml
Serached and replaced all entries of your sensor-id in nordpool_cheapest_hours.yaml
CHANGE-ME: change entity to your own sensor in the block below (TWO ENTRIES): sensor.nordpool_kwh_se4_sek_3_10_025
{%- if state_attr('sensor.nordpool_kwh_se4_sek_3_10_025', 'tomorrow_valid') == true -%}
{%- set ns.counter = ns.counter + state_attr('sensor.nordpool_kwh_se4_sek_3_10_025', 'tomorrow')[j] -%}
I am pretty sure I did something wrong as I am not a programmer.
Would appreciate info on what I did wrong.
Thanks
Could you send me your modified package to creatingsmarthome (at) gmail.com and I will see if I can spot the error?
Great application! I really appreciate it!
In the code, the number of sequential hours is given as an integer. Have you given any thought to adding support for defining that value as a decimal instead e.g. 3,35 hours? I guess that’s not supported at the moment?
I think I figured out a simple workaround for this: first I set the number of sequential hours to the next full number of hours: in this case 4 full hours.
And since I don’t actually need my device to be on for all that time I then delay device_start_time by half an hour like this:
time: ‘{{ ((as_timestamp(states(”sensor.cheapest_hours_energy_tomorrow”)) + (3600*0.5)) | timestamp_custom(”%H:%M”)) }}’
…and similarily I change device_end_time to take place a bunch of minutes early.
This way I end up running my device for 3,35 hours and when electricity is very cheap. It’s not a perfect solution, since I do end up running my device for up to 30 minutes during a slightly more expensive tarif then then what is theoreticaly possible (I think), but it’s a pretty good heuristic and close enough for me.
Great! I didn’t even have time to reply to your previous and you already found a solution 🙂
Thanks for sharing that!
I am not quite sure how this works.
-I can manually enter “Device start time”-sensor if I add it to the dashboard? What is the point on that? Should this card be changed automatically from the automation?
-Is it possible to add an Apex Chart with the spot price and also showing which hours that will be triggered in advance and which was triggered yesterday?
Thanks!
– Yes, you can manually enter start time if added to the dashboard, since that’s they way the Home Assistant works. Helpers can’t be made read-only from the UI by default
– Unfortunately I’m not expert on Apex charts, I’ve kept it simple myself. Sorry I can’t help you with this 🙁
Ok and if you manually enter a start date it will overrule the automatic one? How to remove this overrule if you accidentally entered one? Is it cleared every 24h or so?
Start time is updated every time ‘Set device start time’ automation run (in the example it’s 23:10).
If you accidentally enter something BEFORE that specific time it will be updated contain new next day cheapest price start time.
If you accidentally enter something AFTER that specific time the device will start at the time you entered.
One more thing: the best way is NOT to add the helper in your UI.
If you want to see the start time, just make a templated text sensor containing this value. That way you can make it just as a normal text without editing support.
Thanks for the explanation (and for everything) !
Toni or anyone knows how to modify this to also be able to include some hours for today?
E.g. between 22:00 (today) and 05:00 (tomorrow).
The price can quite often be cheaper just before midnight than during the night.
Hi – thus far I managed to use the package and I also was able to create the Apex graph for energy prices today. A big thanks to you for sharing your knowledge on this, will be a great help managing our energy bills 😉
Two things I can’t seem to get working are:
1) the Apex graph for “energy prices tomorrow” keeps “loading”. I’ve copied the code you shared and modified the sensor name to my own (sensor.nordpool_kwh_be_eur_3_10_021). Also deleting and recreating isn’t working out
2) the “cheapest sequential elec hours” is returning “unknown”. The only thing I noticed so far is that its settings state “This entity (‘sensor.cheapest_hours_energy_tomorrow’) does not have a unique ID, therefore its settings cannot be managed from the UI. See the documentation for more detail.”
Most likely I did sth wrong but can’t seem to figure it out.
Could you have a look please? Many MANY thanks!
Hi!
Tomorrows energy prices are published about at 16:00 CET from Nordpool, so before that the time is shown as ‘loading’ and cheapest hours will stay unknown.
Have you tried to check the results after 16:00 CET ?
hi Toni, in fact I only configured this past night so you might be right and I have to be patient. I’ll check again after 16h 😉
Worked like a charm!
Hi Toni,
Thanks for this. I have successfully set this up and really appreciate it. A question: let’s say I have I need two hours/24 cycle to heat the water but actually no need for sequential hours. To optimize if prices should vary like this
01 :00 = 0.4€/kWh
02:00 = 0.5€/kWh
03:00 = 0.6€/kWh
04:00 = 0.4€/kWh
05:00 = …
So if I need 2 hours to heat the water the optimal would be 01 & 04, instead of present result 01 & 02
I guess this might be a margin saving but still, optimized
Thanks.
Yep, that would be optimal for water heating, but unfortunately my automation does not support that.
This is something I need to take look at some point as well 🙂
In theory we could rank the hours by prices, but what makes it more complicated is the start/end automation part that is needed to use the heater for previous day values in case of failure.
Here is another version of the apex-chart combining today and tomorrow in one graph with min/max.
– starting from 12:00 (offset: +12h) to help spot relevant future values
– values scaled to match current temporary 10% VAT in Finland (normally 24%
(value*1.1/1.24)
type: custom:apexcharts-card
experimental:
color_threshold: true
header:
show: true
title: Energy Prices Nordpool (c/kWh)
show_states: false
apex_config:
yaxis:
min: 0
max: 60
tickAmount: 6
graph_span: 36h
span:
start: day
offset: +12h
now:
show: true
label: Now
series:
– entity: sensor.nordpool_kwh_fi_eur_1_095_024
name: ”
unit: c
data_generator: |
return (entity.attributes.raw_today.map((start, index) => {
return [new Date(start[“start”]).getTime(), entity.attributes.raw_today[index][“value”]*1.1/1.24];
})).concat(entity.attributes.raw_tomorrow.map((start, index) => {
return [new Date(start[“start”]).getTime(), entity.attributes.raw_tomorrow[index][“value”]*1.1/1.24];
}));
type: column
show:
legend_value: false
in_header: false
extremas: true
extend_to: end
color_threshold:
– value: -2
color: green
– value: 10
color: orange
– value: 20
color: darkred
– value: 30
color: red
– value: 40
color: black
Nice! Thanks for sharing!
Hi!
I am looking a way to find cheapest hour from period e.g. 16.00 – 22.00, Today. I can get that info for tomorrow evening with your code, when playing with start/end hours, but i would like to get e.g. a notification 1 hour before cheapest hour in a evening, so that e.g. cooking, and laundry could be squeezed in that hour of the evening. How would you do that?
Hi Tony,
Many thanks for your efforts! My experience with coding is limited unfortunately. I got nordpool and apex to work, I see the graphs and that all works beautifully. Unfortunately, I get stuck with the part covered in this post. I added the nordpool_cheapest_hours.yaml to the config folder, and added the extra reference lines in configuration.yaml. But I get stuck with the automation logic.
Is it possible to use the standard automation logic as used under setting/automations? That is much more accessible for the non-coders like me 🙂 If yes, some pointers are appreciated as how to us the hours with low prices as a trigger. Thanks in advance!
Yes of course.
If you move the “automation:” parts to the automations.yaml you can see and modify them directly from the standard UI automation editor. (don’t add the ‘automation:’ header to the automations.yaml though)
Hi Tony, thanks! It seems to work, now I need to await 23:15 to see if timers actually get set as intended.
yes it works ! I can use the start and end times for both cheap en expensive hours to charge when prices are low, and discharge when prices are high 🙂
Excellent! Well done! 🙂
Hi Toni and thanks for your work.
After tinkering back and forth, I have the nordpool integration in the configuration.yaml + the package separately. However, I can’t get the apexchart cards to work properly. As soon as I put the code you suggested in your other post and try to restart, I get this:
The system cannot restart because the configuration is not valid: Integration error: now – Integration ‘now’ not found. Integration error: type – Integration ‘type’ not found. Integration error: graph_span – Integration ‘graph_span’ not found. Integration error: series – Integration ‘series’ not found. Integration error: header – Integration ‘header’ not found. Integration error: span – Integration ‘span’ not found.
I figure there has to be something wrong with the apexchart integration, and I have tried re-downloading it, to no avail.
Could you give me a pointer in the right direction?
Thanks again,
Where did you put the Apex chart code? The apex chart is an UI element that needs to be placed through the card configuration (UI).
I put it in configuration.yaml, but I feel like you’re going to tell me that’s not correct… 🙂
Yep, you guessed it 🙂
Proper place to add Apex Chart view (block starting with: type: custom:apexcharts-card) is on the UI layer.
Go to Home Assistant UI -> Edit dashboard -> Press “+ Add card” -> Select Manual -> Paste the code in there (of course rename the entity name for your own).
Thanks, will try tonight. Where can I read up on the principles and structure of HA and its programming? I feel like I’m just copying code without really understanding what or why I’m doing it and would very much like to improve my skills.
OK, so I got it to work now. Great stuff!
In my case, I am controlling a floor thermostat/heating. For that purpose, it doesn’t need to be three SEQUENTIAL hours, it would be even better if it just picked the X cheapest hours. Also, it would be great if it was possible to set a max price where it would never turn on. Is there an easy way to modify the files to accommodate for one or both of these things?
Any help appreciated. Thanks for your work!
Hi Toni, I have made great use of your input on power prices. But now nothing shows tomorrow. Can you see why?
type: custom:apexcharts-card
graph_span: 1d
experimental:
color_threshold: true
apex_config:
chart:
height: 170px
header:
title: Strømpriser i morgen (kr/kWh)
show: true
span:
start: day
offset: +1d
series:
– entity: sensor.nordpool_kwh_dk1_dkk_2_10_025
type: column
data_generator: |
return entity.attributes.raw_tomorrow.map((start, index) => {
return [new Date(start[“start”]).getTime(), entity.attributes.raw_tomorrow[index][“value”]];
});
color_threshold:
– value: 1
color: darkgreen
opacity: 1
– value: 1
color: goldenrod
– value: 3
color: darkred
Hi!
Most probably the reason is that tomorrows energy prices are not yet out.
About 15.00 CET next days prices are published so try again in the afternoon 🙂
Hi
im very new to HA. and i love your script
So here is my problem
i got a viessmann heatpump and it has an “activate_one_time_charge” (entity) button in HA.
so now i want your script to trigger that button when power is cheapest.
i managed to install all your files and everything is working as you intended it to work.
but where in the script can i trigger that button?
should i do it at automation and scenes
this is your action there, right?
how to change it in my action?
service: input_boolean.turn_on
entity_id: input_boolean.cheap_electricity_simulated_switch
Hi!
Everyone has been new to HA at some point, so it’s always good idea to ask for help 🙂
You are on right track since you already have a switch and managed to copy the package to the corresponding place.
What you need to do is to change #CHANGE-ME parts of the package to suit your needs (you might have already done that?).
To start your viessmann at the beginning of the cheapest hours sequence just edit the .yaml file and change the lines you’ve pasted above to this:
service: switch.turn_onentity_id: switch.activate_one_time_charge
Also remember to put the switch.turn_off to the “Stop the device after cheapest hours” part of the automation, unless your viessmann does the turn off by itself.
Hi Toni
Thnx i just changed it.
It is fingerscrossed if it works to night @ 4:00
keep you updated 🙂
Hi,
Great work! As a geek I like different integrations. 🙂
I have a weird problem. I have this package installed and all the numbers and graphics works just fine. So the sensor -part seems to work fine. For some reason the automation -part doesn’t seem to work at all. I can’t figure out where my error is.
I have switch (varaajan_tila) which sends mqtt -message (on / off) to my RaspberryPi that is placed in electric cabin handling Water Heater power contactor with relay.
Everything works, when I manually switch HA switch, but Nordpool automation doesn’t trigger it. I can’t find anything in logs either. 🙁
—– code —-
– id: ‘1663399614858’
alias: Turn on device for cheapest hours
description: ”
trigger:
– platform: time
at: input_datetime.device_start_time
condition: []
action:
– service: switch.turn_on
entity_id: switch.varaajan_tila
mode: single
# Stop the device after cheapest hours
– id: ‘1663399614818’
alias: Turn off device after cheapest hours
description: ”
trigger:
– platform: time
at: input_datetime.device_end_time
condition: []
action:
– service: switch.turn_off
entity_id: switch.varaajan_tila
mode: single
—– code —-
– Samuli
Hi,
Today I moved automation -part to another file (automations.yaml) and it seems to work now. I can’t confirm the actual result yet, because it should run tomorrow evening. 🙂
– Samuli
Good morning!
Didn’t have time to look into your automation deeply, but with a quick look everything looked just fine, so hopefully your current solution works 🙂
If you ever find the root cause of the issue, please let me know 🙂
It seems to me that no matter what value i assign to numberOfSequentialHours , the are always 3 hours between device_start_time and device_end_time
{%- set numberOfSequentialHours = 1 -%} gave me a window from 12:00 until 15:00 today. Why is that?
Did relaod the YAML configuration for automations, still no luck.
Any ideas?
Ah, found it.
We have {%- set numberOfSequentialHours = 3 -%} , but when I set this 3 to another value, it still creates a window of 3 hours.
That’s because of this line of code:
time: ‘{{ ((as_timestamp(states(”sensor.cheapest_hours_energy_tomorrow”)) + (3600*3)) | timestamp_custom(”%H:%M”)) }}’
When I change this to 3600*1, it creates a charge window of 1 hour. So I thougt why not change it to 3600*numberOfSequentialHours , but then endtime will not set
This works:
{%- set numberOfSequentialHours = states(‘input_number.chargewindow’) | int -%}
and
time: “{{ ((as_timestamp(states(‘sensor.cheapest_hours_energy_tomorrow’)) + (3600*states(‘input_number.chargewindow’) | int)) | timestamp_custom(‘%H:%M’)) }}”
Yes, you also need to change another automation from the end of the package (as you clearly noticed yourself :-)) (there should have been #CHANGE-ME block at the end as well)
This is because Home Assistant can’t use same variables through out multiple automations, so multiple changes are needed.
Thank you!!
Now my Home Assistant controls directly the charging of my car, not the socket or the car charger but the car it self.
This is how it works:
– Every day at 21:00.
– HA reads the State of charge (SoC) from the car (Actually from the PSA server).
– HA calculates how long time (hours) it takes to charge the car to 100%.
– HA uses “Nord Poll Cheapest Hours Package” to get the start time for charging.
– HA sends the charging start time to the car (PSA server).
The “PSA Car Controller” HA Add-on is used to control the car (Peugeot 3008 Hybrid4).
Excellent!
I’m doing the same thing with my Tesla, except but just having static time instead of dynamic SoC.
It’s always better to let the car handle the charging schedule instead of cutting power from the charging station.
Hi Toni, would you be willing to share the code you’re mentioning here?
Charging your Tesla with dynamic SoC and the calculation of the time it takes to 100%
Thank u
Hi!
I’m not using dynamic soc (it’s Ilpos comment above). Maybe Ilpo can share the code if he’s still reading this 🙂
..and actually I’ve moved from Tesla api to control directly my Wallbox pulsar plus so I won’t accidentally use expensive energy from the grid when pre-heating the car in the mornings.
I read the comments too quickly.
I do actually have tesla model 3 and wallbox. Do you use the tesla hacs integration and built-in wallbox integration?
I assume you have the advanced_cheapest_hours.yaml with changes for thie.
I’d be very pleased to just see you automation and the changes u have if you don’t mind 😀
For charging, I’m using the Wallbox integration.
I’ve enabled ‘eco smart’ from Wallbox so it won’t charge unless manually started and/or enough solar energy available.
For the timing then, I’m using the Wallbox ‘pause/resume’ switch to start charging when the advanced cheapest hours calendar entry begins (and turn the switch off when ends)
However, I’m not currently 100% happy with this method. I would like to use the Wallbox internal scheduler, but there’s no API for it currently. Thinking of rooting the Wallbox and making own local API to control the schedules. But this last is still in planning phase 🙂
Hello!
This is a great piece of code!
Unfortunately something happened last update 2023.3.6 and I am suspecting the core since it is the same fault on 2 different systems running the same code.
I get this log message.
Any ideas?
Logger: homeassistant.helpers.template_entity
Source: helpers/template_entity.py:393
First occurred: March 25, 2023 at 17:05:16 (4 occurrences)
Last logged: 11:35:25
TemplateError(‘TypeError: unsupported operand type(s) for +: ‘float’ and ‘NoneType”) while processing template ‘Template(“{%- set numberOfSequentialHours = 2 -%} {%- set lastHour = 8 -%} {%- set firstHour = 0 -%} {%- if state_attr(‘sensor.nordpool_kwh_se3_sek_2_10_025’, ‘tomorrow_valid’) == true -%} {%- set ns = namespace(counter=0, list=[], cheapestHour=today_at(“00:00”) + timedelta( hours = (24)), cheapestPrice=999.00) -%} {%- for i in range(firstHour + numberOfSequentialHours, lastHour+1) -%} {%- set ns.counter = 0.0 -%} {%- for j in range(i-numberOfSequentialHours, i) -%} {%- set ns.counter = ns.counter + state_attr(‘sensor.nordpool_kwh_se3_sek_2_10_025’, ‘tomorrow’)[j] -%} {%- endfor -%} {%- set ns.list = ns.list + [ns.counter] -%} {%- if ns.counter < ns.cheapestPrice -%} {%- set ns.cheapestPrice = ns.counter -%} {%- set ns.cheapestHour = today_at("00:00") + timedelta( hours = (24 + i – numberOfSequentialHours)) -%} {%- endif -%} {%- endfor -%} {{ ns.cheapestHour }} {%- set ns.cheapestPrice = ns.cheapestPrice / numberOfSequentialHours -%} {%- endif -%}")' for attribute '_attr_native_value' in entity 'sensor.cheapest_hours_energy_tomorrow'
This was an issue with the Nord pool integration for not handling summer time change properly.