
Home Assistant: Setting up time schedules to Shelly devices (gen1 and gen2)
Since my transformation to dynamic electricity prices are ongoing, I need to try to tackle up all the corner cases that comes with it. In previous article I introduced more advanced cheapest hours automation that can handle devices which can be transferred to use the cheap electricity.
Anyhow, some devices (like the water boiler) are still too much dependant of the system failures! Let me give you an example: My Unifi devices are automatically updated every night at 01:00 and that might cause my WiFi network to go offline for few minutes. And my water boiler is controlled with Shelly EM3 that uses Wifi.. do you already guess where this is going? If the cheapest hours begins at 01:00 AND Unifi update happens, no control signal will be transferred to the Shelly and water boiler won’t start heating at all for that night. I think I would REALLY get some feedback from my wife if there’s no hot water for the upcoming day 😀
Well, I think I’ve found a solution for this corner case as well. Shelly supports internal schedules, but unfortunately Shellys Home Assistant integration is not supporting them at the moment. However, we can use custom HTTP or MQTT commands for that.
So here’s the plan what will happen after this enhancement:
- Next day electricity prices are received and calculated by cheapest hours automation
- Home Assistant will send command through to set the next active schedule to the Shelly directly
- Shelly will handle the relay switch when the time is right
In this way we get rid of the dependency with Home Assistant, WiFi and Shelly. Of course there’s a possibility that during the set schedule sequence, the WiFi is down or Home Assistant is broken (never happened though). But on such special case, Shelly would use previous days schedule, so water would still be heated, even though it might not be the cheapest price at the moment.
Create functionality to set the schedules
Shelly Gen 1 and Gen2 are totally different from each other by the software. Therefore I’ve made actually two guides how to achieve schedule settings: one for gen 1 and one for gen 2. For exact list of devices that are gen 1 can be found from Shelly official website. If the device you are using is not listed, the device is most probably gen 2.
So depending of your Shelly device, jump either into Shelly Gen 1 or Shelly Gen 2 part of this article!
How-To: Shelly Gen 1
First generation Shelly devices only supports settings changes by HTTP POST commands and MQTT is (mostly) just receiving data. So for this operation we can’t use MQTT, but have to rely on HTTP REST requests instead.
For the REST commands to work, a static ip needs be set to the Shelly device used. Static ip can (usually) be set from your network router, so please see the manual of the network router used. Once the IP is set as static, mark it down somewhere. We will use it on next step.
Rest commands can be used by creating e.g. rest_command.yaml file and adding the commands into. Just remember to include the file in the main configuration.yaml file by adding ‘rest_command: !include rest_command.yaml’ -line into it.
Now that the Shelly is ready and we have the support to add rest command, let’s create one to to do what we want to:
shelly_set_schedule:
  url: http://{{deviceip}}/settings/relay/0
  method: POST
  payload: 'schedule={{schedule}}&schedule_rules={{rules}}'
In the url we need to set the Shelly endpoint that receives the command, using parameter ‘deviceip’ in here that will later be provided by the automation.
Depending on your Shelly device and usage, you might want to change relay number to something else (at the end of url line). I’m using Shelly EM3 that has only one relay, so I’m using relay index 0.
Second is the method. POST is generally used to change data, so that’s what we are using now.
Third is the payload. We want to set schedule (on / off) and rules (times) and those comes in as parameters from Home Assistant automations later on.
Rules needs to be in format HHMM-ddddddd-ff:
- HH = Hour of the schedule
- MM = Minute of the schedule
- ddddddd = which days should contain the rules, format as in indexed weekday numbers (0123456 will contain ALL weekdays)
- ff = function of the relay. Basically on or off.
Now that we know the format, we need to make two schedules for the cheapest hours: one to turn on and another one to turn off.
I’m using the same package as used in calculating the cheapest hours and just replacing the action of creating a calendar entry for cheapest hours by setting the data directly into a Shelly!
action:
  - service: rest_command.shelly_set_schedule
    data:
      deviceip: '192.168.1.100'
      schedule: 'true'
      rules: >
        {%- set sensorId = 'sensor.cheapest_hours_energy_water_boiler' -%}
        {{ as_timestamp(states(sensorId)) | timestamp_custom('%H%M') }}-0123456-on,
        {{- (as_timestamp(states(sensorId)) + (3600 * state_attr(sensorId, 'number_of_sequential_hours') | float)) | timestamp_custom('%H%M') }}-0123456-off
Here’s another generic example that set’s the start time to 00 and end time to 05:00:
action:
  - service: rest_command.shelly_set_schedule
    data:
      deviceip: '192.168.1.100'
      schedule: 'true'
      rules: >
        {{ as_timestamp(today_at("00:00")) | timestamp_custom('%H%M') }}-0123456-on,
        {{- as_timestamp(today_at("05:00")) | timestamp_custom('%H%M') }}-0123456-off
One more thing, if you are using authentication with the Shellies on a local network, you need also to send Authorization header with the REST API call. By default, the authentication is disabled on a brand new Shelly so most probably you don’t need to worry about it.
That’s it! Simple automation action to set the start and end times directly to Shelly Gen 1 device!
How-To: Shelly Gen 2
Shelly Gen 2 is in software perspective totally different device compared to first generation! It has much more versatile API and MQTT can be used to set values to the relay.
For Shelly Gen 2 we are going to use MQTT for setting the values, so enabling MQTT and connecting it to the local MQTT broker is essential for this to work. If you don’t have Shelly connected to the broker or don’t have a MQTT broker at all, you can find guides from Setting up MQTT on Home Assistant and Configuring MQTT on Shelly Gen 2. I won’t be going through these steps on this guide, but if you need any help, please drop a comment in the comment section below.
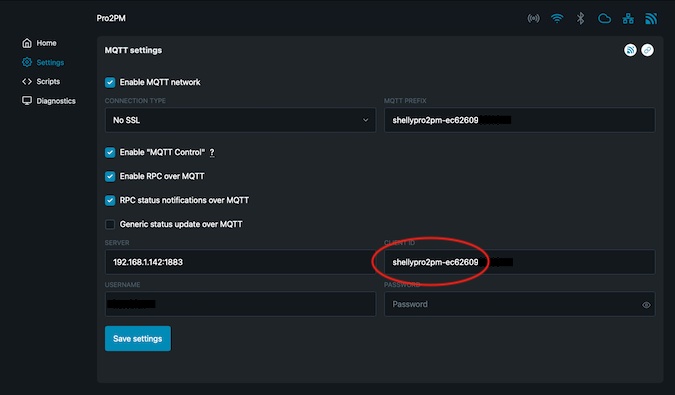
Once Shelly is connected and verified to work with the local MQTT broker, we are ready to continue. First we need to know the Shelly Id that is used to communicate with corresponding device through MQTT. So go to your Shelly configuration page -> settings -> MQTT and check the device id in the corresponding field. Write it down somewhere, we are going to need it in the next step!
Ok, next let’s start by making a Home Assistant script that will: 1. clear all schedules, 2. create a new start time and 3. create a new end time. So add a new script from the UI or by editing your configuration.yaml (or scripts.yaml if using as included) and add the below code on it:
mqtt_set_shelly_schedule:
  alias: 'Set new Shelly (gen 2) schedules using mqtt'
  sequence:
    - service: mqtt.publish
      data:
        topic: "{{shellyid}}/rpc"
        payload: '{"id": 1, "src": "cheapesthours", "method": "Schedule.DeleteAll"}'
    - service: mqtt.publish
      data:
        topic: "{{shellyid}}/rpc"
        payload: '{"id": 2, "src": "cheapesthours", "method": "Schedule.Create", "params": { "timespec": "0 0 {{start}} * * 0,1,2,3,4,5,6", "calls": [{ "method": "Switch.Set", "params":{"id":0,"on":true} }]}}'
    - service: mqtt.publish
      data:
        topic: "{{shellyid}}/rpc"
        payload: '{"id": 3, "src": "cheapesthours", "method": "Schedule.Create", "params": { "timespec": "0 0 {{end}} * * 0,1,2,3,4,5,6", "calls": [{ "method": "Switch.Set", "params":{"id":0,"on":false} }]}}'
Note 14.8.2024: Since ‘latest’ Shelly gen 2 fw update the schedule syntax has changed. Old ‘SUN,MON,TUE,WED,THU,FRI,SAT’ format is no longer acceptable and weekdays as integers are rquired ‘0,1,2,3,4,5,6’ (0 = Sunday).
Now that we have our script in place, it can be called with service.mqtt_set_shelly_schedule and setting data parameters shellyid, start and end. There’s a catch in the script though, Shelly schedules don’t like the leading zeros. When calling the script, we can’t use hours like “01”, but it needs to be formatted as “1”. That will be handled on the automation part.
Let’s start creating the automation to set the schedule next. As same as with the gen 1 device guide above, I’m going to use the same package used in calculating the cheapest hours and just replacing the action of creating a calendar entry for cheapest hour by setting the data directly into a Shelly!
action:
- service: script.mqtt_shelly_set_schedule
  data:
    shellyid: shellypro2pm-ec621000f200
        start: >
          {%- set sensorId = 'sensor.cheapest_hours_energy_water_boiler' -%}
          {{ as_timestamp(states(sensorId)) | timestamp_custom('%-H') }}
        end: >
          {%- set sensorId = 'sensor.cheapest_hours_energy_water_boiler' -%}
          {{ (as_timestamp(states(sensorId)) + (3600 * state_attr(sensorId, 'number_of_sequential_hours') | float)) | timestamp_custom('%-H') }}
In above automation we are calling the mqtt_shelly_set_schedule script we create earlier and defining the target to be ‘shellypro2pm-ec621000f200‘. Start and end times will be received from our sensorId variable defined in the cheapest hours package. To use it with any other automations, just set the timestamps corresponding for the start and end times.
Another thing to notice in above automation is ‘%-H‘ timestamp format. That will strip the possibly leading zero out of the string coming out from the template.
If everything went as expected, automation should be active working as long as you remember to reload your scripts and automations from the developer tools (or restarting the Home Assistant).
And here’s another more generic example to set the on schedule from 00:00 to 05:00:
action:
- service: script.mqtt_shelly_set_schedule
  data:
    shellyid: shellypro2pm-ec621000f200
        start: >
          {{ as_timestamp(today_at("00:00"))| timestamp_custom('%-H') }}
        end: >
          {{ as_timestamp(today_at("05:00"))| timestamp_custom('%-H') }}
Conclusion
After this modification for my water boiler automation, I think it’s going to be even more reliable than before (not that it has failed yet), but I’m just afraid how much of a ‘feedback‘ I would receive from my wife if the water was not heated during the night 😀
Anyhow, it’s possible and rather simple to make schedules using Shelly APIs directly without using ANY cloud services.
Luckily I found this post. 🙂
I’m using the new advanced version of the cheapest hours automation package, and last night my Shelly Pro 2 was shortly unavailable, for still unknown reason, when calendar event was triggered and thus boiler didn’t heat the water.
Shelly Pro 2 is gen2 device, but I didn’t want to setup MQTT so I only partially followed the instructions and modified automation a bit to also use HTTP REST. It was quite straightforward.
Big thanks anyway!
Thanks for the feedback!
Always very happy to hear that my articles are being helpful 🙂
Please share your code 🙂
Looks nice!
But how to do it more native without mqtt and wife parameters 🙂
I have your nordpool_most_expensive hours.yaml file runnig, but would like to turn of some shelly switches (and then on again). If time permits also to turn on some switches when advanced_cheapest_hours.yaml
Thanks for your hard work helping us noob’s .-)
Figured it out 😉
Do you know how the query params are supposed to be formatted? I’m having issues getting the rules encoded correctly. Are they supposed to be wrapped in brackets or not? And do they have any kind of delimiter?
Hi!
Rules are formatted as stated in above article (HHMM-ddddddd-ff).
No brackets, in the article the brackets are for home assistant, so it can fill the info as template.
Query parameters are same as in basic HTTP get request:
– separating parameter from url: ?
– parameter delimeter: &
– parameter value: =
Nice piece of content thanks !
I also set a variable for the id of the switch to trigger since the 2PM has 2 switches.
“params”:{“id”:{{switchid}},”on”:false}
Thanks for the article. That was exactly what I was looking for. But I have some strange problem. I can do what ever I want, it always sets the schedule only for Sunday.
This is my action:
start: “{{ as_timestamp(today_at(\”06:00\”))| timestamp_custom(‘%-H’) }} \n”
end: “{{ (as_timestamp(now()) + 10 * 60)| timestamp_custom(‘%-H’) }} \n”
And part of the script:data:
topic: “{{shellyid}}/rpc”
payload: ‘{“id”: 3, “src”: “cheapesthours”, “method”: “Schedule.Create”, “params”: { “timespec”: “0 0 {{end}} * * MON,TUE,WED,THU,FRI,SAT”, “calls”: [{ “method”: “Switch.Set”, “params”:{“id”:0,”on”:false} }]}}’
I also removed the SUN and left only MON,…. but it always sets only SUN. Very weird. Do you have an idea?
Hi!
Just tried this out and I’m getting the same issue and that’s even with using Shelly API doc example.
My guess would be that there’s something broken in the latest Shelly firmware or API has been changed and documents aren’t up to date.
I will dig this a bit deeper and will get back to you.
Ps. I haven’t noticed this behaviour before as I’m using gen1 shelly with my daily boiler automations and shelly 2 is just during winter times for pre-heating the car.
Most probably just an issue with the HTTP interface as REST API will return correct schedule:
{"jobs":[{"id":1,"enable":true,"timespec":"0 0 22 * * MON","calls":[{ "method": "Switch.Set", "params":{"id":0,"on":true} }]}], "rev":483}However, I will verify this if the action is still run properly tomorrow as it’s Sunday now anyways 😀
Hi!
Looks like the API on Shelly has changed with some of the latest firmwares. Too bad they have not had interest to update the documentation.
The days should now be described as integer (0 = sunday).
Changing the data from SUN,MON,TUE,WED,THU,FRI,SAY to 0,1,2,3,4,5,6 should to the trick!
I will update this guide very soon as well!