
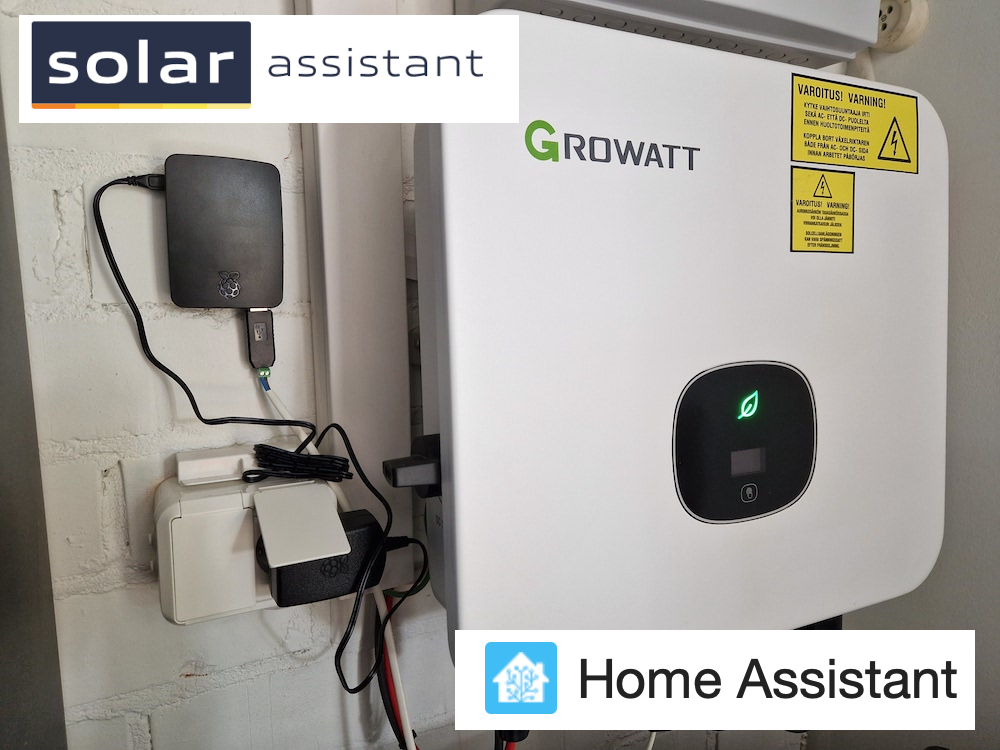
Solar PV data logger using Solar Assistant
If you’re following me on Instagram, you might already know that I’ve got solar panels installed on to my roof recently! So far I’ve not done much of automations regarding solar power yet, but I’m getting there..
Anyhow, before really starting to automate anything, base data needs to be received from the inverter. For that, a data logger is required. My Growatt inverter itself has its own cloud based data logger usable with their WiFi-dongle, but as you might know, I’d like to have as much local control as possible and not rely on a cloud based service. Also, Growatt seems to only update data every five minutes and that is way too long period for automations or just viewing real-time information.
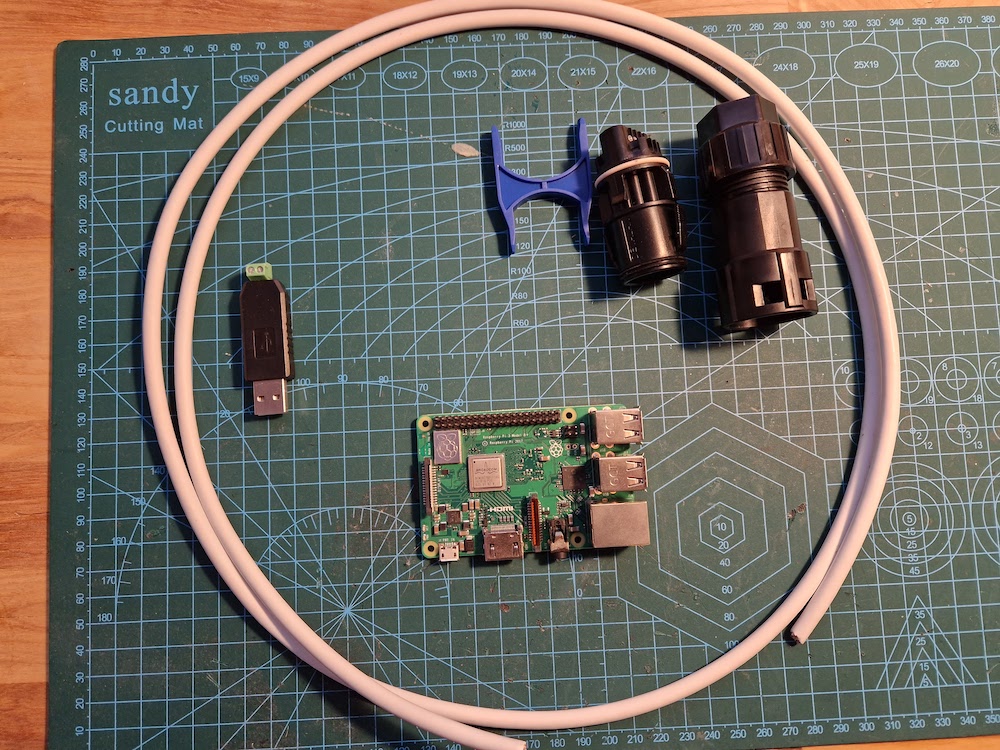
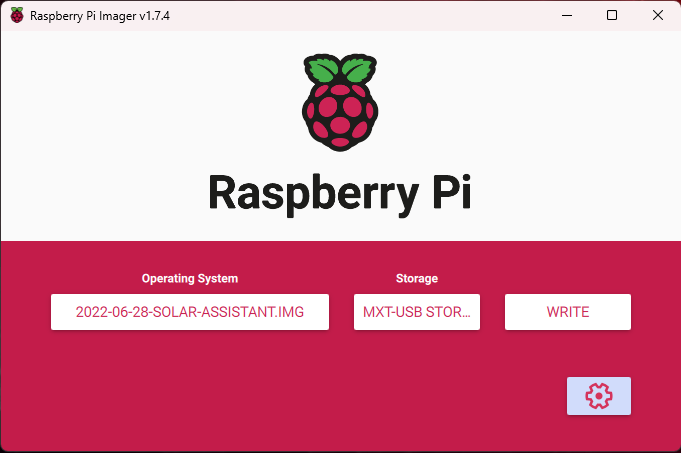
The solution for this is to use a local data logger! For that I’ll be using Solar Assistant that can be installed on a modern Raspberry Pi device. So for this project, I’m going to need a Raspberry Pi, MicroSD card (32G), power supply, Growatt connector (included with the inverter), USB-RS485 converter and some cable and of course the Solar Assistant Software.
Solar Assistant
Solar Assistant is a commercial made data logger supporting various inverters (see the full list of supported inverters from their site). It’s self-installable on a Raspberry Pi or an Orange Pi.. Alternatively there’s a possibility to buy a whole device + software combos as well. It’s not particularly cheap software costing 54.48€, but it should be quite easy and fast to install and maintain.
In feature wise Solar Assistant isn’t actually very rich. It logs and displays data from an inverter and/or hybrid battery system. It has a cloud proxy so that your instance is accessible anywhere and has a multi-user support. That all the major features basically..
My solar system
Maybe a bit of a background is required so you get the point, why and how I want my PV data logger to work.
My current solar system consists of 20 pieces of Hyundai Shingled 430Wp panels and a Growatt 9000TL3-X inverter. Total system peak power is 8.6KWp.
Growatt has its own WiFi dongle and a free cloud based data logger, but the five minute update interval is not enough for me and along with that, the cloud site has been down in few occasions already in past few months. It does have a good designed mobile software and I’m not getting rid of it even though making a local data logger as well. Both Growatt Cloud and Solar Assistant can be installed in parallel.
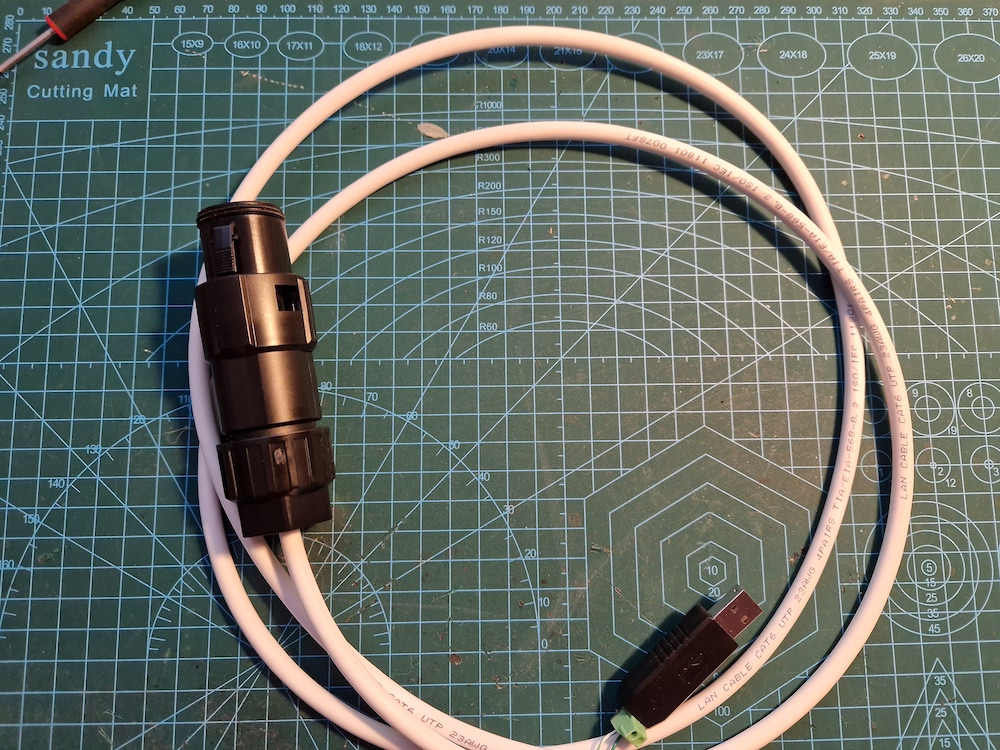
Growatt cable constructions
With the Growatt 9000TL3-X I got a modbus connector included (I think all Growatt inverters deliver this within their package), so I only need to create a proper RS485 USB-cable and screw it into the Growatt connector.
For the construction I’d suggest to get USB-RS485-WE-1800-BT cable even though I did have couple of old cheap RS485-USB adapters available in the closet so I decided to use one of those instead for now as they work with native Linux just fine.
Anyhow, cable creation is as simple as it could be, no need for any special tools or soldering, just pliers and a small Philips screw driver is enough.
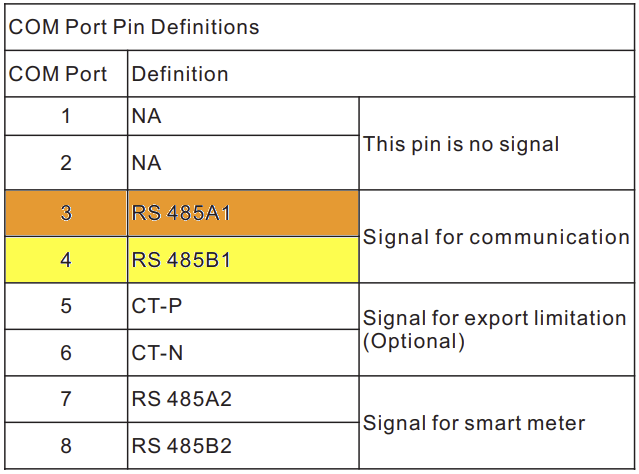
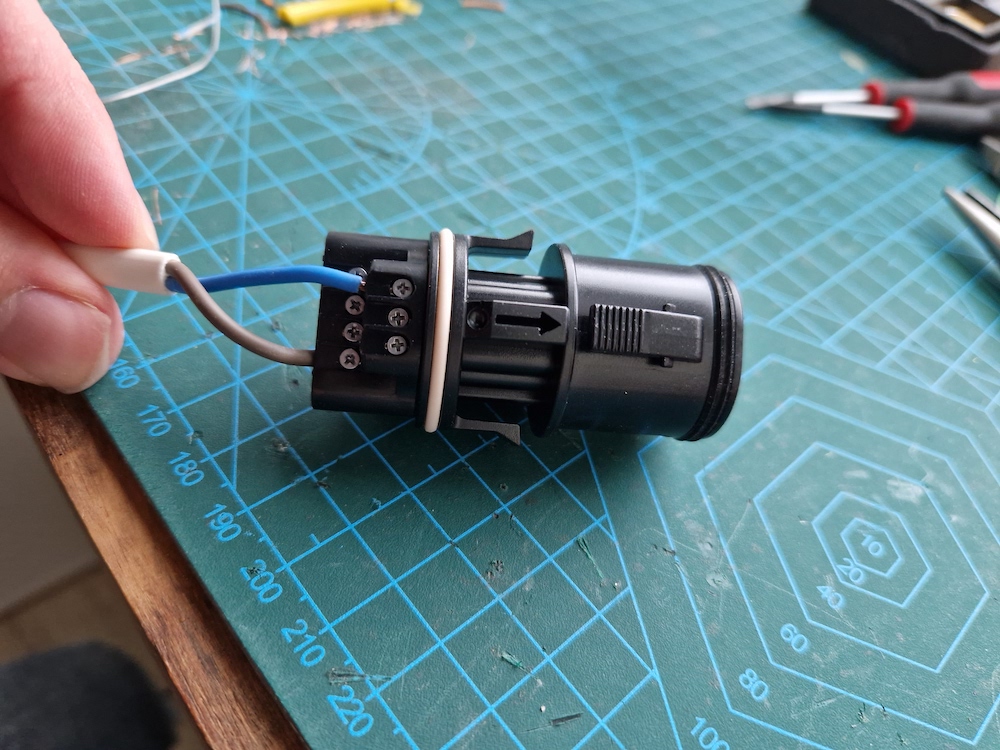
The Growatt MOD pinout is described in the chart below. Only pins three and four are used as they transfer the ModBus data (A+ and B-). Just screwing in those two pins into from the connector to a cable of your choice. A little side note about the cable though: using a cable of 2mm-2.5mm thickness is recommended! I did use a cat6 cable first, but those screws easily cuts the thin copper.
Now just connect the USB to RS485 adapter to the other end to the same A+ and B- pins.
Setting up Solar Assistant
Solar assistant installation has been made as simple as possible: Download, flash, connect and use. Detailed installation steps can be found directly from Solar Assistant guides so I won’t be going through the full installation process. Just saying that the installing went as simple as with any Raspberry PI image when using Raspberry Pi Imager software.
Configuration
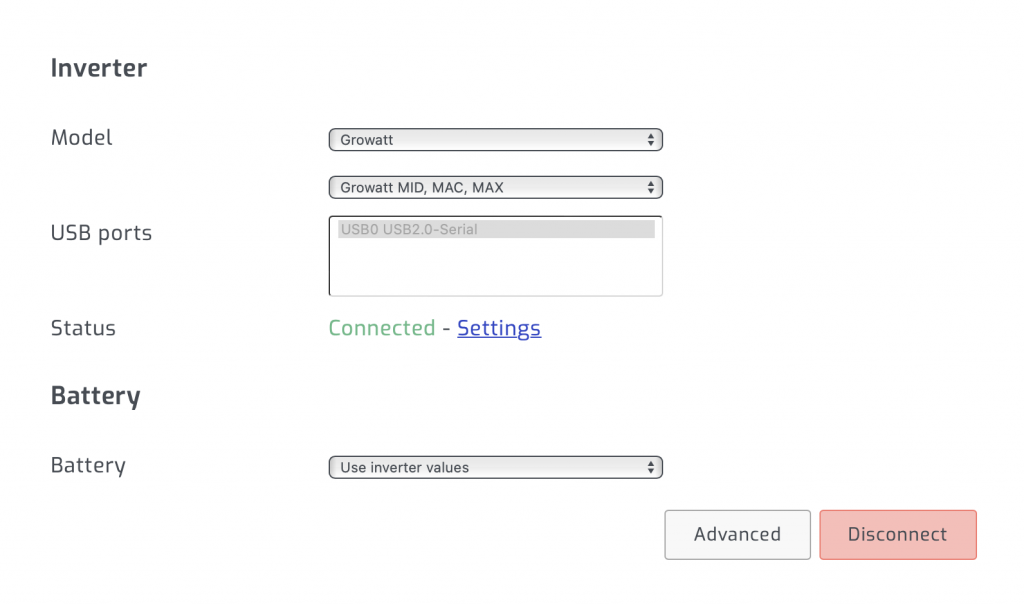
After initial installation and WiFi/Ethernet setup, it’s time to configure for the selected inverter and battery.
However, before actually going to the configuration part, license activation is required. If you’ve already bought the license, choosing an available site name and activating the license is enough. If not, you can use the ‘use trial’ period to test the system beforehand. The trial is a bit weird case though, since you can’t get the image download link anywhere until buying the license. So in practice there’s no trial at all..
Once license is activated (happens instantly by the way), all that is needed is to select corresponding inverter, USB device used for the communication and setting up PV maximum power values. Once set, just press ‘start‘ and data should begin flowing from the inverter to the solar-assistant.
Through the cloud and client device support
Activated solar assistant can work through cloud tunnelling and you can basically view it from any place in the whole world as long as you have internet connection of course. This is a blessing and a curse at a same time: you have access, but you also expose your data for hackers so you must rely on security of the software and service. In my case, I would rather use Solar Assistant local only, but so far, I haven’t found a way to actually disable the cloud connection. Of course I can, and I will, block the connection to the solar-assistant cloud from my WAN router.
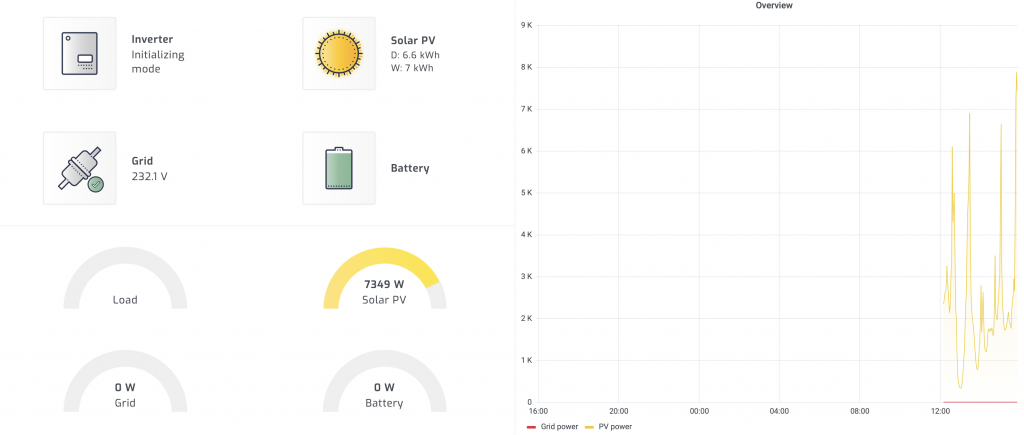
Solar Assistant Web UI is designed to be scalable and can be viewed with many sizes of screens without any issues. It can be even ‘installed’ as an Android or iPhone application for a quick access. An excellent choice if you want to view solar data quickly without navigating to the web site through a browser.
Viewing the data
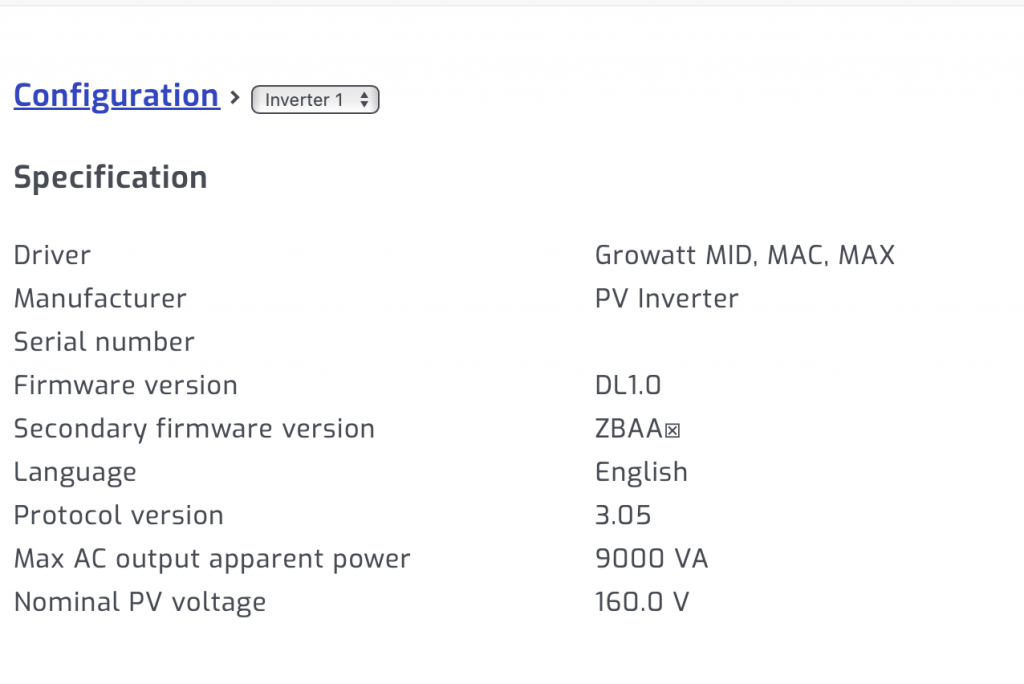
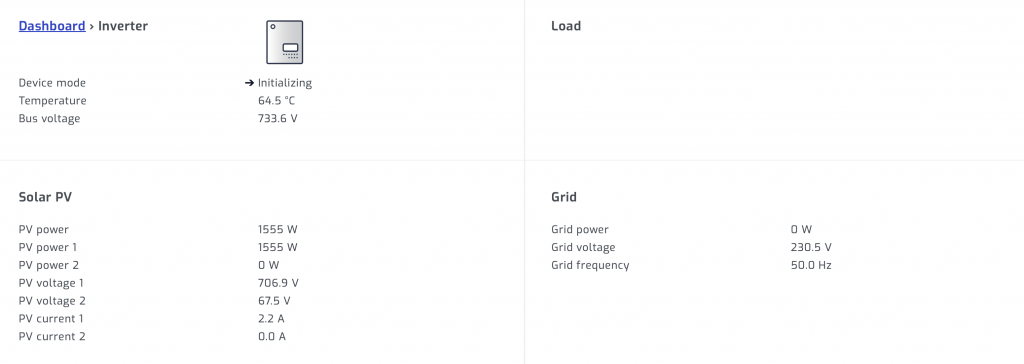
As with all data loggers, the data can be divided into two main areas: realtime data and historical data. Available data depends very much of users setup like battery system and inverter model. With my Growatt MOD 9000TL3-X inverter I get all the basic information: inverter temperature, bus voltage, PV power, voltage and current from both inputs and grid voltage and frequency. All that data can be viewed real-time or as historical from any period.
If also owning a battery system and a hybrid inverter, you can also get the data from the batteries and control the power usage of those (depending of the inverter model). I don’t have battery system my self at all, so unfortunately I can’t give you any more details about these features..
But since I don’t have the battery system, I would like to hide all battery related data from the screen, unfortunately that’s not possible with the Solar Assistant. A bit of a disappointment as I don’t want graphs with zero values to be visible all the time.
Integration to Home Assistant
I admit it, I’m a Home Assistant addict and everything I put in place SHOULD have a possibility to be integrated into Home Assistant. Luckily Solar Assistant has taken care of this already as it supports real-time values to be sent directly to MQTT broker. There’s a catch though, Solar Assistant hosts it’s own MQTT broker and there’s no way to configure it to use external MQTT broker, but we can do an MQTT bridging between two brokers though, just needs some more configurations.
Setting up MQTT bridge between Home Assistant MQTT Add-On and Solar Assistant
First we need to enable the MQTT broker from Solar Assistant configurations. The things we need to enable with the Solar Assistant broker are username + password and to enable Home Assistant discovery, so that all the entities will be automatically be found by the Home Assistant. Once those are done, enabling the MQTT broker from main configuration page should do the job on this end.
More complicated setup is then needed in the Home Assistant end. For this, we need to add a new bridging configuration to Home Assistant systems /share/mosquitto/solar_assistant.conf file either by using File Editor or SSH terminal (I used the SSH).
File contents should be following. Just change the username + password you set in the Solar Assistant end and Solar Assistant device local IP address:
connection SolarAssistant
remote_username solar-assistant
remote_password solar-assistant-password
address 192.168.1.100
topic # in
topic solar_assistant/# out
But that’s not all.. we still need enable the custom configurations by going to the Home Assistant MQTT Add-On page and configurations. Set the active to true and folder as mosquitto:

Now just save and restart the add-on. The real-time data should now be seen in Devices & Services -> MQTT integration.
Conclusion
Solar Assistant does what it is needed for: logs data and provides real-time information to Home Assistant. However, it does not have much of a fancy features and lacks lots of customizations that expert users would like to have: e.g. customising visibility of the items, more complex MQTT configurations, cloud enable/disable or even direct access to database. Also the release cycles of the software seems to be quite long and not that many updates are brought to the customer per year.
If the data logger part was not needed and one would just require a real-time data passed to the Home Assistant, there’s most probably a better and cheaper ESP32 based options out there. But as a data logger, Solar Assistant does it’s job in a good level.
I’m going to keep this Solar Assistant running for now (I’ve bought it already, so why not..) and maybe later to see if there are any better open-source alternatives available with more customzations.
Thanks for a great write up!
Have you noticed if support for this inverter has improved with Solar Assistant, so that you can also control operation of the inverter through Solar Assistant and ultimately Home Assistant?
Hi Mike and thanks for the feedback!
Unfortunately, I’ve not checked if the controlling is supported by the Solar Assistant as I don’t have hybrid inverter myself (basically I have nothing to control) 🙂
thanks for the great explanation, I just have a question, would you mind share/show how you made the cable for both ends?
Hi!
Found a picture only of the Growatt side connector (https://www.creatingsmarthome.com/wp-content/uploads/2024/06/20230718_204929.jpg).
Anyhow, both end are just screw terminals no nothing too fancy needs to be done 🙂
thank you very much Toni!
I flashed ESPhome to the USB WiFi stick that came with the inverter.
Then used https://esphome.io/components/sensor/growatt_solar.html
Works exceptionally well.
Can see the same data in real time.
I am also controlling the maximum allowed output power, to limit the solar production during negative spot price times.
There’s an option to limit allowed output power in Growatt inverters?
I’ve not found such feature using the Solar Assistant, but it could really come handy in cases when negative price is effective.
Yes! Although it’s not officially visible anywhere, like in the mobile app or the inverter touch screen panel.
I found it by reading through the Growatt Modbus documentation, available here: https://www.photovoltaicsolar.in/Growatt_Manual/MAX%20Series%20Modbus%20RTU%20Protocol.pdf
So in practice, write the desired output power in percentage (of the full output power of the inverter) to Modbus register number 3.
I did this in ESPhome by adding a number entity:
“`
number:
– platform: modbus_controller
name: “Solar Max Output Power percent”
address: 3
value_type: U_WORD
min_value: 0
max_value: 100
entity_category: config
“`
And then I implemented a Home Assistant automation that automatically decreases or increases the output power when electricity spot price is negative. It tries to achieve zero net grid power (ie. no import nor export) and takes into account the situation where the car charger is charging (then I want the solar inverter to output in full power).
I think this would be a good idea for a blog post that I could write.