
Review: SwitchBot Blind Tilt Controller
I’ve already dove into the SwitchBot ecosystem and this time it’s time to check out their most innovative product yet: The SwitchBot Blind Tilt Controller.
Blind tilt controller is designed to fit onto existing window blinds so it’s a perfect match for people that want to do some smart retrofitting on their current home! They say that the blind controller will fit 99% of the existing blinds and I must admit that I was a bit sceptical at first that how will it fit into my blinds and does it really work as promised.. well, continue reading if you wish to find out how did everything work out 🙂
Disclaimer: I was contacted by a SwitchBot representante few weeks ago and we agreed that I will try out their devices and write an article about it. So even though the products to be tested are sent as a gift, all the reviews and discoveries in this article are all 100% honest as always!
Specifications
The promised specifications of the tilt blind are:
- Support for 99% of tilt blind types
- Easy installation
- Solar panel charging
- Precise alignment
- Light sensing
- Automations and voice control (with the HUB)
- BLE 5.0
Pretty impressive specifications I’d say, but let’s have a closer look if any of these are actually true!
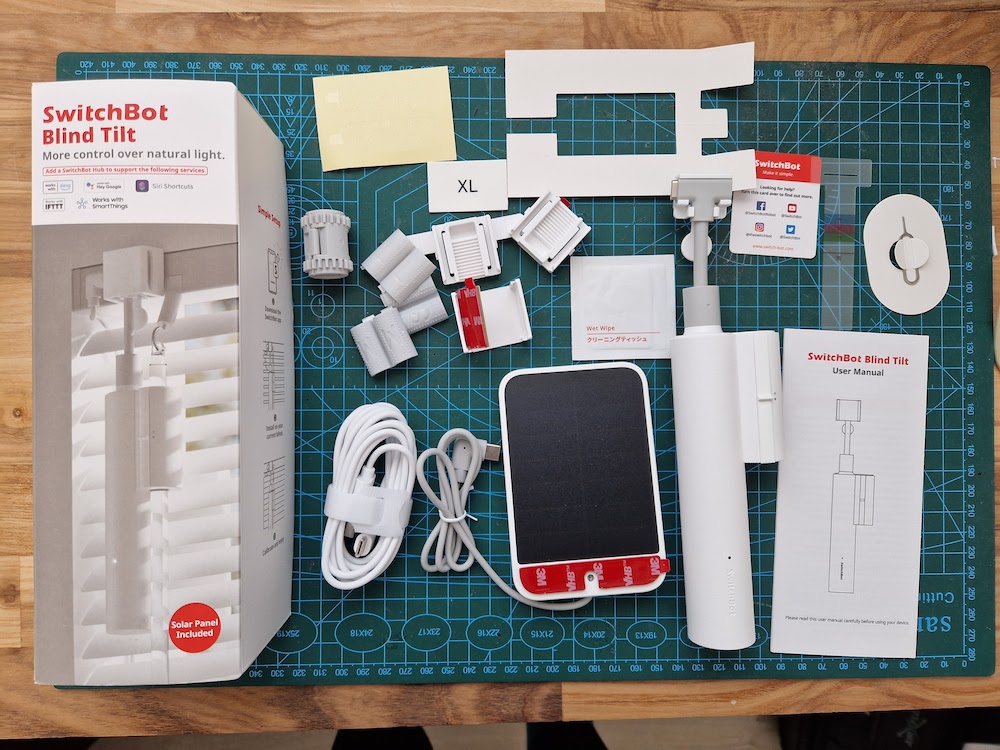
What’s inside the box
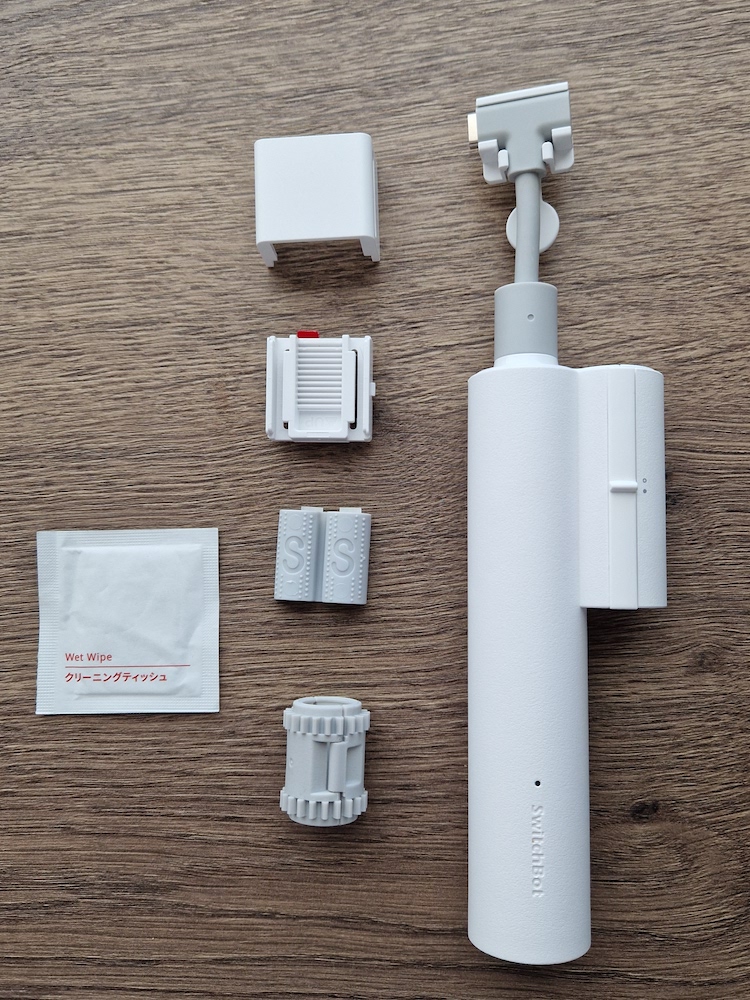
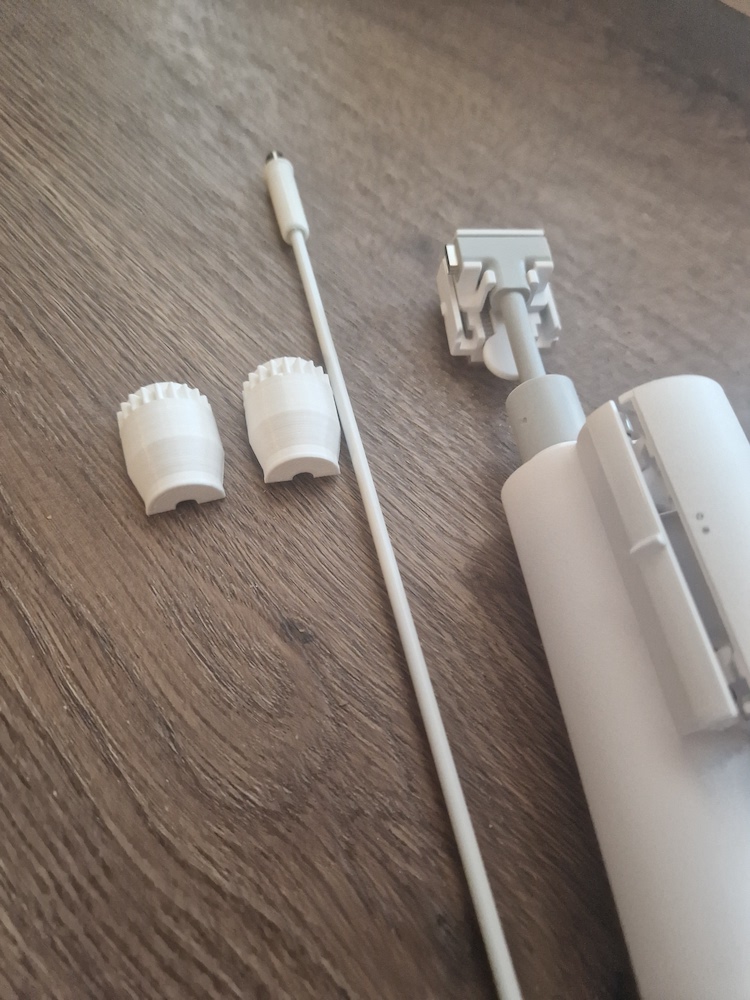
When opening the box and checking the contents, there’s LOTS of items inside. The blind controller and solar panel are of course the most important ones, but when having a closer look there’s also three blind wand adapters, a plastic blind wand connector, few connectors to connect to the window frame, couple of different measurement templates, a wet wipe (!), extra adhesive stickers and of course a installation manual and an USB-c cable for charging.
It might get a bit confusing at first to think how does everything comes together, but in the end, only half of these are going to be in actual use. It just that the device has support for many types and sizes of different tilt blinds. Which is good, of course.
Installation
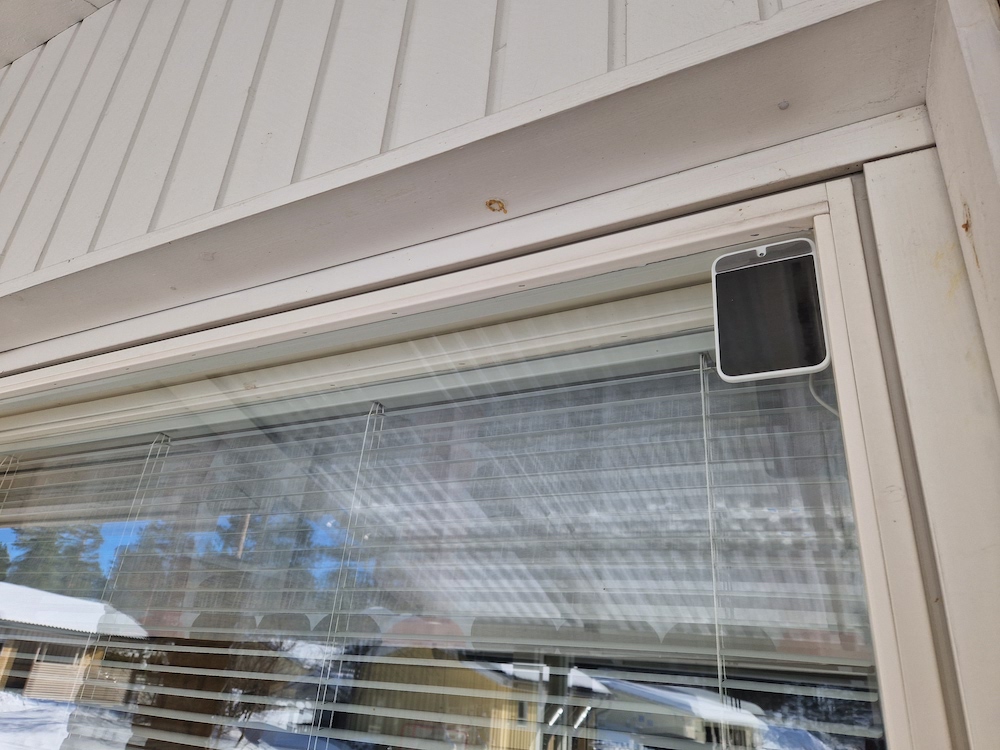
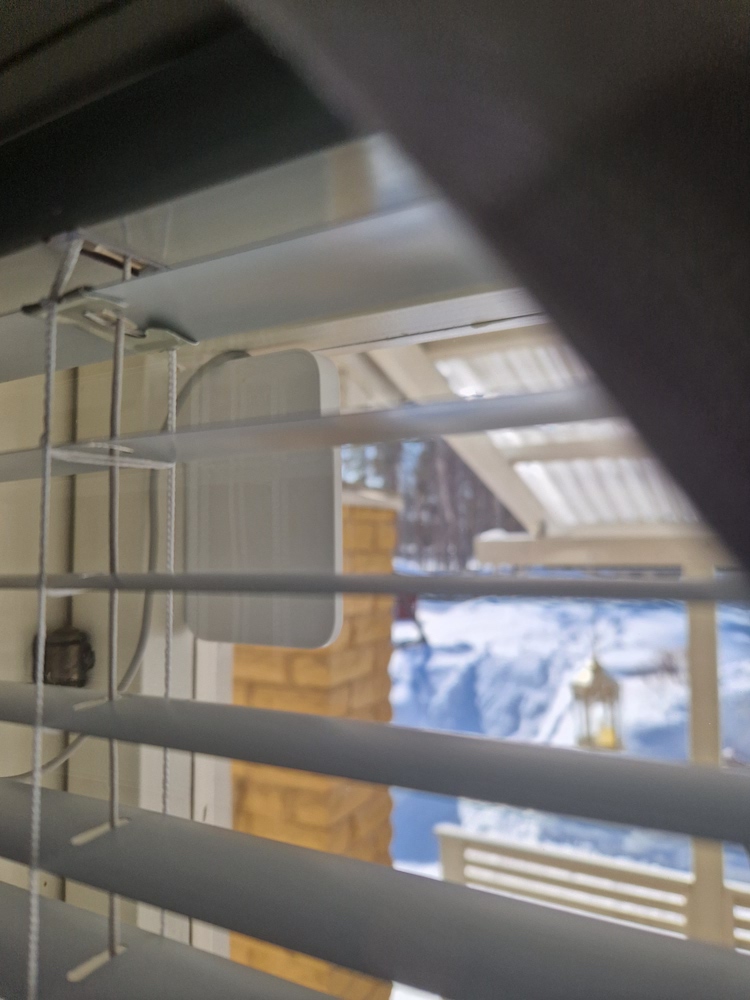
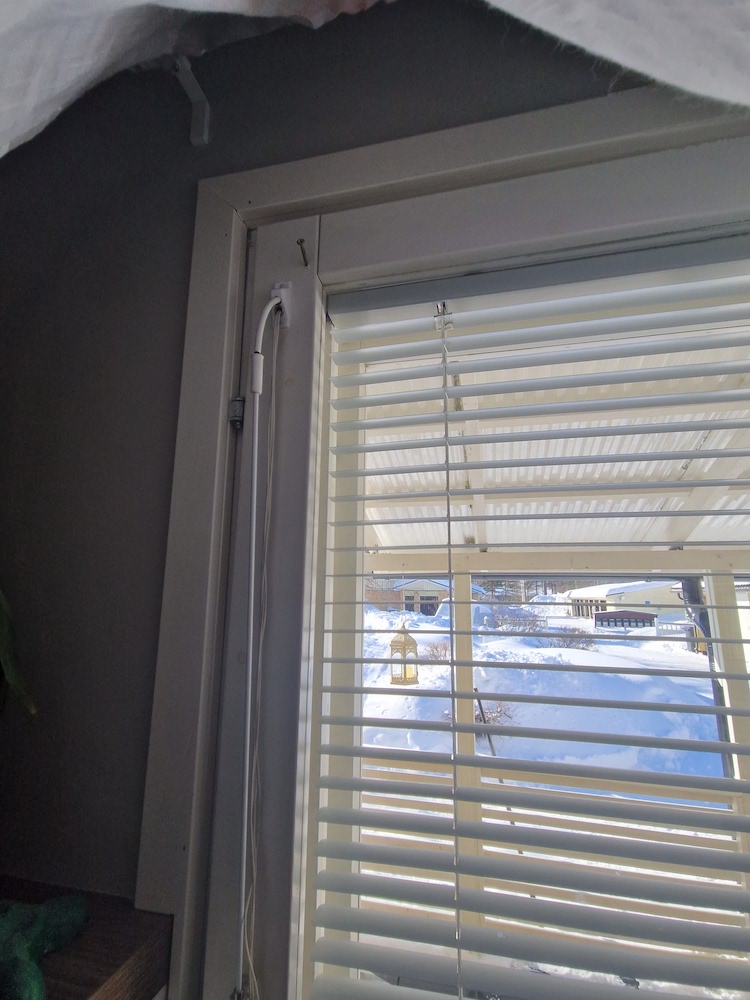
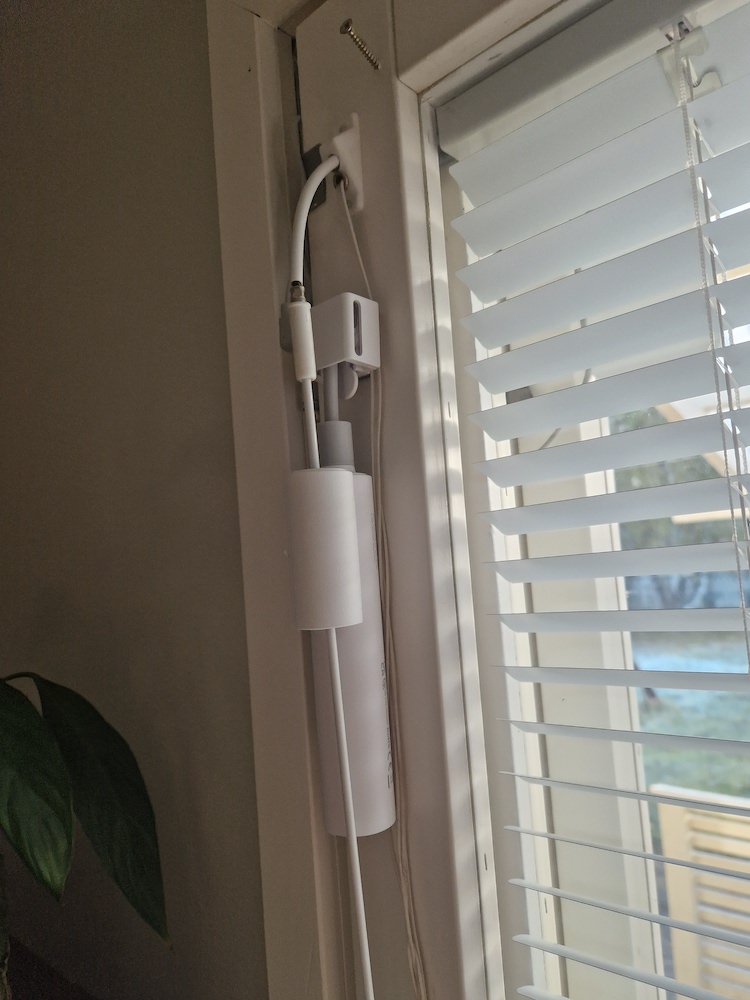
My blinds are not the most common type used in the Europe, but common in Finland, so I was a bit sceptical if I really can fit the controller in my existing blinds. My tilt blinds are located in between the two inner window glasses and the rod is coming out through the window frame. Also, the size of my blind wand is just two millimetres! However, there’s a joint connector in the upper part of the wand that connects the spring coming out of the blinds and the rotating wand it self, and the diameter of that is exactly 6.7 millimetres which is the minimum size supported. So maybe there’s hope after all.. In the SwitchBot manual examples they only show the guide, how to install over the window venetian blinds.
Another thing I was worried about in the beginning was the stiffness of the wand rod and the fact that the rod is only rotating 360 degrees (180 to fully close down and 180 to fully close up. In the middle fully open).
Setting up the solar panel
In the manual there’s instructions to set up the solar panel behind the blinds. But, my blinds are in a quite tight fit between two glasses, the blinds won’t turn properly if the solar panel is installed in guided position. The provided solar panel is somewhat thick from the upper part of the panel, so it needs some space to install, which I did not have.
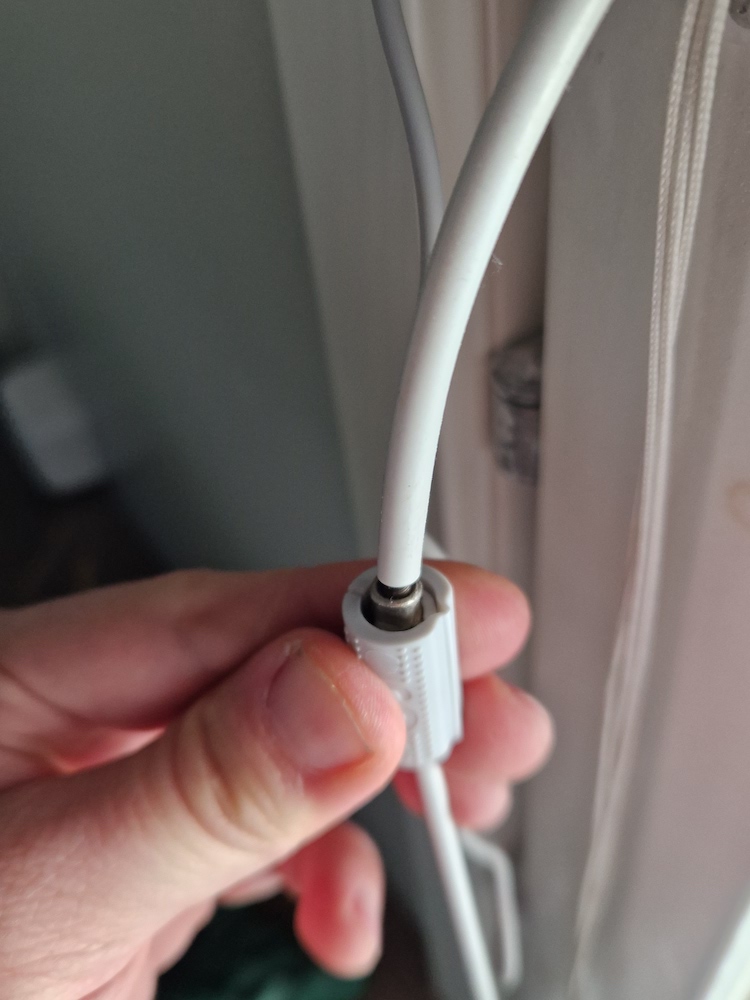
A bit of planning and I decided to install the solar panel behind the most outer window and bring the charging cable through the sealant. I was a bit worried (again) that the cable will break since it’s in a quite big compression between the window glass and a sealant, but luckily it worked and no cables were harmed! However, if installed this way in a window that is opened and closed frequently, it could break at some point eventually. I might have to do a small hole for the cable at some point..
The solar panel did have preinstalled an adhesive sticker that just needed to be placed on the window and voila, it’s in a place!
Now solar panel is now in place, next it’s time to install the actual controller!
Installing the controller
Since there are lot of parts and the user guide has many alternative options for installation, it can get a bit overwhelming to actual get an idea how everything works. But, in the end, it’s actually very easy! Here are the steps I did:
- Measured the blinds wand diameter using provided measurement tool
- Selected proper adapter (small in my case)
- Set the adapter in place to the wand connector part (the wand itself was too narrow)
- Set up the gear wheel part on the adapter
- Installed the connector itself to the gear wheel
- Cleaned the window frame with provided wet wipe
- Sticked the controller to the cleaned part of frame
- Set the small cover to the upper part of the connector
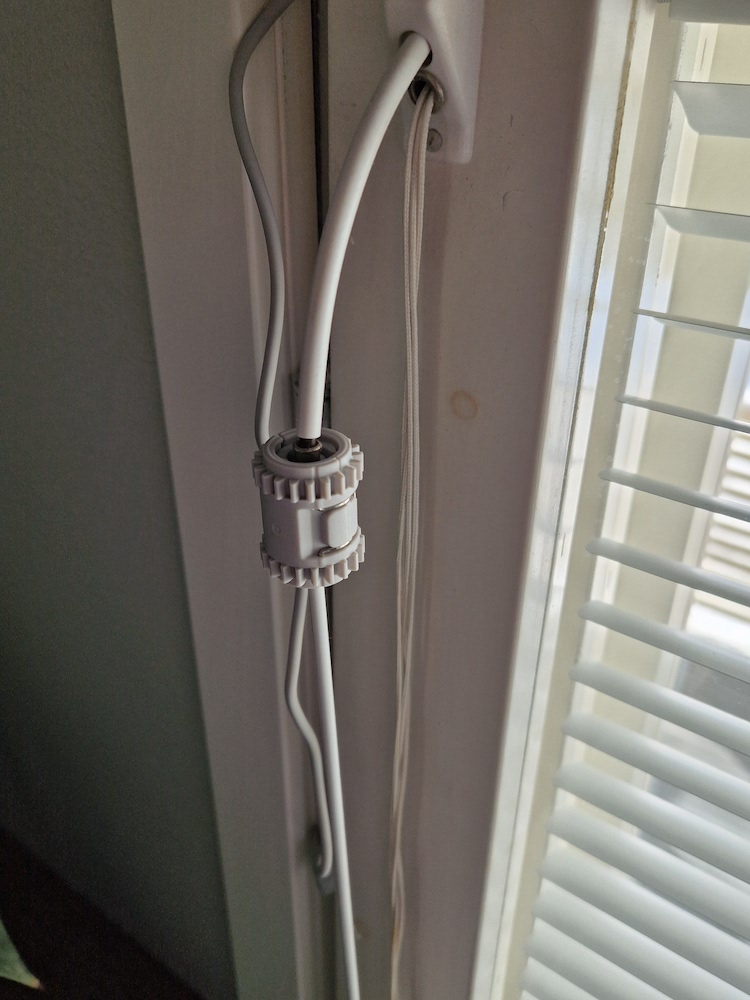
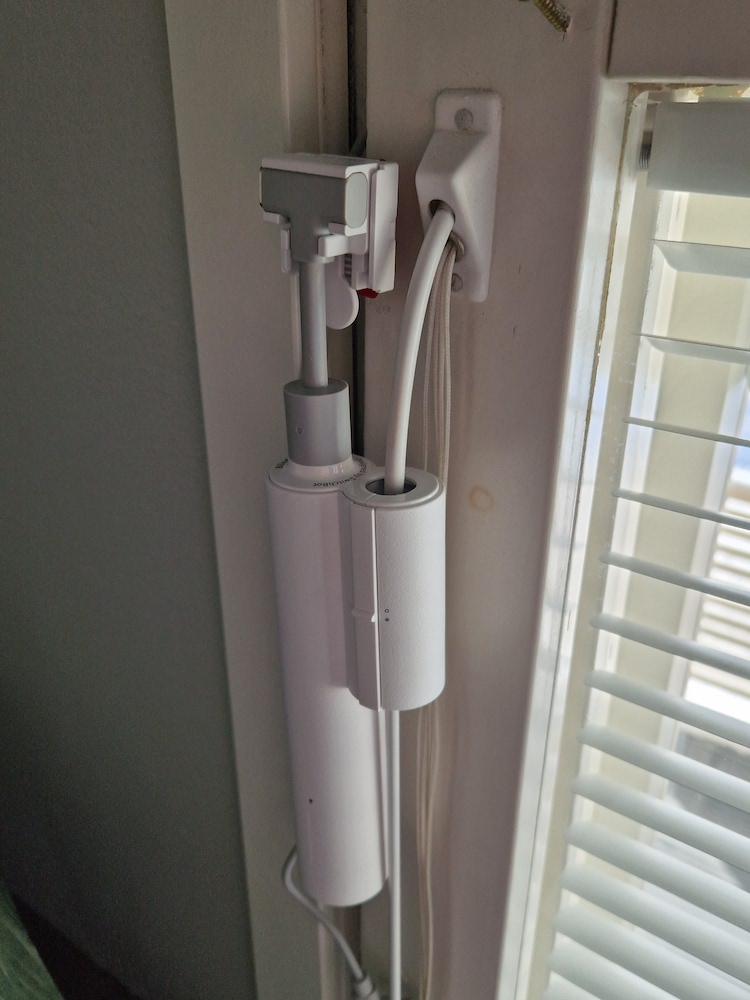
- Connect solar panel cable
Ready! Not that bad of a chore, at least on my environment. In most of the blind types, probably would need to use the template that marks the proper height position of the wand adapter. But in my window blinds, I did install the controller in the window frame. That’s where the wand is coming out of, so I did not need use the template and mark the position for that at all.
22.10.2023: I designed and 3d printed an adapter for thin rods (3mm) to make the installation more solid. This method requires an 3D printer plus some two sided gorilla tape. The model can be downloaded from thingiverse.

Configuring the device
When first time powering the device and starting the SwitchBot software, it will scan a new nearby BT devices and guide through the full setup process.
At the beginning, the software asks to pair the device by pressing the button few seconds from the device itself. Once paired, a name and area of the device is queried from the user.
Second we need to calibrate the tilt control! Once again, this is fully guided through by the software. Basically there’s a need to turn the blinds to fully closed down, in the middle open and fully closed up. After this is done the device is ready to use!
Optionally, if used the HUB, the software asks kindly to enable cloud connection in order to use voice voice commands and automations. To use the voice, the user needs to have Alexa and/or Google Home device of course.
Usage and the SwitchBot software
And then the most interesting part of the controller, does it really work and Is it any good? Well, short answer is absolutely yes. Continue reading to find out more details..
Mechanical quality
As said in the installation part I was a bit worried if the controller motor is too weak to actually tilt my blinds, but fortunately I was totally wrong in here. The motor does not have any issues of tilting my blinds what so ever. In addition to that, the motor is quite silent and wouldn’t even bother if placed in the bedroom and opened/closed during the sleep.
The adhesive tapes are very strong and keeps all the parts in place firmly. Only thing I’m a bit concerned that will the solar panel sticker actually hold the panel in place for years? It’s at outdoor temperatures all the time (in my installation setup) and is exposed directly to the sun light. That’s actually a good thing, so it can charge the controller. 🙂
Another concern is that will the solar panel charge the controller enough during the darkest winter time in Finland? Only time will tell and I will give you an update next winter once had longer experience with the device.
One more important thing about the mechanical quality: its wife approved! The motor does not block manual usage of the tilt blinds like my own DIY approach, so the original wand can still be used along with the smart control.
The software
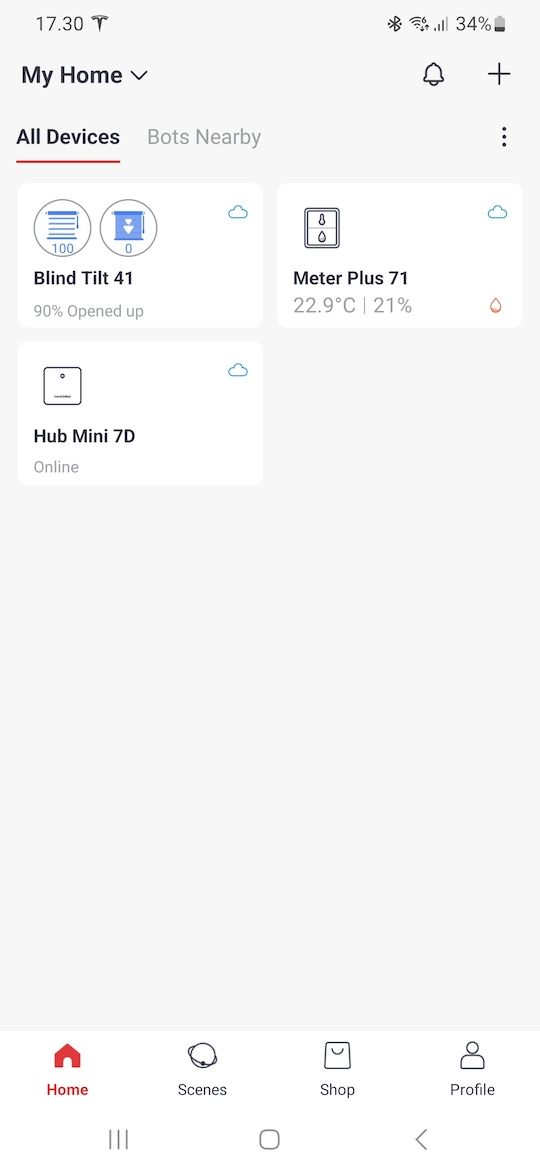
Blind tilt controller can be used with or without a SwitchBot HUB, but I’d suggest to use the HUB in order to enable voice commands (Alexa, Google) and automations. Unless you have Home Assistant or other compatible HUB already of course.
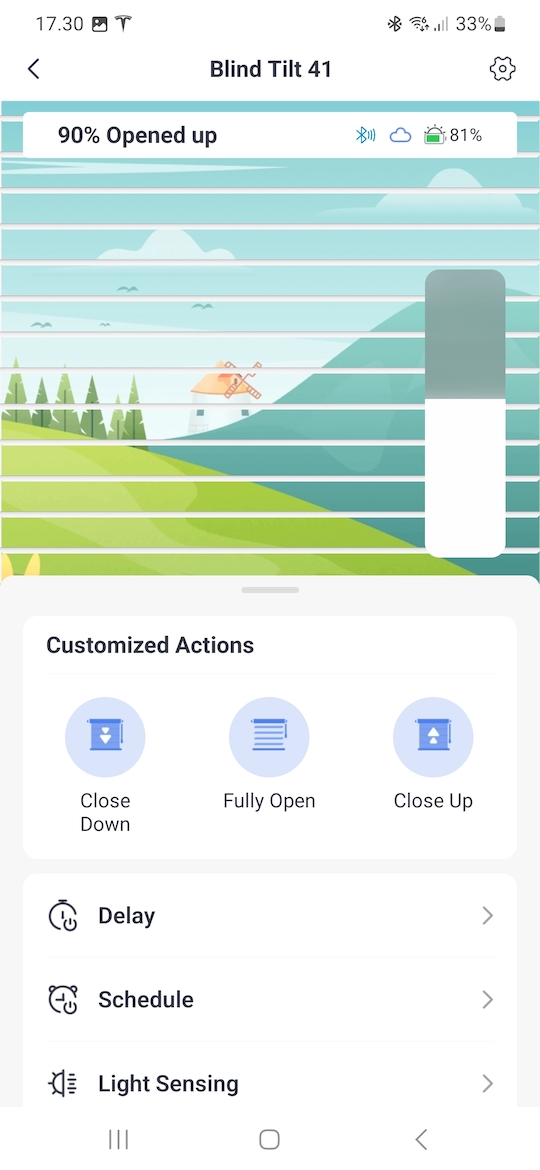
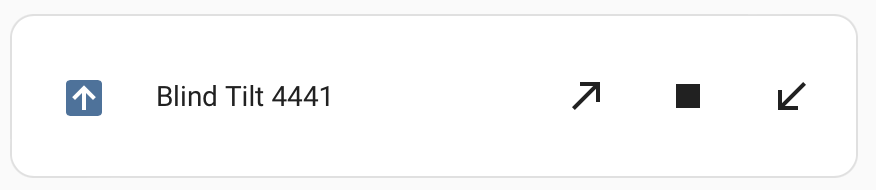
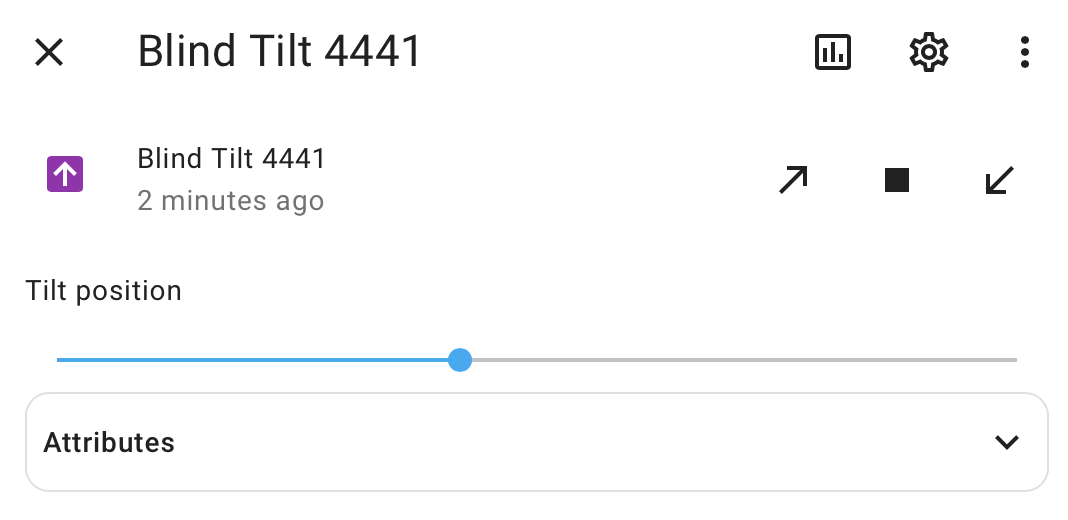
Anyhow, I really like the SwitchBot software and will continue to use it along with my Home Assistant. SwitchBot app is clearly very well designed and easy to use. Everything is guided through and corresponding devices and functions are easy to find out. Features like open, close and setting the blinds in a specific position are all supported and well placed within the app itself.
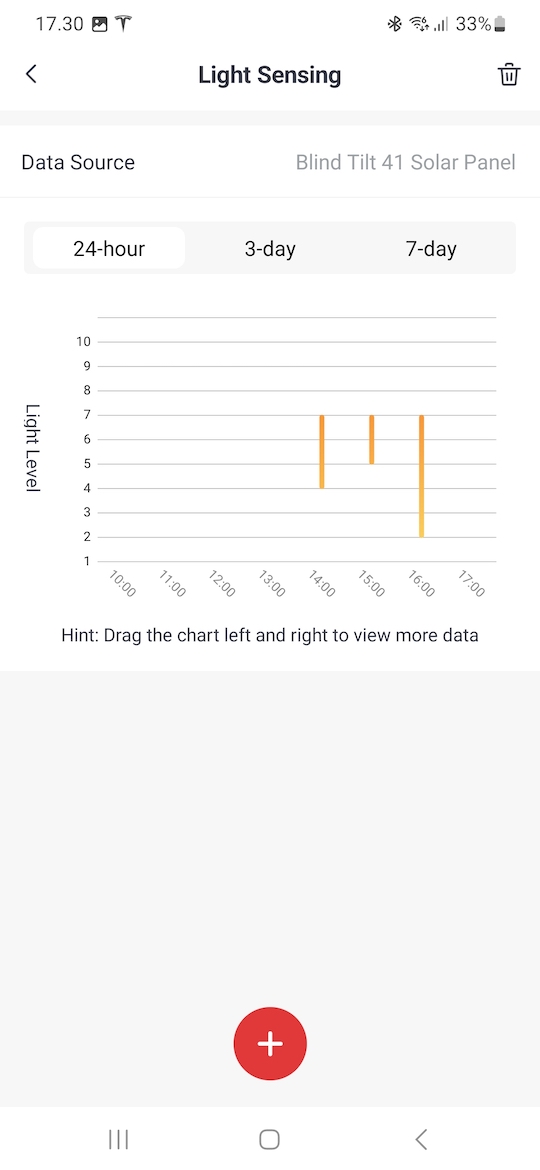
In the app there’s also a possibility to check the light status of the solar panel. Solar panel has a light sensor included and that data is provided all the way to the app and can be seen in scale from 0 to 10. I really would like to see the raw lux values also, but that’s not a big issue 🙂
The app also provides you the information about blind controller battery and charging status. It will display the solar charging with a simple solar+battery icon in the top of the view.
If using the HUB, there’s also possibility to add schedules, delays and automations triggered by other SwitchBot devices.
Integration to Home Assistant
You probably already know, that I’m using Home Assistant in my home to connect all the devices with each other, so Home Assistant integration is a crucial thing to me.
In the previous article I wrote a guide how to use ESP32 with ESPHome as Bluetooth Proxy and obviously I’m using this method to connect the controller in my Home Assistant instance. When the device is in ESP32 range it’s automatically discovered and notified in the Home Assistant notification area. The bluetooth proxy uses internally official Home Assistant SwitchBot integration, so the tilt controller provides blinds controls along with light level and battery percentage! Very nice!
Final thoughts
This is one of the most useful devices I’ve got my hands on in a long time! I really like the quality of the hardware and software with this device. In the end it was almost too easy to install and has all the features needed for daily use, no more manual tilting!
However, I don’t think the device will fit 99% of the tilt blind types (as mentioned in SwitchBot website) and I really suggest to do a preliminary compatibility checks and only order one device for test before filling out rest of the house with these. If it fits, just order more 🙂
The device is actually so good (and compatible with my tilt blinds), that I will be ordering one for all of our bedrooms! No more manual blind tilting in our house, I can automate all the day/night routines to contain all window blinds as well!
One note though: this review is written with a short time of usage and still need to see if the provided solar panel charging will be enough during the dark winter times in Finland.
Pros
- Solar panel charging
- Mechanical quality
- Supports many types of blinds
- Easy to install
- Blinds can still be used manually (wife approved)
- Not too expensive (retail price of 69.90€)
Cons
- It’s difficult to be certain if the blinds are supported before ordering one
- Bluetooth.. I still prefer something like ZigBee 🙂
Smart Home Score: 5/5
Promotional message:
Need a SwitchBot device? You can get 10% off with the creatingsmarthome.com code 10UPF4RLGELVDV directly from the SwitchBot store.
Suomessa varmaan kaikilla on tuollaiset kaihtimet, ainakin vähän vanhemmissa asunnoissa. Itselläni myös.
Sain viriteltyä tuon Blind Tiltin siihen ohuimpaan osaan, eli suoraan varteen, en siihen liitoskohtaan kuten sinä teit.
Käytin hyvin tarttuvaa paksua kaksipuoleista teippiä paksuntamaan kaihtimen säädinvartta. Lisäksi jouduin käyttämään ohutta kaksipuoleista teippiä sen adapterin ja ratasadapterin välissä. Ilman teippiä se pyöri vain ympäri. Kuten sanoitkin, nuo kaihtimet vaatii vähä enempi vääntövoimaa.
Kalibrointia en saanut läpi millään oikein. Jäi aina vajaaksi. Joten tässäkin jouduin vähän kikkailemaan. Säädin verhot auki, merkkasin teipillä kaihtimen säätimeen parit viivat, toinen kaihtimen ollessa auki ja toinen pystyviiva kaihtimen ollessa kiinni. Jätin kaihtimet auki, irrotin säädinvarren sen liitoskohdasta, jolloin se pyöri käytännössä tyhjää. Sen jälkeen käynnistin kalibroinnin ja väänsin kalibroinnin ohjeen mukaan, mutta aina reippaasti yli pystyviivojen, noin 270 astetta.
Esim. Auki asennosta kiinni asentoon, käänsin vartta 270 astetta vastapäivään. Seuraavaksi auki asentoon käänsin vartta myötäpäivään noin 225 astetta. Ja ylä-kiinni asentoon seuraavaksi väänsin myötäpäivään 270 astetta ja viimeinen auki asento taas noin 225 astetta vastapäivään.
Kalibrointi suoritettu ja kiinnitin kaihdin säätimen takaisin liitoskohtaan.
Asensin tällä tavalla kolme säädintä.
Aurinkolaturia en ottanut käyttöön. On vähä turhan ruma laittaa ikkunaan kiinni. Periaatteessa jos sen haluais ottaa käyttöön niin sen vois laittaa ehkä myös sisäpuolelle, kaippa se sen verran ehtii lataamaan siinä ajassa kun verhot on auki.
Pitää nyt katsoa kaunko akku noissa kestää ennen kuin pitää laittaa lataukseen. Jos ne tyhjenee nopeasti niin pitää sitten harkita uudelleen aurinkokennoa. Nyt käytän vain battery pack -laturia tarvittaessa.
Moottorin kiinnitin ikkunan karmiin kaksipuoleisella teipillä. Hyvin pysyy väännöstä huolimatta.
Mutta muuten oikein hyvä tuote. Ei vain ole suunniteltu Suomen kaihtimiin, mutta pienellä virittelyllä saa toimimaan.
Tuohon edelliseen kommenttiin pieni korjaus kalibroinnin suhteen:
– Aukiasennosta kiinni asentoon = vastapäivään 270 astetta.
– Kiinni asennosta auki asentoon = myötäpäivään 315 astetta.
– Auki asennosta ylä-kiinni asentoon = myötäpäivään 225 astetta.
– Ylä-kiinni asennosta taas auki asentoon = vastapäivään 315 astetta.
Toivottavasti muistin nyt oikein.
Thank you for the comments Sami!
And for foreign readers: The comments are in Finnish, but very useful and related to the article + SwitchBot Blinds installation, so you can use e.g. Google Translate to get more out of it 🙂
About the installation location of the motor. Does the motor installation bracket interfere with opening the window in your installation? So if install location would be the same in small ventilation window would the window still work normally (open to about 45 degrees)?
Yes. The window won’t open 100% if installed like I did.
I’ve hear that some has set stuffing (e.g. thick tape) between the installation bracket and the thin part of the rod. I currently have four more tilt controllers waiting for installation and most probably will try the method out. Using that style it should be possible to install on the center of the frame.
Thanks for this review. Now I feel that it can be worth to trying them as I have similar blinds construction as you. Do you know how many mA the use when tilting the blinds?
Don’t know about that sorry.
But if you are worried about the battery life, here are my experiences:
I’ve been running one blind tilt controller at the bedroom for three months, battery starting at 80%.
Minimum of two tilts every day (one open, one close) and now I got 19% of battery remaining.
Another one with the solar panel installed I’ve never have to charge it and it’s been on for more than eight months.
Hi!
Great article !
I would appreciate your opinion in my case. I have integrated blinds, like this: https://www.articstore.fi/tuotteet/salekaihtimet/integroitu-salekaihdin/
I was wondering would this work for my blinds – I think I would have to install those inside the window. I have two concerns.
They would be nicely hidden but I’m worried about the temperatures . I checked spesifications, I think temperatures should be inside operating temperatures.
Also would the device nicely between window? Space inside window seems to be more than enough but hard to say based on pictures.
Thoughts?
Hi!
I think the temperature inside the window is not a problem. In worst case using the controller inside the window could affect the battery life of the device decreasingly, but should not be a real issue.
However, I don’t have experience of that type of blinds so there could be few issues:
Does the tilt rod of the blinds fit inside switch SwitchBot tilt controller? You should be able to modify and print a proper adapter from my design if needed though.
And the real question is, what you mentioned also, if the controller fits inside the window? If you can measure the space between your windows I can then check the width of my tilt controller to see.
Also if you could take a picture of the rod inside your window, I can try to ‘guess’ if the blind controller is compatible.
A wild card: seems like you’re from Finland. If you happen to live near Oulu, I can borrow you a blind controller for testing 🙂
Hi!
Guessed right, I live in Finland but unfortunately not near enough for the borrowing, thanks though :).
Based on pictures I would imagine size is not the issue – easily 11cm space: https://pasteboard.co/kkSUciT6J1cW.jpg
Rod might be the issue – is the metallic rod too small? It’s about 3 mm (one side is flat): https://pasteboard.co/NP2U7sn2Z4JX.jpg
Thanks for the reply in advance!
Hi and sorry for the late reply.
There seems to be a plenty of space between windows, so no issues expected with that.
I also have 3mm rods and the controller works fine with a custom 3D printer adapter and some double sided tape so I guess it should work on your setup as well.
Here’s a link to my adapter design: https://www.thingiverse.com/thing:6277537
My recommendation is to order one and test it. Most probably will fit just fine, but only trying it out will tell eventually 🙂
Encouraged by this post, I ordered few switchbot blind tilts. We have pretty standard Finnish windows with the standard rod.
At first I tried installing it to the “joint” of the wand which is thicked but I quickly found out that as it is not really attached to the wand it started to spin freely when trying to get the blinds to their extreme positions where the resistance is a bit higher.
Then I printed out your adapter but I didn’t find any thin double sided tape and I think I printed it too large so it didn’t really work.
Finally what I could get working was printing this: https://www.printables.com/model/699811-switchbot-blind-tilt-adapter-for-swedish-blinds . Looking at the image, it seems to be pretty much same wand as we have in Finland. My double sided tape was a bit too thick for this too so I ended up using the “L” adapter, but I feel this was better option anyway.
I still have some problems reaching the fully closed positions so I might use some glue or something to replace the thick 2 sided tape and get rid of the slipping.
One thing to note while connecting to Home Assistant is that if you happen to have shelly devices as bluetooth proxies, they won’t work for the required active connection on initial setup!
Thanks for valuable comments!
I used double sided gorilla tape along with the custom printed part mentioned in the article itself. The 3d print should be scaled something between 97% – 100%, depending of the printer and calibration as the fit is quite tight.
With my previous Ender-3 Pro I scaled it to 97%, but with my Bambulab P1S the 100% scale is a perfect fit 🙂
I’ve had the tilt controllers in use for a year and a half and been very happy with those. Few times I’ve had to recalibrate.
One of my blind controller only has solar panel installed and I’ve had no need to charge it ever. Without the solar panel charging needs to be done about every 4 months while on daily use.