
Guide: DIY Smart window blinds to Home Assistant
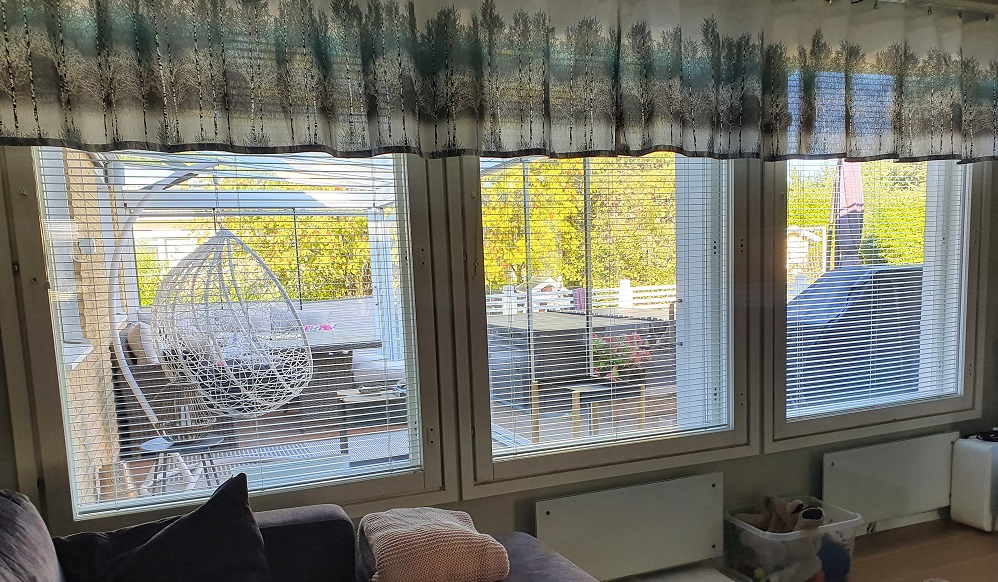
For a long time I’ve been wishing for automatic window blinds for my living room. Those three window blinds are always closed and opened at the same time so it’s “too much work” (yes, laziness is the most common motivation for smart home systems).
However, there’s no affordable ready made solutions in market so why not to do it myself? Basically everything needed is an ESP8266, power supply and a servo. Rest of the components can tinkered and boughr from a local hardware stores.
So, here’s a solution/guide how I made my blinds smart. This specific guide might not work for your blinds since there’s a ton of different blinds with different mechanical parts, so please think and experiment first how to connect your blinds into a servo before buying the materials!
My old stupid blinds and the plan
Before going to the business, I’d like to explain how my old blinds works and how did I end up doing control like this.
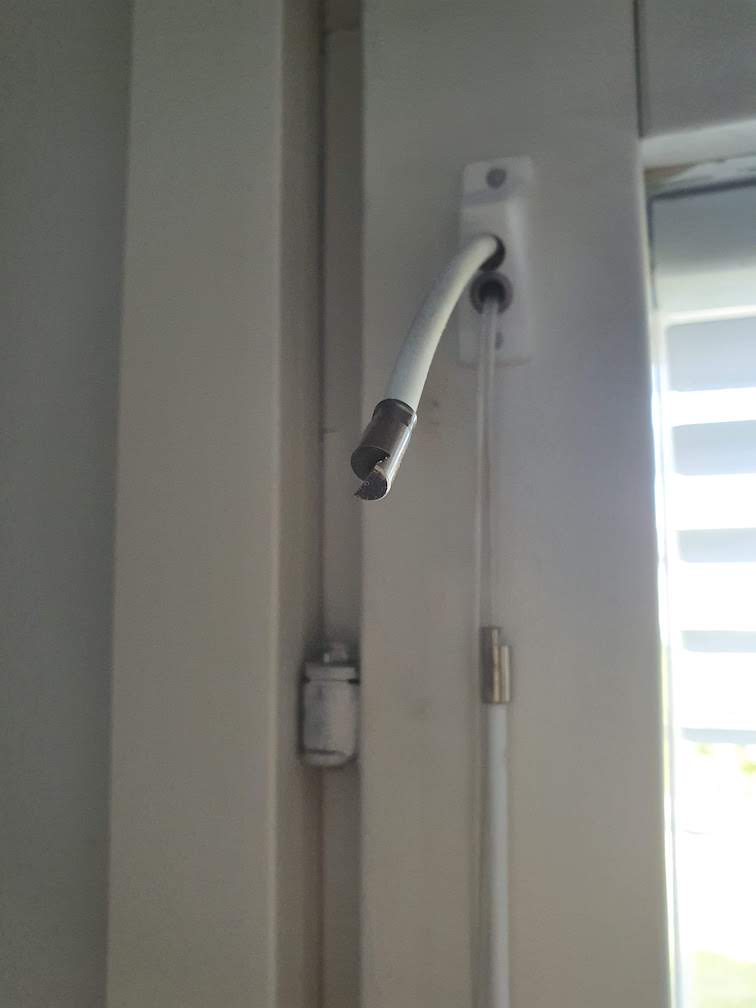
First plan was actually to install the servos inside the window, but after measuring dimensions I quickly realised that there’s no way I can fit the servo inside. So plan B was to place it out of the window and use the existing mechanical connector.
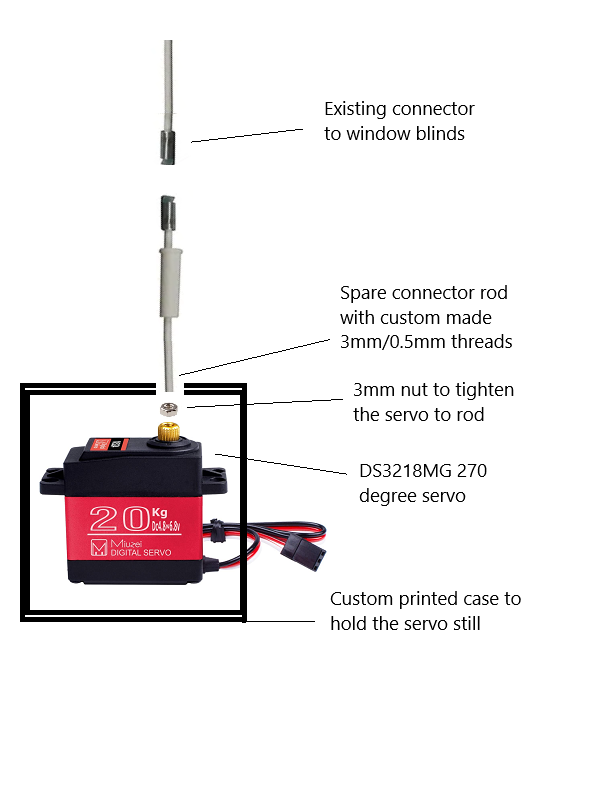
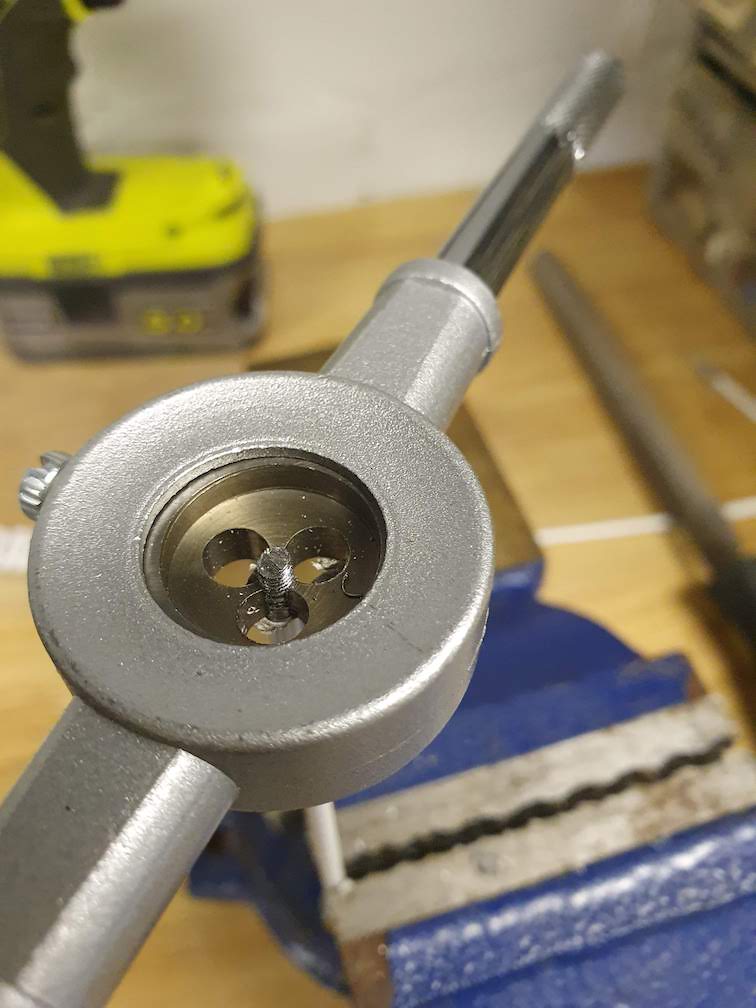
First problem of outside installation hit me when I tried to figure out how to actually connect the servo to the existing blinds connector. Luckily the rod diameter is almost the same as inside thread of the servo so I could just create outer threads to the rod and tighten it in place with a nut. A diagram of the plan and blinds connector shown below:
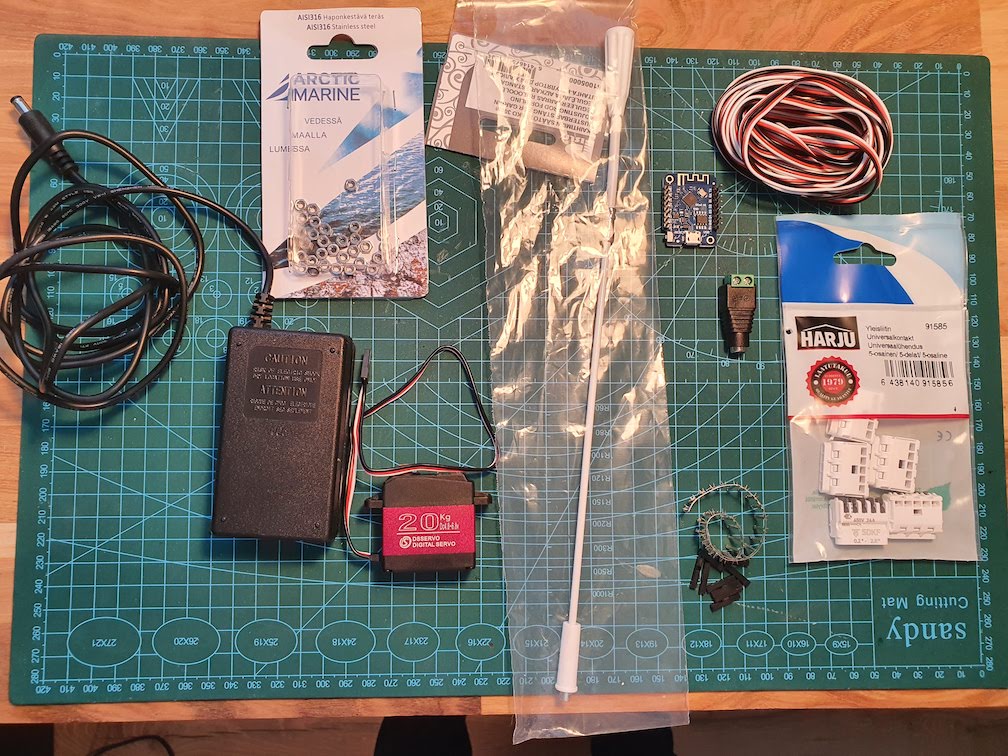
Materials needed
- Wemos D1 Mini
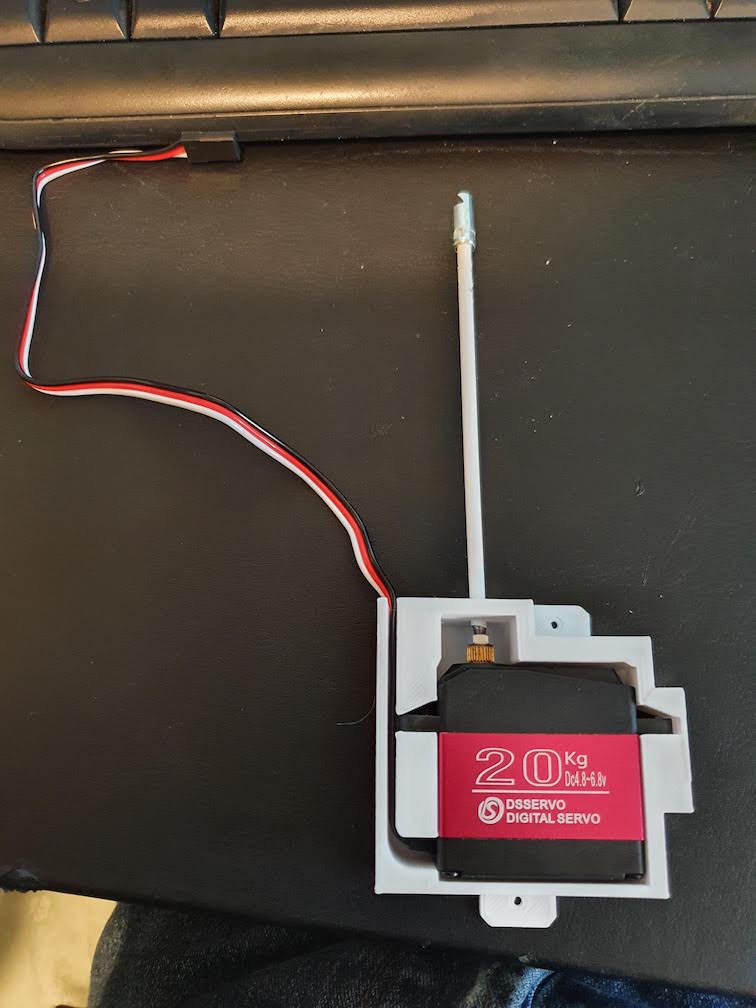
- DS3218MG 270 Servo (one per window)
- Be sure to order 270 degree servo. There are also 180 available, but that’s not enough at least for my blinds.
- 5v power supply (about 1A per blind)
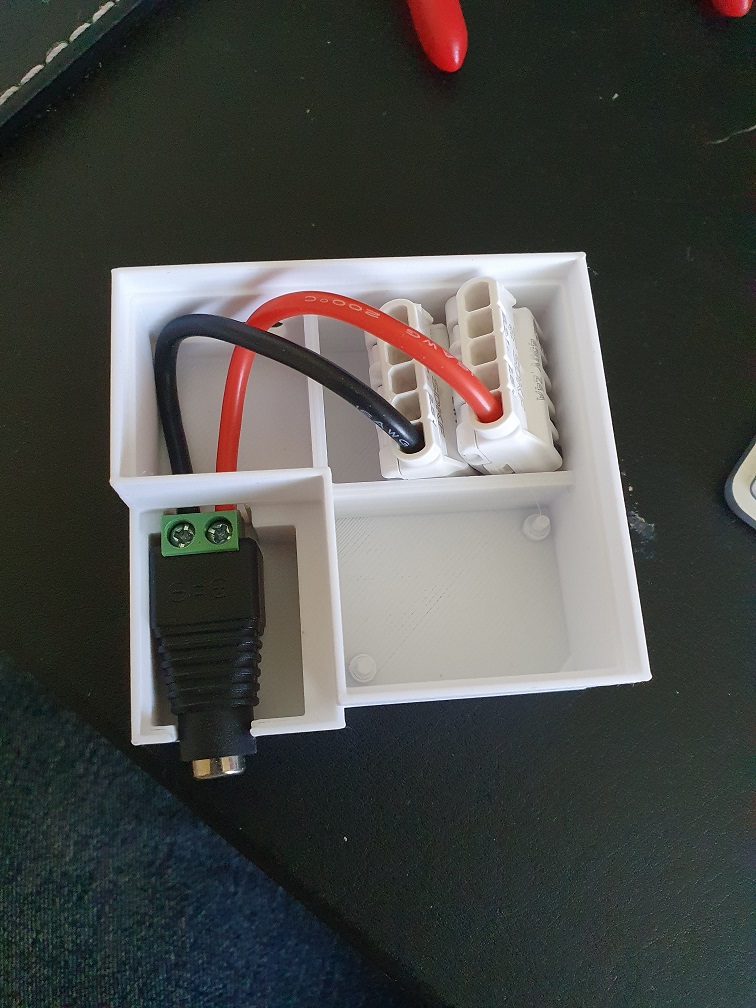
- 5.5/2.1mm Female power connector (should fit in your power supply)
- Some wire with three cores (thick enough to handle 5V/1A power + signal. (e.g. 0.75mm))
- 3mm / 0.5 nuts
- Connection rod (one per window)
- Wire connectors/splitters
Optional (for easier installation):
- 1-pin dupont connectors (one per window)
- Female servo connectors (one per window)
Software & flashing:
Tools:
- 3mm/0.5 threading tool (depending of your connection rod)
- A soldering iron
- 3D printer
Mechanical parts
This is the most important part and depends a lot of your specific window blinds. In this part, you need to find a way to connect your blinds into your servo. This part is written how I did it on my blinds so maybe you will get the idea.
My blinds are using a common nordic blinds connection system. Basically blinds will turn from closed-open-closed by turning the rod around about 360 degrees. I need the servo to be able to do open to closed so 270 degrees will do the trick. The ‘interface’ coming out from inside the window is having a L-shaped connector and there’s spare parts sold by local hardware store.
Connection rod diameter is about 3.4mm so I can cut it into proper length and create a 3mm/0.5 threads with a threading tool into end of the rod. That rod can then be screwed into the servo, because the servo has also 3mm/0.5 outer threads. Just to make sure that the rod itself won’t rotate, we need also to add 3mm nut into our newly created thread and tighten it into proper position at installation state.
After figuring out how to connect the blinds into servo we can move to the electronics part..
Electronics
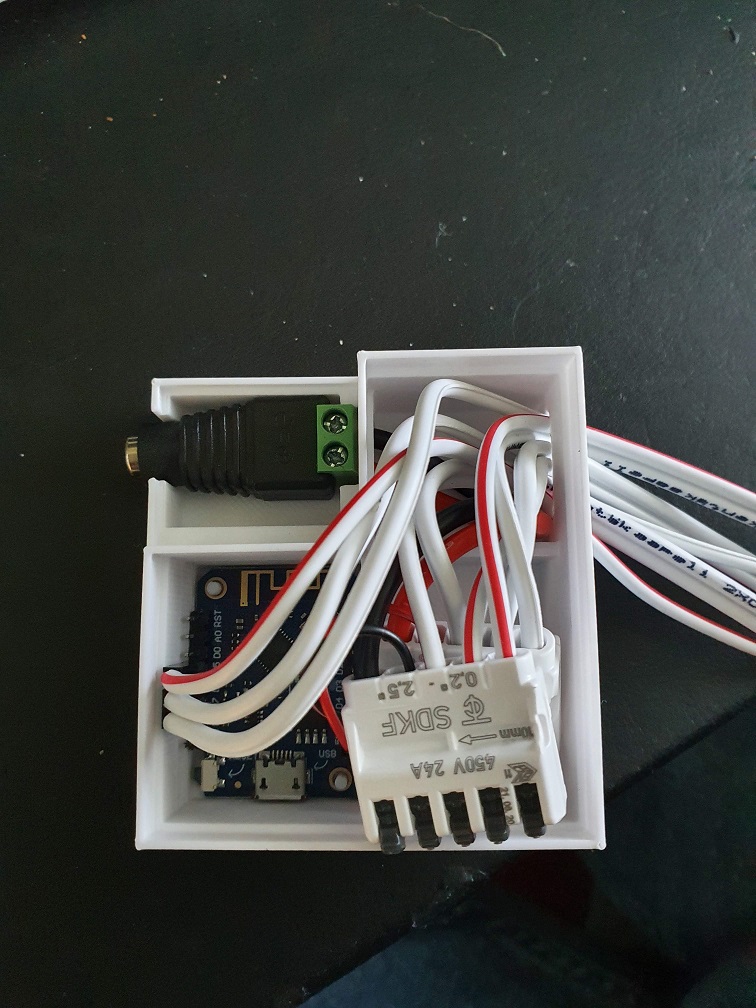
For electronics: the brains will be in an ESP8266 device (Wemos D1 mini) that will handle all the servos and report it’s state back to Home Assistant.
Electronics – Servos
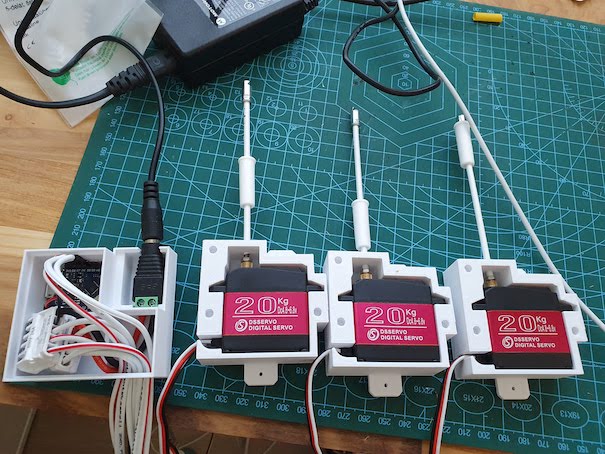
This servo is working with Dc4.8-6.8v and will draw about 1A per servo when turning so make sure your power supply has enough power to handle all the servos. I found an old power supply from my closet that has 5V/3.5A output so that should give me enough power for all of my three servos and for my Wemos.
First thing to do is to cut the wires in length. So, measure the distance from your servo place to the designed location of controller and make the cut. Make sure the length is not too long to avoid possible power loss or use thicker wire. My longest cable is about three meters long at at least that did not cause any issues with 0.75mm wire thickness.
Next either solder the wires at servo end directly to the servo (cut the servo plug) or use a female servo connector in another end to be able to replace the servo easier if needed. I would have used the female servo connectors myself, but unfortunately I’ve run out of those components. Red = Vcc, Black = Gnd, White = signal
On the other end of the cable (the controller side): peel all the wires and solder dupont connector on the signal wire.
At this point, you should have your servo with a long enough cable and dupont connector on the signal cable at the other end.
Electronics – ESP8266
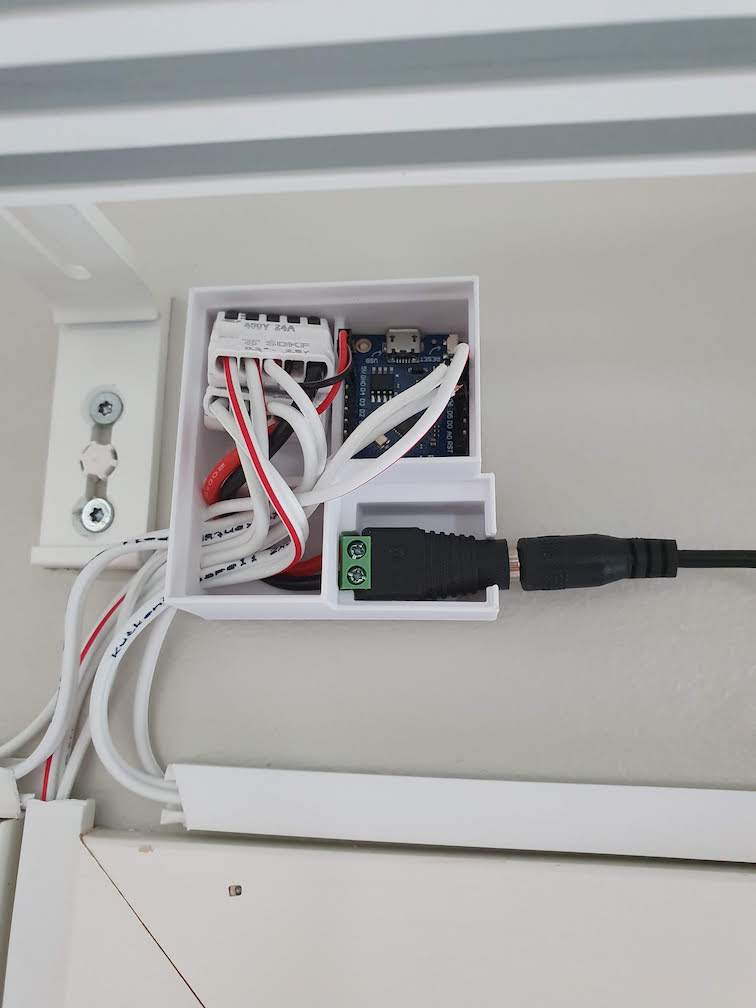
ESP8266 part is quite simple: it involves lots of wires (depending how many windows you are controlling), but zero extra components. I decided to use two five slot wire splitter to connect the all ground and all VCC lines. The main power is received from the 3.5mm power socket and forwarded to the splitter. From the splitter VCC and GND is then brought to the Wemos and servos.
The servos should be connected to any free Digital I/O pins (I’m using D5, D6 and D7 for my three servos). You just have to remember to setup selected I/O ports in the software prior to flashing.
Software
Software is written using Arduin and can be downloaded from https://github.com/kotope/blinds2mqtt. The software uses MQTT (as might be guessed from the name) so you’ll have to have MQTT broker installed and MQTT integration with Home Assistant.
I presume that you have basic knowledge of Arduino and flashing software. If not, you can find tons of information from the google. If using Wemos D1 mini, the software can directly be flashed using USB connector and no external flashing hardware is needed for that.
After downloading the software and setting up the Arduino environments, open the blinds2mqtt.h file and configure your own variables:
// wifi settings
const char* ssid     = "****"; // Your WiFi SSID
const char* password = "****"; // Your WiFi password

// Servo pins to use (each servo to be placed on it's own IO pin)
const unsigned int servoPins[] = { D7, D6, D5 };

// mqtt server settings
const char* mqtt_server   = "192.168.1.*"; // Your MQTT server address
const int mqtt_port       = 1883; // Your MQTT server port
const char* mqtt_username = "****"; // Your MQTT user
const char* mqtt_password = "****"; // Your MQTT password

// mqtt client settings
const char* client_id                 = "blinds"; // MQTT Client ID (must be unique to the network)

// Home assistant configuration
const String friendly_name = "Blinds";
Rest of the variables should not be changed if using the same hardware specified in this blog post.
Now you are ready to start flashing so flash it, but NEVER connect external power at the same time. It might burn your USB and/or damage your Wemos.
After flashing is done and the device is powered with your external power supply, you should now be able to see some MQTT messages coming through the MQTT gateway. If not, drop a message on comments section and I’ll try to help as much as I can 🙂
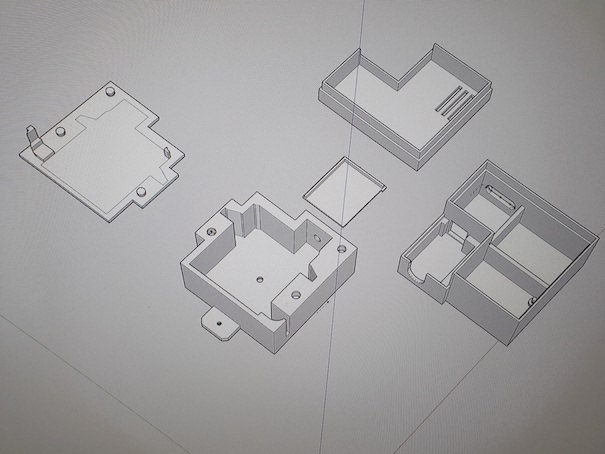
The case
To actually be able to install servos in the wall, I’d recommend to download and print the designed case for it from https://www.thingiverse.com/thing:4946890. You might be able to glue the servos in place or create other kind of case for servos, but the easiest way would be to get the case 3D printed.
Wemos and the connectors could be easily installed in standard electronics cases, but again, 3D printed case would be a better choice. Current version of Wemos case is designed to hold stuff for necessary connectors for three servos and Wemos D1 mini.
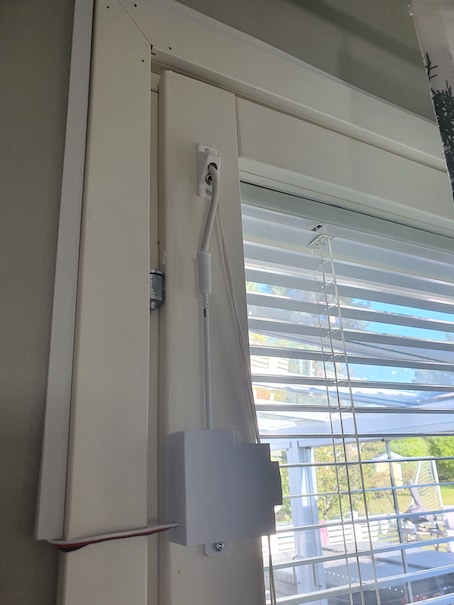
Installing into the blinds
Installing the blinds next to the window might take some tweaking and precision depending on your blind types.
First that you should do is verify that your blinds open when turning clockwise. After that, power on the controller and turn the servo on close position using MQTT commands or Home Assistant directly (see section ‘Integration to Home Assistant’). Close the blinds on closed bottom position and take out the existing rod. Put the smart blinds rod inside the servo case, screw the nut to the rod, put your servo roughly in place and connect the end of the rod to the existing blinds connector. Tweak the rod within the servo and when you are happy with the position, tighten the 3mm nut inside using narrow pliers.
You might want to test out that the servo opens and closes properly few times when connected to the blinds. If not, do some more tweaking until you’re happy with the result.
When finished, screw the case on the window frame and start installing the next servo (if needed). 🙂
Integration to Home Assistant
This time I decided to do a bit different implementation compared to Vallox ventilation project. The blinds controller is now using MQTT with Home Assistant auto discovery, so all the configured blinds should now automatically appear in your Home Assistant MQTT integrations page as soon as you power up the controller for the first time.
The blinds controller supports commands close, open and stop. Status information is received as open, closed, opening or closing. That’s it (for now).
Hopefully your installation works and if not, please feel free to drop a comment below and I’ll try to help as much as I can.
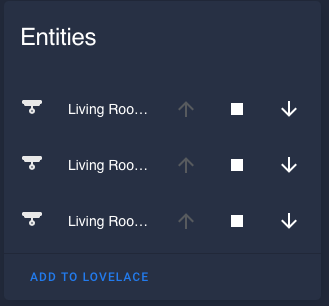

Bonus: Group the blinds under one entity
If you are using multiple blinds at the same room like I am, it might be better to group all the blinds together. Grouping is not currently supported through Lovelace UI and need to be done directly from configurations.yaml
Here’s an example of the configuration I’m using:
cover:
  - platform: group
    name: Living Room Blinds
    unique_id: living_room_blinds
    entities:
      - cover.living_room_blinds_1
      - cover.living_room_blinds_2
      - cover.living_room_blinds_3

Working fine 😉
My two servos are turning at the same direction, but I need one servo to turn opposite direction. How to do that?
Hi,
Thanks for the comment!
Actually reversing servo direction is not supported at the moment (something I did not think of).
Anyhow, very good feature request. I will try to have time to implement it on Sunday so, if you can wait until Sunday evening then it could be supported 😀
Of course, if you are familiar with Arduino and coding you might want to implement it yourself. If so, then please make a pull request to my repository and I’ll take it to master branch as well 🙂
Hi again,
Now it’s possible to reverse the turn direction of servo(s).
Get the latest codes from github and configure proper values in blinds2mqtt.h file.
You can change the direction of a servo by adding specific servo pin to reversedPins array in the config file. e.g.:
const unsigned int reversedPins[] = { D7 }; // Array of reversed servo pins. Must be subset of servoPins.Hi,
Great job. Works like expedted
Hi Toni,
Excellent guide and code even though I only understand some of it.
I have a different servo than what you are using but I did manage to get it rotating in both directions.
I am having some trouble, so hoping you can answer my questions:
1) The rotation does not stop when I press the stop button in Home Assistant, nothing happens, it keeps rotating.
2) As soon as I plug the power it starts rotating and only stops when I unplug the power (maybe related to my first question?)
Your code is the only one I found that actually rotates the servo so thanks for that!
Hi and thanks for the comment!
Your servo pulse ranges might be wrong. Servos I used were 500-2500 pulse ranges (0-270 degrees).
If using pulses over the ranges the servo might do ‘anything’ e.g. start rotating wildly.
You can change servo parameters in blinds2mqtt.h file.
Can you please share the model of the servo and I can try to tell more specific error for you? 🙂
Br, Toni
My servo model is MG99R Digi Hi Torque. I will try also to find the correct ranges.
Thanks so much for helping me out!
I bought the same servo as you are using and got my blinds automated perfectly. Thanks again Toni!
Glad to hear that, great job! 🙂
When my servo is idle, it is making a loud repetitive clicking sound like the motor is still running. Any idea what that could be?
Good morning!
What servo(s) are you using? One guy was using TD-8120MG and had the same kind of issues and had to order new set of servos (same that I’m using DS3218MG).
Hi Toni – I am using single “Miuzei 20KG DS3218 Control Angle 270°” servo. I will see if I can find DS3218MG servo exactly like you have. I though DS3218 would be enough but maybe not?
Hi Paul!
Checked the specifications of your servo and it ‘should’ be ok. However, the ‘Miuzei 20KG DS3218’ servo from amazon.com seems to have model number of MS24-F and does not have the DS3218MG labeled elsewhere except in the title.
My guess would be that the servo is somewhat bad and does not lock in a required position after moving (i.e. looking for a proper position endlessly)
Is the servo working ok otherwise?
Yes, it’s working okay otherwise.
One thing you could try to do is to comment out ‘detach();’ from file ‘BlindsServo.cpp’ at line 88.
That would leave the servo in attached state rather than leave it hang idle.
Usually this detaching is done to actually stop behaviour like your servos, but it could keep the position locked in and stop the clicking sound.
Most probably won’t help, but worth of a shot I’d say 🙂
Ok, I will try comment out that line. I did receive a DS3218MG servo but that also has the clicking sound and it does not rotate all the way so I think it might be a defective servo – I have ordered another one but in the meantime I will try your suggestion.
Thanks again for your help Toni!
Hi, maybe silly question but what I need to do,after changing wifi and mqtt details, to put this program into Wemos mini? Anyone step by step, please?
Thanks
Hi!
I’ve not written a guide how to actually flash the code to Wemos d1, since the internet is full of those guides 🙂
For example you can check out this out https://www.instructables.com/Wemos-ESP8266-Getting-Started-Guide-Wemos-101/
Starting from “Step 3” and of course using the blinds2mqtt sketch instead of the example one on the page.
Thank you for quick reply. Will have a look into this. I really hope I will get it done, as never had any touch with Arduino.
It’s super easy, shouldn’t be a problem to anyone. 🙂
If you bump into any issue, you can always ask in here or through mail creatingsmarthome (at) gmail.com
Hi!
Thanks for sharing this code and the DYI manual. We have got the HD-Power 1812MG servo’s installed in our shutters. In our setting the servo is within the shutter box itself. It is working, but when the shutters are closed the servo makes a rattling sound like it is still trying to go further. Maybe good to mention; when the shutters are closed there is some tension to leave it in that position.
I’ve tried deleting detach(); like you mentioned before, but unfortunately without any succes.
Any idea what that could be?
Thanks!
Hi!
Unfortunately I’ve heard this before and it looked like the servos used were somewhat different that I was using. Those servos were then making a high pitch noice. Unfortunately I think that this is now the same issue with your servos as well 🙁
We did not find a solution for that and the guy did eventually end up doing an automation which disconnects the power from the device when servos are no longer needed to be turned (he did use an external remote controllable socket for that and home assistant automation).
One better approach would be to use relays/transistors to disconnect the power from servos through the ESP8266 when movement is done needed. That way we could control everything (also power to servos) with HA.
Unfortunately I’m quite of lacking time right now so can’t (at least yet) prototype that kind of behaviour, but if you are well technically orientated you might want to try it out 🙂
Another way would be of course to try a different servo manufacturer.. there seems to be quite much of variation with the servos when the servo is trying to hold a position.
Hi Toni!
Thanks for your fast reply! Unfortunately i’ll have to get the same servo’s as you described. Best and fastest way to fix it, at least i hope so…
Thanks again!
Hi Tony,
Just installed the same servo’s as mentioned. But I’m experiencing some problems with the heating of the Servo’s. One just died and I could’t even touch it because it was that hot. Good to mention; when the shutter is open I don’t have the problem, but when it is closed its gets really hot. Is there somehow an explanation for this problem? Is it maybe because it isn’t really the same servo and the Servo settings aren’t working properly?
Thanks!
Ensure the max and min servo pulse limits. If they go above the range of the servo it could cause issues like this, since going over the physical servo limits and trying to keep that position.
Thats just a guess though, haven’t had similar problems my self.
Hi Toni,
Thank you for the guide.
I am using the same servos but at the moment having some problems with the setup. I am running 4 servos (located to the pins D8, D7, D6 and D5 on Wemos. However once powered up I managed to get only one device showing up in Home Assistant (Blinds 1). I modified the code regarding the servo pins:
const unsigned int servoPins[] = { D8, D7, D6, D5 };
Another problem I am having is that the home assistant commands won’t do anything (once pressed nothing happens with the servos). I noticed that if i touch the the solders on the Wemos servos start moving though so that might be a issue with my soldering.
Ensure that you’ve selected proper ESP board from the Arduino IDE so that the PIN mapping goes properly.
..and of course double check the wirings 🙂
Thank you Toni for the reply. I indeed checked the ESP board from Arduino IDE and it seems that the board I had selected was not correct. The board I am using is the AZ-delivery D1 Mini NodeMcu with ESP8266-12F (bought it from Amazon). The e-documentation for that board tells me to select the Generic ESP8266 module as a board. When using this board I received the error that the servopins (D8 etc) were not correct. So looked into it and it seems not all boards use the same naming. So i changed the servopin array to point to the generic arduino pinouts 13, 12, 14, 15. Not sure if this is correct but so far no success on getting the servo motors to work (my mqtt broker sees the client blinds connecting (and disconnecting) in home assistant addons but my integration does not see the blinds devices
Nevermind my previous post. Managed to get them to work and issue was as stupid as weak wifi signal. Changed the setting of my wifi to my mesh network and everything started to work (the pinout had to be from 12, 13, 14 and 15)
Great to hear you got it working! 🙂